Showing posts with label candy. Show all posts

Tuesday, December 9, 2014

Fairy Food Candy


This candy is known by many names as I've discovered while researching recipes.  Here, in the Milwaukee area, we call it Fairy Food.  Other parts of the country call it Sponge Candy, Puff Candy, Hokey Pokey, Cinder Toffee, Molasses Puffs and Sea Foam.  Wow! That's a lot of names for the same candy! Basically, Fairy Food tastes like puffed and crispy sweet molasses wrapped up in good chocolate.  If you knew how expensive it is to buy good Fairy Food, you would know why I was on a mission to try and make it myself.

The making of Fairy Food is really a miracle of science.  Water, sugar, and corn syrup are brought to a boil and simmered until golden amber.  Then, baking soda is added and quickly stirred in.  The volcano that erupts in the pan when the baking soda is stirred in is what creates the marvelous sponge-like texture of this candy.


Making this candy was definitely a labor of love for me!  The first batch I burned.  The second batch turned out tough and flat but the third time finally was a charm!  Luckily, the ingredients to make Fairy Food are inexpensive - sugar, corn syrup, water, baking soda and a little honey. The only costly item is using good quality chocolate to coat the Fairy Food but you will only use the chocolate when the candy has turned out well.  The candy should be crisp and delicate when it breaks. 

Above is what a good batch of candy should look like.The candy should be about one inch thick with tiny holes, creating the spongy look.  Don't be fooled by the word sponge, however.  The candy should be crisp and delicate when you break it or bite into it.

This is NOT what good Fairy Food should look like (batch number 2)...


There are a few tips I can give you. Don't make Fairy Food on a humid day and don't make it in the summer because the candy could lose its crispness and become tough and chewy. That is why you can only buy Fairy Food from the end of September until April or May here. Also, make sure you have all of your ingredients and prepared sheet pay ready ahead of time as you will need to pour the candy out of the pan quickly once you mix in the baking soda. 


And also, don't be afraid of failure.  Sometimes, it makes us better people - with good candy to share during the holidays :)


I've adapted my recipe from several sources, working with different combinations until I got the result I liked best. 


Savoring Time in the Kitchen is a member of the Amazon Affiliate Program. If you purchase a product by following a link that we provide, the price you pay as a consumer does not change, but if you do make a purchase through one of these links, we earn a very small commission for providing that link. Thank you for your support of Savoring Time in the Kitchen!

After having some 'bloom' show up on my chocolate the day following coating my candy, I found this useful YouTube video on how to temper chocolate.  You will again need a candy thermometer, a step I did not take when I tempered mine, likely leading to the 'bloom' the next day. There are many online instructions available on how to temper chocolate.  I thought this one was very comprehensive.

Fairy Food Candy

(Adapted from Several Recipes)


Makes about 4 dozen 1-1/2 inch candies You will need a candy thermometer

1 ½ cups sugar
½ cups light corn syrup
½ cup water

1 Tbsp Honey
1 tbsp baking soda (sifted)

Melted dark or milk chocolate

Line a half sheet baking pan with sides with parchment paper.

Near the stove, have ready a small bowl of water and a pastry brush, the 1 tablespoon of honey in a small dish, the sifted baking soda in a small dish, an oven mitt and a long wooden spoon.

In a medium sauce pan with high sides (I used a 3.5 quart saucepan), mix sugar, corn syrup and 1/2 cup water together. Stir over over medium heat until sugar dissolves and mixture comes to a boil. Clip on candy thermometer. Do not stir after it boils and you have clipped the thermometer onto the saucepan. Wash down any sugar crystals from the sides of the pan with the pastry brush dipped in water. Heat to 250F on the candy thermometer.

When the temperature reaches 250, drizzle the 1 T of honey evenly over the top of the syrup and gently swirl the pan. Continue to cook the syrup to 275-300 - until golden-amber colored (or the first puff of light smoke that rises from the pan). You do not want to burn the syrup so watch carefully.

Remove the pan from the heat and allow to sit for about 1-2 minutes until most of the bubbling subsides. Put an oven mitt on the hand that will hold the pan and sprinkle the sifted baking soda evenly over the top of the syrup.  Stir quickly, thoroughly and vigorously with a long wooden spoon (the mixture will rise to almost the top of the pan). Stir until all of the baking soda is well incorporated and you don’t see any white spots. Pour the mixture immediately into the prepared sheet pan. Let the mixture spread out on its own and do not tap or try to spread it as this will eliminate the spongy texture that was just created.

Allow to cool completely, about 1-2 hours. At this point, you may break the hardened candy into pieces or score the candy with a serrated knife and snap the pieces into neater squares.

To coat candy with chocolate, melt about 6 ounces of chopped chocolate (either dark or milk - your preference) in a microwavable bowl or in a double boiler until just melted.  Add 3 more ounces of chocolate and stir in.  Keep stirring until the new chocolate is completely melted but don't put back in the microwave or back on the heat, unless absolutely necessary. 

Line a small cookie sheet with parchment.  Drop pieces of candy into the bowl and swirl around with a spoon until well coated.  Lift out with a tongs allowing much of the chocolate to drip back in the bowl.  Place on the parchment-lined pan. 

When the pan is full, place in the refrigerator for about 20 minutes or just until chocolate is hardened.  Remove from refrigerator and store in a cookie jar or other non-airtight container. 

Saturday, January 30, 2010

Fruity, Nutty Chocolate Chunks - Silver and Gold~


You may wonder how these chunky, chocolate and nut goodies fit into this post...please stay with me until the end!


Here are a few of the serving pieces my late mother collected. I love the little Bon Bon server in the center! It's Community silver plate and dates back to 1938. The pattern is called Old South.

My mother displayed her collection in this spoon cabinet. You can see the little Bon Bon server on the bottom, left, which finally brings me back to those delicious-looking chocolates that I used to open this post - the Gold!


Please let me serve you a piece of Fruit and Nut Chocolate that I made this morning. Do you remember Chunky Bars? I used to love them when I was a kid! I've always loved nuts and dark chocolate is one my favorite things! I've you're looking for a little 'indulgence' to make for yourself or your sweetie for Valentine's Day, read on...these are wonderful and you can custom-make them to suit your taste as I did. Pure Gold!


I remember seeing these on a blog recently and saved the recipe. I'm sorry I didn't save the blogger's link.


Fruity, Nutty Chocolate Chunks
Adapted from Gourmet, February 2003 via Epicurious
Printable Recipe

1 1/4 lb fine-quality bittersweet and semisweet chocolate (I used a combination of both), chopped into chunks, Scharffen Berger preferred
3/4 cup dried orange-flavored Craisins
3/4 cup salted, roasted shelled pistachios
3/4 cup salted, roasted whole almonds (I roasted my own using a teaspoon of butter and Kosher salt on a baking sheet in a 350 oven for about 7 minutes)

Prepare an 8" Square by lining it with foil, leaving a 2-inch overhang, and spray it with a flavorless non-stick cooking spray.

Melt chocolate in the top of a double boiler or metal bowl set over a saucepan of barely simmering water, stirring occasionally until smooth. Remove chocolate from heat and stir in fruit and nuts, then spread evenly in the prepared baking pan. Refrigerate until firm, about 2 hours. Using the overhanging foil, lift the candy from pan transfer to a cutting board. Peel off foil and cut candy with a long heavy knife into pieces. The number of pieces will depend on how large you cut them. Approximately 36.

Friday, December 18, 2009

A Flashback of Christmas Delights~


In the first photo, you have one of my favorites, almond toffee. I like to leave the almonds whole in this recipe for a wonderful nutty crunch. You can find the recipe here.

This next picture is the caramel corn I made last year. It was the best caramel corn I've ever made! That recipe can be found here.


This last photo is the breakfast strata that I make every Christmas to serve on Christmas morning. Another fabulous recipe, it has become a tradition in my home. It has sun dried tomatoes, turkey sausage, fresh rosemary and Monterey Jack cheese for a wonderful mix of flavors. You have to prepare one day ahead for this one. Here is that recipe.

Tuesday, December 15, 2009

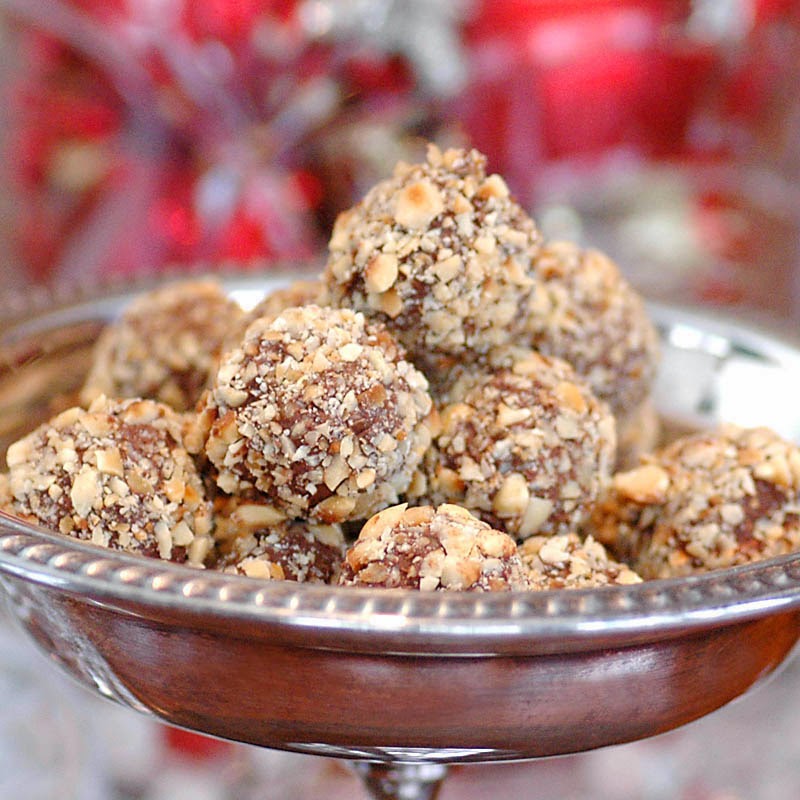
Dark Chocolate Truffles with Toasted Hazelnuts

 
Do you love chocolate as much as I do? Are you a certified, card-carrying, chocoholic? If so, you will love these tasty little morsels!

For me, nothing but dark chocolate can ring my bell. I made these truffles with a combination of bittersweet and semi-sweet chocolate by Scharffen Berger. The combination of the dark chocolate and toasted hazelnuts is exquisite!


I know they will make a lovely addition to my holiday dessert tray!


Make these and have a little bell-ringing of your own :)

Dark Chocolate Truffles with Toasted Hazelnuts
Recipe adapted from Epicurious
~from Savoring Time in the Kitchen
Printable Recipe

4 ounces bittersweet chocolate, chopped
4 ounces semi-sweet chocolate, chopped
1/2 cup plus 2 tablespoons whipping cream
1 tablespoon cognac (or brandy)
1/4 teaspoon vanilla extract
1-1/2 cups of toasted hazelnuts, chopped small (reserve 1/3 cup for adding to truffle batter)

Place the chopped chocolate in medium bowl, preferably metal but I used an oven-proof glass bowl. Bring the cream to a simmer in small saucepan. Pour the hot cream over the chocolate and allow to stand for 5 minutes. Stir until smooth. Mix in cognac or brandy and vanilla. Cool for 30 minutes, stirring every 10 minutes.

Using an electric mixer, beat the chocolate/cream mixture until fluffy and lighter in color, about 4 minutes. Add 6 tablespoons of finely chopped hazelnuts. Cover and refrigerate until firm, about an hour or so.

Line a baking sheet with parchment paper or waxed paper. Place the remaining chopped nuts in another medium bowl. Dip a melon-baller into a glass of hot water and then into the cold truffle mixture, forming round truffle. (I had to round them with my hands afterward). Place the truffle into the chopped nuts and roll around to coat completely, pressing in the nuts so they stick. Place on prepared sheet. Repeat with remaining truffle mixture and nuts. Cover and chill until firm, about 1 hour.

Chocolate truffles can be stored, covered, in the refrigerator for up to two weeks or in the freezer for up to two months.

Enjoy!

Sunday, December 7, 2008

Almond Toffee to Share...


One of my favorite gift-giving treats during the holidays is Almond Toffee. I love making it so much for friends because then I get to save a little for myself! This recipe was given to my mother-in-law by a friend who used to pass it out to her neighbors at Christmas. Simple and wonderful!


Shop this candy thermometer to make this delicious recipe HERE. (Affiliate Link).

Almond Toffee
Recipe given to my MIL by a neighbor 50 years ago! 

1 cup butter
1 cup sugar
1 cup whole blanched almonds
1/2 cup wonderful, dark chocolate - the best you can find (or milk chocolate if you must), chopped
1/4 cup chopped, toasted pecans (optional)

Melt butter in heavy sauce pan. Add sugar and almonds. 

Cook on high with pan tilted, stirring constantly, with wooden spoon until light brown which would be the crack to hard crack stage or about 300F). 

Pour into large flat pan such as a . Allow to sit for 5 minutes and then cover with grated chocolate and allow to melt - smooth chocolate with a knife.  Sprinkle with chopped pecans, if desired. 

Cool completely and break into pieces. Store in a covered container at room temperature.