Showing posts with label breakfast and brunch. Show all posts

Friday, February 22, 2019

Blueberry Pecan Muffins


Happy last week of February, friends! As I type this post,  I'm watching snow flying outside my window. AGAIN. I think this winter calls from some TLC, don't you?  These blueberry muffins with a crunchy pecan topping fits that prescription perfectly!  You may even have everything you need to make these in your frig, pantry and freezer right now.


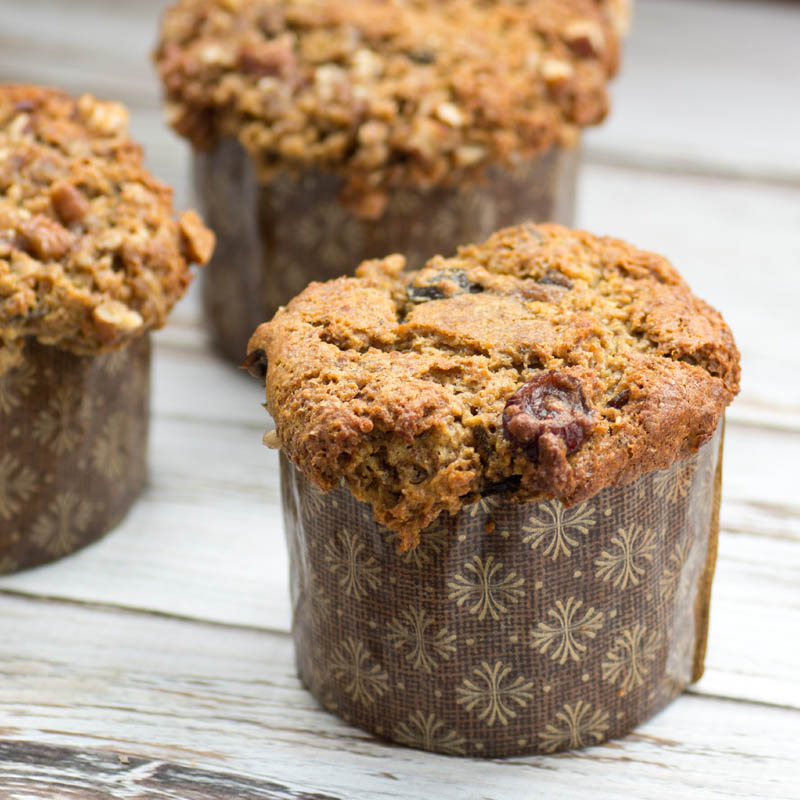
I recently came across a recipe for a blueberry cake in Food 52's Genius Desserts cookbook.  I decided to convert the recipe into jumbo muffins.  I love how easy muffins are to freeze and take one out at a time to enjoy.  Both my husband and I really enjoy these as a treat at breakfast or with tea or milk in the afternoon.  The little bit of cornmeal gives them a wonderful texture and color.  I added a simple streusel topping made without butter for a bit of delicious crunch.


If you're using frozen blueberries, it's a good idea to rinse them well under cold, running water and then pat them dry before adding them to the batter.


If you're as winter-wearing as we are, I hope this video of my 3-year-old grandson brings a smile to your face.  He loves playing the keyboard at Nana and Papa's house ♥  Priceless!

Blueberry Pecan Muffins


Makes 6 extra large muffins or 12 regular size muffins.  I found the paper jumbo muffin cups on Amazon.

1 cup all purpose flour
3 tablespoons ground cornmeal
1 teaspoon baking powder
1/4 teaspoon salt
1/2 cup butter, softened
1 cup granulated sugar
2 large eggs
1/3 cup milk
2 teaspoons vanilla extract
3/4 teaspoon grated orange zest (use organic, if possible)
1-1/2 cups fresh or frozen blueberries

Simple Streusel:
2 tablespoons brown sugar
1 cup chopped pecans

Place rack in center of oven and preheat to 350F .

Line muffin pan with paper liners or use jumbo muffin cups that don't need a muffin pan. I found mine here.

For the streusel, mix together the brown sugar and chopped pecans until blended together and set aside.

Add flour, cornmeal, baking powder and salt in a large bowl and whisk together.

Using a stand or hand mixer, cream together the butter and sugar until smooth. Add the eggs, milk, vanilla and lemon zest and beat until well incorporated. Don't worry if it looks a little curdled. Add the flour mixture and mix just until the flour is incorporated. Fold in the blueberries just until combined.

Fill muffin cups about 3/4 full and top with a generous amount of streusel on the top of each muffin.

Bake muffins until golden and nuts are browned and a toothpick inserted comes out clean. This will take about 20-25 minutes for standard-sized muffins and 30-35 minutes for large muffins. Oven temperatures vary so check often toward the end of baking.

Adapted from Genius Desserts

Tuesday, November 13, 2018

Pumpkin Apple Bread with Sunflower Seeds


If you love the taste of pumpkin bread and apple bread,  here is a delightful recipe that contains both! My husband is not a big fan of pumpkin and won't touch pumpkin pie at Thanksgiving but he loves this pumpkin apple bread.


Also filled and topped with healthy, crunchy sunflower seeds you will have a hard time stopping at one slice!

Wondering what those little green spots are inside the bread?  Sunflower seeds contain cholorophyll, which is also know as chologenic acid, one of their healthy attributes.  When they are baked in a recipe with baking powder or soda, they turn green.  There is absolutely no difference in taste whatsoever.  If the sight of green specks doesn't appeal to you, simple substitute chopped walnuts in the batter and save the sunflower seeds to sprinkle on top.


The original recipe calls for boiling apple cider to a condensed syrup but that takes a lot of time so I substituted unsweetened apple sauce for the apple cider.  I found some organic Gravenstein applesauce at my local grocery store which worked beautifully.


I used my Wilton 4-cavity mini loaf pan but had quite a bit of batter left after filling them, so I used it to make muffins.  The mini loaves and muffins are the perfect size for the two of us!  They would also make wonderful gifts during the holidays or for breakfast and brunch if you have having friends or family staying with you. They freeze beautifully!

Pumpkin Apple Bread with Sunflower Seeds

Printable Recipe

Makes 2-3 large loaves (I made 4 mini loaves plus a few muffins)

1-1/2 cups whole wheat flour
1-1/2 cups all-purpose flour
2-1/4 teaspoons pumpkin pie spice (or make your own using 1 1/2 teaspoons ground cinnamon, 1/2 teaspoon ground nutmeg, 1/4 teaspoon ground ginger and 1/8 teaspoon ground cloves)
2 teaspoons baking soda
1 teaspoon salt
1 cup granulated sugar
1 cup packed brown sugar
1 cup sunflower or other mild vegetable oil
4 eggs
2/3 cup unsweetened applesauce
1 15-ounce can pure pumpkin puree
1-1/2 cups finely chopped, crisp sweet apples such as Gala or Fuji, preferably organic
1/2 cup roasted sunflower seeds* or chopped walnuts

Notes:  If you have more batter than loaf pans, you can use the extra batter to make muffins.  Baking instructions below.

*Don't be alarmed if the sunflower seeds turn green around the edges inside the loaves during baking.  This is due to the natural chlorophyll in the sunflower seeds.  There will be no difference in taste whatsoever.  If the green color doesn't appeal to you, simply sprinkle the sunflower seeds on top and use chopped walnuts in the batter.

Grease loaf pans with butter and line with parchment or spray with a baking spray that contains flour, such as Bakers Joy.

In a large bowl, combine whole wheat and all-purpose flour, pumpkin pie spice, baking soda and salt.  Stir to blend.

In an extra-large mixing bowl, such as the bowl of a stand mixer, combine granulated sugar, brown sugar and oil. Beat with electric mixer on medium speed until well mixed. Add eggs, one at a time and beat well. Add half of flour mixture and mix, then half of applesauce and mix, repeating with remaining flour mixture and applesauce, beating on low speed after each addition just until combined. Beat in pumpkin puree until combined. Then, fold in apples and sunflower seeds. Fill loaf pans 3/4 full and spread evenly. If making muffins, place muffin liners in muffin pan and fill cups 3/4 full.

Bake loaves in a 350 degrees oven for 55 to 60 minutes for 9 x 5-inch loaves, 45 to 50 minutes for 8 x 4-inch loaves or 40 to 45 minutes for 7-1/2 x 3-inch loaves, or until a toothpick inserted near centers comes out clean.  Bake muffins for 25 minutes.

Cool on wire racks for 10 minutes. Remove from pans. Cool completely before slicing.

Freezes well.  Wrap in plastic wrap and then aluminum foil to freeze.

Wednesday, May 10, 2017

Rhubarb Streusel Muffins


Doesn't it feel great to be outdoors again?  I call it my 3G season - Garden, Golf and Grandchildren!


The garden is bursting with early spring blooms (and many weeds which need pulling) but my biggest planting chores are yet to come.  The containers and bedding plants will hopefully be planted in the next week or so, weather permitting.


At a recent sleepover at our home, we taught our grandsons how to play Crazy Eights and they each had a turn 'driving' the garden tractor with their Papa. We love spending time with those boys ♥

I'm excited to bring you this delicious rhubarb muffin recipe for those of you who are rhubarb lovers out there, as I am!  A few years ago I planted my little rhubarb patch and have never regretted that decision. 


This Rhubarb Streusel Muffin recipe combines brown sugar in the batter and also a little mixed with butter and cinnamon for a tasty streusel topping.  I've made this recipe twice in the past two weeks as they have made a rhubarb convert out of my husband. 

Happy May and Happy Mother's Day!

Rhubarb Streusel Muffins

Printable Recipe

Makes about 24, depending on how full the muffin cups are filled. 

2 1/2 cups flour
1 teaspoon baking soda
1 teaspoon baking powder
1/2 teaspoon salt
1 cup brown sugar
1/2 cup vegetable oil
1 egg
1 teaspoon vanilla extract
1 cup buttermilk
2 1/2 cups diced rhubarb
1/2 cup chopped pecans
Streusel Toppping:

1 tablespoon melted butter
1/3 cup brown sugar
1-1/2 cinnamon

Preheat the oven to 350 degrees F (175 degrees C).

Spray 12 cup muffin pans with non stick baking spray (with flour added - such as Bakers Joy) or line with paper liners.

In a 3 cup bowl, stir together the flour, baking soda, baking powder and salt.

In a stand mixer or large bowl, beat the brown sugar, oil, egg, vanilla and buttermilk with an electric mixer until smooth. Pour in the dry ingredients and mix by hand just until blended. Stir in the rhubarb and chopped pecans.

In a small bowl, mix together the melted butter, brown sugar and cinnamon until blended together.

Spoon the batter into the prepared cups, filling almost to the top, and then sprinkle with about 1 teaspoon or so of the streusel mixture. 

Bake in the preheated oven until the tops of the muffins spring back when lightly pressed, about 25 minutes. Cool in the pans for about 10 minutes before removing.

Adapted from AllRecipes.com

Friday, January 20, 2017

Cream Scones with Lemon and Dried Fruit~


How do you cozy up a dark and dreary winter day? Since the ice storm rolled through, we have had rain, fog and gloomy days...dark even earlier than than on a sunny day.  We like to light lots of candles (mostly the no-flame, no little burned fingers kind), turn on cheery music and on the weekends, I like to bake!

Early this week, I was craving something sweet but not too sweet. Something that would taste great with a warm cup of tea.  Scones sounded perfect and this was one of the best scone recipes I've tried.  Other recipes I've made have added butter and egg in the dough. This recipe gets enough added fat from using cream rather than milk or buttermilk to moisten the dough.  


First published in Bon Appetit in 1996, these scones are flaky and tender with a luscious lemony flavor from grated lemon zest - not only in the dough but also mixed with sugar and sprinkled on top before baking.


They are indeed perfect with a cup of tea - especially my favorite green tea with lemon.  


I added chopped dried apricots and dried cherries as I had them on hand.  Since my dried cherries were not brand new and soft, I plumped them in a splash of Kirsch liqueur before baking. I think dried blueberries would be delicious in this recipe too!


Even my husband, who is not a fan of dried fruit in bakery, loved these.


And did I mention the sugary, lemon-zest topping? So good!


So bring on the baking and bring on the light - we need it!

Cream Scones with Lemon


Makes 12 Scones

Note: I like to use organic lemons when I need lemon zest to avoid any pesticide residue.

2 cups all purpose flour
1/4 cup plus 2 tablespoons sugar
1 tablespoon baking powder
1/2 teaspoon salt
1/2 cup dried cherries (plumped in enough Kirsch to cover)
1/2 cup chopped dried apricots
2 teaspoons or so of grated lemon peel, divided (from 2 large, organic lemons)
1 cup heavy whipping cream (8 oz container)
3 tablespoons unsalted butter, melted

Preheat oven to 425°F.

Line a large baking sheet with parchment paper or a silicone baking mat.

If your dried cherries are no longer soft, plump them in a small cup with enough Kirsch liqueur (Cointreau, Grand Marnier or Amaretto will also work) to cover. Place another cup on top of cherries submerge them. Allow to 'plump' for about 15 minutes or so and then drain. Squeeze dry with paper toweling.

Mix flour, the 1/4 cup of sugar, baking powder and salt in large bowl. Stir in apricots, cherries and 1 teaspoon lemon zest. Add whipping cream and stir just until dough forms. If necessary, add another tablespoon or so of milk if your dough is still too dry but don't get the dough too wet. Kneed dough gently on a lightly floured surface, just until dough holds together. Form the dough into a 10-inch circle, 1/2 inch-thick or so. Cut into 12 wedges with a clean knife dipped in cold water. 

Transfer wedges onto a large baking sheet, about 2 inches apart. Combine remaining 2 tablespoons sugar and 1 teaspoon lemon peel in small bowl. Brush scones with melted butter and sprinkle with the sugar mixture.

Bake scones in the preheated oven until light golden brown, about 15-25 minutes. Transfer to a rack to cool slightly. Serve scones warm or at room temperature. May be made a day ahead and wrapped in foil.

Adapted from Bon Appetit, 1996

Tuesday, January 3, 2017

Sourdough Waffles to Start the New Year


Happy New Year, my friends! I hope this post finds you all well and as excited about the start of a new year as I am. 

What better way to start 2017 than to begin with a special breakfast, which is what my husband and I did on January 1st! If any of you were inspired to make a sourdough starter after my sourdough bread post here, or may be interested in starting one in the future,  you will love this recipe.  I'm happy to report that the sourdough starter that I began last October is still alive and well!

One of the more important steps of maintaining a sourdough starter is feeding it about once a week with flour and water.  Knowing that, if you don't get rid of some of it occasionally, you will have far too much starter to store in your refrigerator and it will become too cumbersome to manage.  So, in order to maintain a happy sourdough starter, you need to remove some of it  before  you feed the rest. This is called 'unfed' starter.


Instead of tossing that excess starter down the sink, you can make these delicious sourdough waffles (or pancakes).  Honestly, these are the most delicious, lightest and crispiest waffles I've ever made with just a hint of sourdough flavor.  My husband proclaimed them the best waffles he's ever had. 


My favorite waffle topping is applesauce or pure maple syrup, but I decided to make something a little more festive to start the new year and pureed a cup of frozen strawberries and raspberries along with a small splash (1-2 tablespoons) of orange juice, a squeeze of honey for sweetness and a 1-2 teaspoons of chia seeds for thickness. Next time I'm going to try a blend of berries and applesauce!


As with most sourdough recipes, you do need to plan ahead.  The evening before, the starter gets mixed with buttermilk, flour and light brown sugar and is covered and left on the kitchen counter overnight.  In the morning,  egg, vanilla and melted butter (or oil) is added to complete the batter.  Now you're ready to make some of the most wonderfully tasty waffles or pancakes you've ever eaten! If you don't have a sourdough starter to use, you could substitute plain, Greek yogurt with active yogurt culture (such as Fage, Chobani, etc) for the starter in the recipe below.

Here's to a great start to 2017!  

Sourdough Waffles or Pancakes

Printable Recipe

Serves 4

Note: This recipe can be halved for 2 people...Half of one large egg is 1/8 cup of beaten egg

For the overnight sponge:

1 cup (240 grams) unfed sourdough starter (or substitute plain, Greek yogurt)
1 cup (224 grams) buttermilk (if you don't have buttermilk, just add 1 tablespoon white vinegar or fresh lemon juice to a 1 cup measure and then fill with milk)
1 cup (120 grams) all-purpose flour or a mixture of AP and whole wheat flour
1 tablespoon (about 13 grams) light brown sugar

For the morning batter:

1 large egg, lightly beaten
2 tablespoons melted butter or neutral oil (coconut oil would be a great choice)
½ teaspoon vanilla extract
½ teaspoon (3 grams)salt
1 teaspoon (6 grams) baking soda

Pour the sourdough starter into a large bowl and add the buttermilk, flour and sugar, then stir to combine. Cover the bowl and allow it to rest overnight on the kitchen counter.

The next morning, preheat a waffle iron or large frying pan. Whisk the egg, melted butter (or oil) and the vanilla extract together in a medium bowl, then add the rested sponge. Add the salt and the baking soda to the batter and mix to combine.

Spray the waffle iron or frying pan lightly with nonstick cooking oil.

Pour some batter onto the preheated waffle iron and cook until the waffle is brown and crisp and repeat with remaining batter. For pancakes, pour a small ladle-full of batter on a preheated pan or griddle, flipping them when they are well browned on the bottom. Serve immediately.

Adapted from King Arthur Flour and the New York Times

Wednesday, March 23, 2016

Bruffins with Ham and Cheese


Easter idea alert!

First, it was Cruffins, a flaky croissant-like muffin (click here for my post on Cruffins from last year) that became immensely popular in bakeries and cafes and now it's Bruffins!  Bruffins are muffins made from brioche dough and filled with any savory filling that sounds good to you.  Basically, it's breakfast, brunch or lunch that you can eat on the go.


For my first attempt at making them, I picked a simple filling of lean, diced, smoked ham and diced sharp Wisconsin cheddar cheese.  The sweet brioche dough and the savory filling were a delicious combination! After my husband ate two, there was a request for a third.  'These are good!', he said.


Two days ahead of time, you will need to get your brioche dough started.  You'll need a very large bowl, jar or container with a lid.  I used a large cracker jar that I bought a Target.  I decided on the brioche dough recipe from Artisan Bread in Five Minutes a Day as I've made it before.  It's easy, stores well in the frig and is delicious!  The next day, pull out a chunk of dough (I took out a 1-pound piece which I weighed on my digital kitchen scale).  The dough is rolled on on a very well-floured surface and the filling is added.  It's folded over like a letter and rolled again, then cut into strips which are twisted and placed (artfully or not) into muffin cups or greased muffin tins to rise. 


These ham and cheese Bruffins would be perfect for a simple Easter brunch buffet.  They would also be a great way to use the left-over ham from your Easter dinner. You can make them a day ahead, refrigerate them and them simply pop them in the oven to warm gently before serving.  Let the Oohs and Aahs roll! 


"I'm so tired!  Hiding all of those Easter eggs is exhausting!"
"You think you're tired, I had to lay all of them!"


Have you tried the unbreakable eggs from Walmart yet?  They are great for kids and crafting! They dye just like regular eggs and you never have to worry about breaks and cracks with little ones.  We had our two oldest grandsons for a sleep over recently and we colored eggs together ♥ 

Hope all of you who celebrate, have a very Happy Easter!

Bruffins with Ham and Cheese


Brioche dough (makes about 4 loaves) - Recipe can be cut in half - half recipe ingredients in parentheses.

1 1/2 cups (3/4 cup) lukewarm water
1 tablespoon (1-1/2 teaspoons) Active Dry, or Quick-Rise yeast
1 to 1 1/2 tablespoons (1-1/2 to 1-3/4 teaspoons)  kosher salt
8 (4) large eggs at room temperature, lightly beaten
1/2 cup (1/4 cup) honey
1 1/2 cups or 3 sticks (3/4 cup or 1-1/2 sticks) butter, melted
7 1/2 cups (3-3/4 cups) unbleached all-purpose flour

For the Bruffins (makes 8)

1 pound of brioche dough
3 ounces of diced smoked ham
3 ounces of diced sharp cheddar cheese
1 small egg mixed with 1 tablespoon water for the egg wash
8 pretty muffin liners, if desired

Mix the yeast, salt, eggs honey and melted butter with the water in a 5-quart bowl, or lidded (not airtight) food container.

Mix in the flour, using a spoon until all of the flour is incorporated but do not knead.

Cover (not airtight), and allow to sit at room temperature for about 2-2-1/2 hours. (If you use cold eggs the initial rise can be very slow. Using eggs that have come to room temperature helps.)

Refrigerate the dough overnight and use over the next five days. The dough can be frozen in 1 pound portions for 4 weeks.

On baking day (or when the dough has chilled for 8–12 hours), prepare two 12-muffin pans by spraying them with baking spray or your may use muffin liners. These rise quite a bit so it's best to use every-other muffin space, if possible.

Using floured hands, remove a 1 pound portion of brioche dough from the container (about the size of a cantaloupe melon).

Flour a work surface very well and turn the dough out onto it and dust the dough with more flour. It can be quite sticky. Roll or pat the dough into a rectangle, approximately 8 x 16" and about 1/2" thick. Add more flour if the dough sticks to the work surface.

Spread the diced cheese and ham evenly over the rectangle and then press them lightly into the dough. Fold the top third of the dough over the middle (your may need a large, floured spatula for this if the dough stick), then fold the bottom third up into a letter fold. Press the edges to seal them and roll the dough into another rectangle, about 3/4" thick.

With a knife or pizza cutter, cut along the short side to make 8 even strips. You may bake any scrapes on a baking sheet.

Take each strip and twist the ends in opposite directions a few times, then pick up middle of the strip with one hand and the ends with the other, lay the ends into the muffin cup first, laying down the middle on top with a another gentle twist.

Cover the muffin pans lightly with plastic wrap and let rest for about 1 1/2–2 hours or until doubled in volume.

About 30 minutes before baking, preheat the oven to 375°.

Whisk together the egg wash and gently brush over the tops of the muffins.

Bake for about 20-25 minutes, switching racks and rotating the muffin pans for even baking. Baking time with vary depending on your oven.

Cool in the pans on wire racks for about 10 minutes. Serve immediately or cool completely and refrigerate in a covered container. The muffins will keep refrigerated for about three days. Chilled muffins can be rewarmed in a 300 degree oven for 10-12 minutes.

Left-over dough can be used to make brioche bread, muffins or sandwich buns. Filling with cinnamon sugar will make a delicious sweet treat.

Inspired by an article on Bruffins in the Milwaukee Journal-Sentinel and Artisan Bread in 5 Minutes a Day

Thursday, January 28, 2016

Eggs Baked in Creamy Pasta Nests


Here's a delicious meal that you can whip up in less than 45 minutes and you may even have most of the ingredients in your refrigerator or pantry!  It was inspired by Put an Egg On It, by Lara Ferroni, a book that I found by chance while shopping recently.  The photo of this egg dish on the cover had me drooling!

Are you as happy as I am that eggs are no longer shunned as a food that was unhealthy and should be avoided?  Actually, they are quite fashionable now so you need to get on trend! Hopefully, they aren't so 'last year' yet :)


My version of the recipe (you can find the original recipe here), starts with cooked capellini pasta, which is mixed together with some cream (feel free to substitute fat-free or light cream), grated Sartori Parmesan cheese, chopped fresh parsley and salt and pepper to taste. This will form the 'nest'. 


Getting that perfectly cooked, soft and slightly runny egg was the hardest part and it took a couple of attempts to get it right.  All ovens are different so times may vary for you. The best test is to lightly touch the top of the egg with your finger when you see the egg white has turned white. If the yolk still feels slightly 'jiggly' inside then it's done.  Remember, it will keep cooking after you remove it from the oven.  If your eggs turn out too well done, you can always whip up a little extra cream sauce and drizzle it over the top as a dressing.


I decided that I needed a salad to make the meal complete, so I lined the plate with a spinach and arugula blend of organic greens before topping it with the pasta/egg nest.  This was so good that my husband ate all of the 'tests' and asked for me to make it for dinner the next night too. 


A truly delicious meal for brunch, lunch or dinner!

Eggs Baked in Creamy Pasta Nests

Serves 2
Printable Recipe

Makes 4 using 1 cup-sized ramekins
(You could also use a 1 quart pyrex dish and make evenly-spaced wells for all four eggs.)

Butter for greasing ramekins
1/2 pound (1/2 box) of capellini pasta or regular spaghetti
4 large eggs
4 cups of fresh arugula, or greens of your choice

For the cream sauce:
1/2 cup heavy cream (half and half or light cream can be substituted)
1-1/2 cups freshly grated Sartori Parmesan cheese
1/4 teaspoon freshly ground pepper
1/2 teaspoon fine sea salt
1 tablespoon freshly chopped parsley

Preheat the oven to 425 degrees F and lightly butter ramekins and place them on a baking sheet.

In a large bowl, mix together the cream, 1/2 cup of grated cheese, chopped parsley, salt and pepper. Set aside.

Cook the pasta according to the package directions until al dente and drain, reserving a small ladle-full of the pasta cooking water.

Place the cooked pasta into the cream mixture and swirl with tongs to coat well. Add a little of the pasta water, if necessary. Let the pasta remain in the sauce for a few minutes.

Remove about one-fourth of the pasta and and place it in one of the ramekins, swirling as you lay it down. With the tongs, or your fingers, spread the pasta to the outside leaving an indentation in the middle for the egg. Repeat filling the rest of the ramekins. If you still have some cream in the bowl, pour it over each of the pasta nests, otherwise, add a teaspoon or so of cream to the top off each nest.

Bake the nests until the tops are golden and bubbly, about 10 minutes. Remove them from the oven and carefully, crack an egg into a small cup, and then pour into the center of each nest. Reduce the oven temperature to 350 degrees F and bake the eggs for 5 minutes, or until the whites have set. (Alternately, you may put the egg into the nest before baking the nest which will result in a softer, creamier pasta. Bake for about 15 minutes at 400F.)

Let the nests cool for 5 minutes to firm up, then run a knife around the outside of the ramekin and gently remove it. Place on a bed of greens for serving. Garnish with another grind or two of fresh pepper and serve. Delicious!

Inspired by this recipe.

Friday, January 22, 2016

Ricardo's Bran Muffins and My New Little 'Muffin'


How would you like to have warm, fresh muffins any day for a month with no further effort than scooping the dough into muffin cups and baking them?

This healthy and delicious muffin recipe was shared my friend, Monique, at her blog La Table de Nana recently.  She has shared them and other wonderful recipes of Ricardo's before but sometimes I need a reminder :) Ricardo Larrivée (known simply as Ricardo) is a food celebrity in Quebec and throughout Canada. 


The muffin 'batter' recipe makes a generous amount which can be stored in the refrigerator for up to month!  Simply scoop out as many portions as you want, and bake.  I added chopped dates (Monique's suggestion) and also chopped, dried cranberries.  I like adding a pecan streusel to the some of some of them.  Wonderful!  The possibilities are endless.  You could add any dried fruit or nuts you like.  You could even add a few fresh blueberries to the muffin cups as you scoop in the batter.


They are moist, delicious and a wonderful way to start the day!

I would like to introduce to you our 4-day-old, 3rd grandson, Bo.  He was born on Monday, January 18.  Our daughter and Baby Bo are both doing well!  Our hearts are full of love and happiness! Our other two grandsons are pretty excited to have a baby brother too :)


Ricardo's Bran Muffins

Adapted from Ricardo Cuisine

Note: You will need a very large bowl and storage container to accommodate this recipe.

Makes about 4 dozen, depending on size

5 cups (1.25 litres) whole-wheat flour or unbleached all-purpose flour  (I used 1 cup WW flour and 4 cups AP flour)
3 cups (750 ml) bran cereal (l used original All-Bran)
3 cups (750 ml) wheat bran (or wheat germ)
1 cup (250 ml) oat bran
2 cups (500 ml) brown sugar
1 1/2 cups (375 ml) raisins or other dried fruit (dates, cranberries, apricots...)
2 tablespoons (30 ml) baking soda
2 teaspoons (10 ml) salt
1 teaspoon (5 ml) ground cinnamon
1/2 teaspoon (2.5 ml) ground nutmeg
4 cups (1 litre) buttermilk
1 1/2 cups (310 ml) canola oil
1 1/4 cups (310 ml) water
3 eggs, lightly beaten
1/3 cup (75 ml) molasses (I used honey)

Topping of your choice (walnuts, pecans, pine nuts, almonds, hazelnuts, chocolate Chips
I mixed 1/3 cup of chopped pecans with 1 tablespoon melted butter and 1 tablespoon brown sugar and made a streusel topping (makes enough for 6 muffins)

In a very large bowl, combine the flour, cereal, wheat and oat bran, brown sugar, dried fruit, baking soda, salt and spices.

In another bowl, blend the remaining ingredients. Add to the dry ingredients and stir gently with a spatula until the mixture is barely moist. Cover and refrigerate until ready to bake the muffins (see note).

With the rack in the middle position, preheat the oven to 180 °C (350 °F). Line 12 muffin cups with paper liners or butter the cavities.

Cook the muffin batter as-is or add the toppings of your choice. Fill the cups with batter up to the edge because it barely rises. Bake for about 25 minutes or until a toothpick inserted in the centre of a muffin comes out clean. Cool. Unmould and cool completely on a rack.

The unbaked muffin batter will keep for up to 30 days in the refrigerator in an airtight container. You can bake muffins fresh daily or at any time by baking the desired quantity at the last moment. You can also bake and freeze them. Just thaw in the microwave for mornings in a hurry or bake at 180 °C (350 °F) for about 15 minutes to get a crunchy muffin top.  

Tuesday, April 14, 2015

Morning Bun Cruffins and Bunny Bundt Cakelets!


Hello, friends, I have so much to share today so this will be a long post! It's been a very busy time here the past two weeks with spring birthdays and a belated Easter celebration with family this past weekend.

Today, I'm sharing a recipe that I have become totally obsessed with. TOTALLY. I've made these Cruffins (croissant meets muffin) three times in the past two weeks and my jeans are feeling a little tight.  I'm thinking an intervention or rehab might be in order.  When I first saw the technique using a pasta roller to thinly roll the dough for these cruffins on Lady and Pups I immediately imagined how wonderful they might taste with cinnamon sugar added as in Morning Bun pastries.


I got out my KA mixer pasta attachment and got rolling!  Flaky, croissant-y layers of butter and cinnamon-sugar deliciousness.  I was hooked when I tasted the first one.


I'm not adding a tutorial because the one you'll see on Lady and Pups is very thorough if you decide to try these (although mine are not nearly as beautiful as hers).  From now on, I promise to only eat these on the weekend.  Promise!  Fingers crossed~


For our Easter celebration, I made Bunny Cakelets for my grandsons with my new cakelet pan from Williams Sonoma.  WS is already sold out of them but you can still find them on Amazon.  Aren't they adorable?


Our boys also enjoyed an egg hunt here and I made shark hats for them - idea courtesy of La Table de Nana and her creative daughter :)

 
Last, and certainly not least, things are growing and blooming here at last! It certainly is a time to celebrate!


I'll be back soon to share a recipe for the delicious birthday cake that I made for my daughter!

Morning Bun Cruffins

Recipe Adapted from Lady and Pups

Please see tutorial on Lady and Pups as a guide. 

The major change I made to her recipe (other than my addition of cinnamon sugar) was in the cutting of the dough 'logs' after they are rolled out in the pasta roller and covered with butter and cinnamon-sugar mixture.  I tried cutting them 'crosswise' as she did but most of the cinnamon sugar oozed out with the butter during baking which made a caramelized mess and kept them from rising properly.  Therefore, for my morning bun adaptation, instead of cutting the logs lengthwise before twisting into buns, I cut my logs crosswise instead and rolled them with my hands until long enough to twist into the pretzel shape.  Two successful batches later can't be bad (unless of course you become addicted to these as I have). 
It is best to use a digital kitchen scale to measure the flour and water, but if you don't have one, loosely pile the flours in a measuring cup and scrape the top level with a knife. 

150 grams (1 cup + 1 tbsp) bread flour
150 grams (1 cup + 1 tbsp) all-purpose flour
1 1/2 tsp (6 grams) instant dry yeast
1 1/2 tsp (11 grams) salt
130 grams (1/2 cup) luke-warm water + 30 grams (2 tbsp) if more is needed
50 grams (3 1/2 tbsp) unsalted butter, cubed and softened to room temperature

115 grams (8 tbsp) unsalted butter, divided into 4 equal parts (2 T each) and softened to room-temperature (I placed mine in four small individual ramekin dishes)
1 cup granulated sugar
4 teaspoons of cinnamon

2 hours before starting the dough, leave the butter on the counter for it to completely come to room-temperature.
Mix 1 cup of sugar with 4 teaspoons of cinnamon and blend thoroughly and set aside.
Butter a muffin pan or spray with baking spray with flour, such as Bakers Joy.

In a stand-mixer with dough-hook (or large bowl with hand-held mixer with dough-hooks), whisk together flours, yeast and salt until blended. Add 130 grams of luke-warm water (around 95F/35C) and knead on low speed for 3 min. The dough should be slightly shaggy and stiff, but if it has difficulty coming together, add the additional 30 grams (2 tbsp) of water and knead again. Then, add the 50 grams of cubed butter and knead on low speed for 5 minutes until completely incorporated. Increase to medium speed and knead for another 10 ~ 15 minutes until the dough is extremely smooth and elastic. Cover with plastic wrap and let rest for 20 minutes at room-temperature. It should expand slightly.

Transfer the dough to a lightly floured surface, and divide it into 4 equal portions. (Use your digital scale to proportion them if you have one). Work with 1 portion at a time covering the rest loosely with plastic wrap. Dust the dough with just enough flour so it doesn't stick, then pat into 1/3" (1 cm) thickness. With a pasta machine at its thickest setting, feed the dough through the machine.

Very lightly dust both the dough with a bit of flour, then start running the dough through the machine, until you reach the thinnest increment (should be very thin but not falling apart). If necessary, cut the dough in half if it gets too long.  On my pasta roller attachment I rolled my dough to the second thinnest setting.  

Lay the very long piece (or two pieces if you had to cut it side by side) on the counter. With your fingers, gently rub a thin layer of the room-temperature butter (has to be very soft but NOT MELTED) evenly across the dough, extending all the way to the edges. A pastry brush may help with this step. Do this to both sections of the dough if you had to cut it in half. Keep in mind that this is a 1/4 of the entire dough and you should use up 1/4 of the butter.
Sprinkle 1/8th cup or so of cinnamon sugar over the buttered dough. 

Once finished, start rolling the dough from one end to the other, as tightly as you can, into a firm log. If you had to cut the dough into two pieces, then place the first log on end of the other buttered section of dough, and roll it up again. Now, cut the log in half cross-wise with a floured knife.  Roll the two cut pieces with your hands on the counter until they are about 6 inches long and then twirl the dough and shape it into a semi-knot and tuck the ends underneath. Place the knots inside buttered muffin-pan. Repeat the process with the other 3 portions of the dough and butter.
Cover the muffin tin loosely with plastic wrap and let rise for about 1-1/2 to 2 hours until doubled in size. 

Bake in a preheated oven at 400F/200C, for about 20 minutes (more or less, depending on your oven) until puffed and golden browned

Note: You can wrap the entire muffin-pan with plastic wrap and leave it in the fridge without allowing the dough to rise and bake them the next day.  They may take up to 3 hours or more to rise after being chilled.