Showing posts with label holidays and celebrations. Show all posts

Sunday, December 22, 2024

Almond Pastry Sticks


I've been baking these Almond Pastry Sticks since 2015 after I first saw them on Saving Room for Dessert's blog.  The original recipe was a Pillsbury Bake Off winner. 


These cookies are flaky and delicate with a distinct almond flavor with help from the almond sugar mixture.  I would say they are very close to a Danish Almond Kringle if you've ever had the opportunity to taste one. They pair well with my Chocolate Pecan Tassies on a cookie tray.  

This year I also tried Ritz Cracker Toffee which I loved, however it didn't go over well with the grandsons.  You can Google them and find lots of recipes.  I used Half Baked Harvest's version.  My candy cane cookies, and both sugar cookie recipes are on my sidebar right now but you can also find them in "Christmas Cookies" under Labels, below right. 


My favorite brand of half-sheet baking pan, along a silicone mat to use over and over again with your pan.  (Affiliate Links). 

Almond Pastry Sticks

Makes approximately 2 dozen stick cookies

3/4 cup granulated sugar
2 teaspoons almond extract

1/2 cup salted butter (one stick)
4 ounces cream cheese (original recipe calls for 6 ounces, I only had 4 oz in my frig)
2 tablespoons of sour cream (Note: I subbed 2 T sour cream to make up for the missing cream cheese)
1½ cups unbleached all-purpose flour
1/2 teaspoon salt
1/2 teaspoon baking powder
Yolk of 1 egg, separated (white is reserved for glazing)

1 tablespoon softened butter for filling

1/2 cup sliced almonds
1 teaspoon coarse sugar for topping (I used Lars Swedish Pearl Sugar)

Preheat oven to 375 degrees.

Line a cookie sheet with parchment paper and set aside.
 
In a small bowl combine the sugar and almond extract; set aside.

In a medium bowl whisk together the flour, salt and baking powder.

In a large mixing bowl combine 8 tablespoons (1/2 cup) butter and cream cheese. Beat on low until blended. Add the egg yolk and blend until smooth. Add the flour mixture and beat on low until just combined, do not overwork

Transfer the dough to a floured work surface. Knead by hand about several times until the dough comes together and is pliable. Roll or press into an approximate 12x12 inch square. Spread with the remaining 1 tablespoon of softened butter.

Cut the dough in half and place one half on the prepared cookie sheet, butter side up.

Spoon the sugar mixture all over, to within  about ½-inch of the dough edges. Place the remaining dough half, butter side down, over the sugar. Press the edges tightly to seal.

Brush the dough with a lightly beaten egg white. Sprinkle with almonds and coarse sugar.

Bake about 25 minutes or until just golden brown. Do not overbake. 

Cool at least 30 minutes.

Cut the pastry in half lengthwise and then into ½ to 1 inch strips crosswise. (I like to use a serrated knife to cut the sticks.  This brand is my favorite

Store in an airtight container.

ENJOY! 

Friday, December 23, 2022

Christmas Traditions, New and Old


Hello friends!  I know I've been MIA here lately and have neglected my blog.  I haven't been gone, as you know if any of you follow me on Instagram, @savoringtime.  

I wanted to pop in before Christmas to share two of my Christmas traditions...one new that will definitely be repeated in Christmas to come, and the other, an oldie but goodie that I've been making for a VERY long time.  

First, this riff on the Christmas cheese ball.  A Cheesy Christmas Tree!  If you need a very quick and easy appetizer to bring to a party this weekend, this is it!  This is not my invention, but one I discovered on Instagram.  This started out as an idea made from a traditional home-made cheese ball to become a very quick and easy one made from a package of Boursin cheese.  You don't have to make a thing!  Simple assembly.  I've included the directions below.  


Boursin Cheese Christmas Tree Appetizer

Purchase a package of Boursin cheese. I used Garlic and Herb. Or, use 3 to make a mini tree forest :)

Buy some fresh parsley, a yellow bell pepper, sliced almonds or any other edible decor you'd like such as pomegranite arils.

Rinse, dry and chop parlsey finely. Lay out on paper toweling dry thoroughly.

Toast sliced almonds in a 350 oven for about 6 minutes until lightly browned. Cool.

Unwrap the cheese but keep the base on the bottom.

Place the cheese on a large sheet of plastic wrap and bring it upward. 

Shape cheese into a pyramid/tree by pressing or rolling gently along the sides to bring cheese upward.
Twist top of plastic wrap and freeze cheese for about 10-15 minutes.

Remove cheese from freezer and upwrap. Roll in chopped parsley all around and press to adhere.

Stick in toasted almonds all around and top with a star made from the yellow pepper.

Serve with crackers and slices of yellow pepper or other veggies.  

Done!  A cute and festive addition to a cheese or charcuterie platter.  


The Oldie but Goodie tradition in my family are these Candy Cane Cookies.  I've been making for more years than I can remember and are from an old Betty Crocker cookbook where I've found many gems! Betty Crocker's All Time Favorites.  We have already had one family Christmas celebration and this was my cookie platter.  

The recipe for the Candy Cane cookies can be found here:  Candy Cane Cookies

The recipe for my Sugar Cut Out cookies can be found here:  Celebration Christmas Cookies
(sometimes I'll roll the dough into logs and drizzle with melted chocolate). 

The recipe for my (mild) Gingerbread Cookies can be found here:  Gingerbread Cookies, My Way

May those of you who celebrate all have a safe and blessed Christmas and Best Wishes for a Happy New Year! 

Fondly, Susan

Savoring Time in the Kitchen is a member of the Amazon Affiliate Program. If you purchase a product by following a link that we provide, the price you pay as a consumer does not change, but if you do make a purchase through one of these links, we earn a very small commission for providing that link. Thank you for your support of Savoring Time in the Kitchen!

Wednesday, December 8, 2021

Meringue Snowman Cookies


I can't believe I forgot to post these adorable snowman meringue cookies last year!  I posted it on Instagram but never got around to sharing it here.  A friend's recent meringue post reminded me :)  I know we all had a lot on our minds last year at this time!  Thankfully, the holidays will be celebrated with many more families together this year.  

These little meringue snowman are crispy and delicious with a touch of chocolate used to make the face, buttons and arms.  I used a good, tasty chocolate - Ghirardelli is my favorite.  


They not only make great decorations for your next gingerbread house project like mine did, but also make great cake or cupcake decorations.  If your kids are old enough, they can help you pipe on the faces, arms, buttons, hats, scarf, whatever sounds fun!  They make a cute addition to a holiday cookie platter or are fun to float on top of a cup of hot chocolate.  

Merry, Merry! ♥

Savoring Time in the Kitchen is a member of the Amazon Affiliate Program. If you purchase a product by following a link that we provide, the price you pay as a consumer does not change, but if you do make a purchase through one of these links, we earn a very small commission for providing that link. Thank you for your support of Savoring Time in the Kitchen!

Meringue Snowman

3 large egg whites, at room temperature
¼ teaspoon fresh cream of tartar
¾ cup sugar
½ teaspoon vanilla extract
¼ cup semisweet chocolate chips or baking chocolate (I used 1-1/3 ounces of Ghirardelli 60% Bittersweet Chocolate Baking Bar)

For the Meringue Bodies:

Place egg whites and cream of tartar in a mixing bowl. Beat with an electric mixer on medium and then medium-high speed until soft peaks form. Continue beating, while slowly adding sugar, about 1 tablespoon at a time, until the whites are stiff and glossy. Add vanilla and beat for 30 seconds.

Place oven racks in upper and lower thirds of oven. Preheat to 200 degrees F.

Line 2 large baking sheets with parchment paper or silicone mats. Fill a pastry bag fitted with a 1/2-inch plain tip) with the meringue. If you don’t have a pastry bag, you may use a 1-quart resealable plastic storage bag. Seal the bag almost completely, leaving a small opening for air to escape from the top as you squeeze. Snip off one corner of the bag with scissors, making a 3/4-inch-wide opening. Fold the top of the either type of bag over a few times, then gently push the meringue down to the tip or snipped corner.

Working with the bag perpendicular to the baking sheet, pipe the meringue into 1 1/2-inch-diameter cookies rounds. Then pipe half as much meringue on top of each round to resemble a snowman.

Bake the cookies, switching the pans from top to bottom and back to front halfway through, until dry and crisp throughout, 1 1/2 to 2 1/2 hours. Transfer the pans to wire racks and let the cookies cool to room temperature, about 15 minutes. Be sure your cookies are crisp before removing from oven. If your kitchen is humid, baking time may take longer.

Chocolate Piping Decorations:

Place chocolate chips or 1-1/2 ounces of baking chocolate in a small microwave-safe bowl and microwave for 30 seconds. Stir and continue microwaving in 10-second intervals until melted and smooth. Place the melted chocolate in a piping bag or sealable plastic bag. Push the chocolate down to one corner and snip off the tip of that corner to create a piping bag. Pipe dots for eyes and buttons and twig-like arms along the sides. Allow the chocolate to harden before serving.

To make ahead bake meringues and store cookies in an airtight container for up to 1 week. Pipe chocolate one day ahead of using.

Adapted from Eating Well Magazine

Wednesday, December 16, 2020

Christmas Cookies!


It's beginning to look a lot like Christmas!  

Even though this holiday season may not be the same as previous years, we could all still use a little 'cookie love' to deliver or send to loved ones or friends.  

Here is a sampling of the cookies I've made and frozen so far to be delivered to my 3 grandsons this weekend.  ♥♥♥


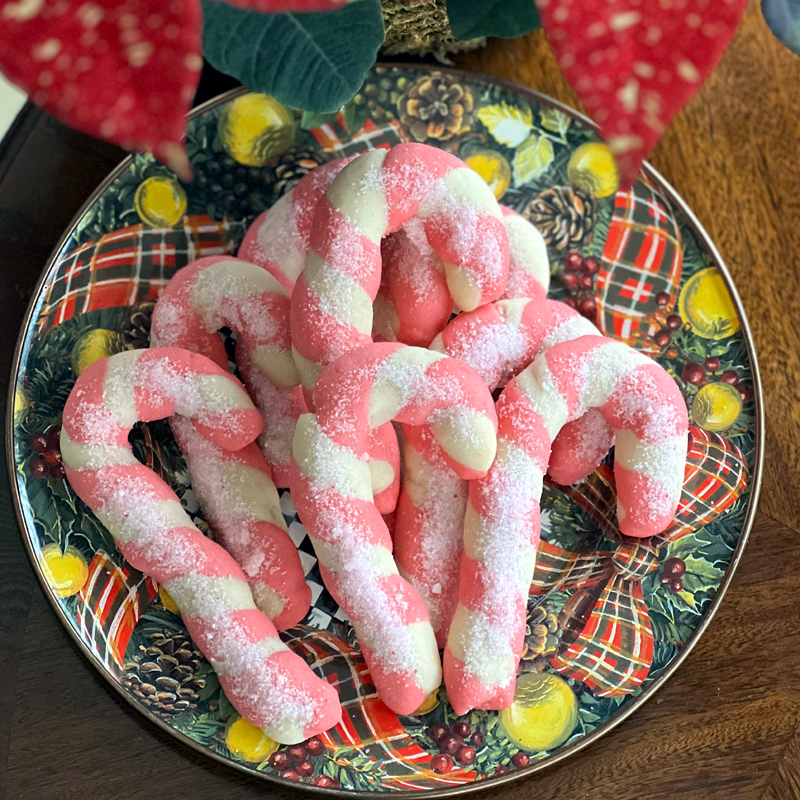
First, on the left, are my family's all-time favorite Candy Cane cookies.  These are from a vintage cookbook called Betty Crocker's All Time Favorites.  A wonderful cookbook I still use! To the right of those, is a new stamp recipe shared my my friend, Monique, at La Table de Nana.  There are some ground oats in the recipe which gives them a slightly nutty flavor which I like.  I'll find out soon how the grandsons like them :) 


The rest are all sugar cookie cutouts.  I first made these at Thanksgiving and my grandsons loved them more than any other sugar cookie I've made, so it's a keeper in my cookbook!  

All the cookies, except for the stamped cookies, were frosted with Royal Icing.  The recipe I use includes meringue powder and glycerin for a slight sheen. You can find both at JoAnn craft stores. It makes enough frosting for a couple dozen cookies and keeps for a few days in an airtight container.  For the pine trees on the bottom, I mixed Wilton gel food coloring with a small amount of vodka to a consistency perfect for painting.  You can blend the colors just like real paint so it's a fun project.  

So, whether you will be alone or with your family "Bubble", a few cookies can bring some cookie happiness into your lives. Wishing you all a very Merry Christmas!

Savoring Time in the Kitchen is a member of the Amazon Affiliate Program. If you purchase a product by following a link that we provide, the price you pay as a consumer does not change, but if you do make a purchase through one of these links, we earn a very small commission for providing that link. Thank you for your support of Savoring Time in the Kitchen!

I still can't figure out how to use the new Google Sites where I have kept all my recipes for years since I've merged them to the new format :(

Please copy and past from here:  

Candy Cane Cookies

Adapted from Betty Crocker's All Time Favorites

½ cup butter or margarine, softened
½ cup shortening
1 cup confectioners’ sugar
1 egg
1-1/2 tsp almond extract
1 tsp vanilla
2-1/2 cups all-purpose flour
1 tsp salt
½ tsp red food coloring

Topping:

1/2 cup crushed peppermint candy (candy canes work)
1/2 cup granulated sugar

Place the peppermint candy into a strong plastic bag and smash with a meat mallet or hammer until broken into bits. Place the broken pieces along with the granulated sugar in a food processor with steel blade and process until just coarse bits remain of the candy. Plastic in a bowl or storage container next to the oven when ready to bake.

Heat oven to 375 F.

Mix thoroughly butter, shortening, confectioners’ sugar, egg, almond extract and vanilla; blend in flour and salt. Divide the dough in half and blend food color into one half. Place the dough in plastic wrap and flatten into a disc. Refrigerate for at least 30 minutes.

For each candy cane, shape 1 tsp of dough from each half into a 4-inch rope (for smooth, even ropes, roll the dough back and forth on a lightly floured surface.) Place the ropes side by side and press together lightly; twist. Place on a Silipat or parchment-lined baking sheet and curve the top of each twist to form the handle of the cane.

Bake 9 minutes or until set and very light brown. Sprinkle the peppermint sugar on the hot cookies right when they come out of the oven. Allow to cool on sheet at least 5 minutes before trying to removing to a cooling rack or parchment paper.

Makes about 4 dozen.

Notes:

I usually double this recipe because I like the canes a little larger. If making separate ropes is too time-consuming just take a little less than a tablespoon of each color dough together and roll them into a rope together, then, holding onto one end of the rope twist the other side to swirl the colors.

Half the dough can also be dyed green for wreaths, or leave the dough plain and dip each end in melted chocolate and then finely chopped nuts.


Stamped Shortbread Cookies

Adapted from Weekend at the Cottage


¾ cup old-fashioned rolled oats, finely ground in a food processor
2½ cups all-purpose flour
½ cup cornstarch
1¼ cups confectioners’ sugar
½ teaspoon salt
18 tablespoons butter, chilled and cut into 1 tablespoon pieces

Sparkling sugar for sprinkling
Fluted or round cookie cutter slightly larger than your stamps
Cookie stamps  (I used Nordic Ware Starry Night Cookie Stamps)

Preheat oven to 300˚F and plastic rack in the center of the oven. 

In a food processor fitted with a blade attachment pulse oats until finely chopped. Add flour, cornstarch, sugar and salt. Pulse once or twice.

Add butter and run on a low dough comes together.

Divide dough in half and wrap in plastic wrap and flatten into a disc.  Refrigerate at least 30 minutes or  up to four days. On a floured surface,  roll one half of dough at a time 1/4 inch thickness. Cut out cookie shapes and transfer to a parchment-lined baking sheet. Gently but firmly press cookie stamps into dough.

It's best to freeze or refrigerated the stamped cookies about 15 minutes before baking to they hold their design better.

Bake for about 10 minutes or until lightly golden, watching carefully that they don’t burn. (Mine took about 15 minutes).  

Remove from oven and sprinkle with sparkling sugar or  confectioners’ sugar. 

Cookies can be stored in an airtight container for up to a week, or frozen.  

Painted Tree Cookies


3-1/2 cups all-purpose flour
1 teaspoon baking soda
1/2 teaspoon cream of tartar
1/2 cup butter, softened
1/2 cup margarine or other shortening, such as Crisco
1 cup granulated sugar
2 eggs
1 teaspoon vanilla
1 teaspoon almond extract

In a medium bowl, combine flour, baking soda and cream of tartar; set aside

In a large bowl, beat butter and shortening with an electric mixer on medium-high for about 30 seconds.  Beat in sugar, scraping sides occasionally.  Beat in eggs, vanilla and almond extract.  Beat in as much of the flour as you can with the mixer.  Stir in any remaining flour with a wooden spoon.

Divide dough in half.  Flatten each portion to make 2 round discs.  Wrap each disk in plastic wrap and refrigerate 2 hours or overnight, until dough is easy to handle. 

Preheat oven to 375F.  On a lightly floured surface, roll out dough to 1/8-inch thick. Cut dough into desired shapes.  Place 1 inch apart on ungreased cookie sheets. Reroll scraps. 

Bake until edges are firm and bottoms are very lightly browned, 8 to 10 minutes.  Transfer to wire racks and let cool.  Decorate as desired.  


Royal Icing

Adapted from Martha Stewart

Makes about 2 1/2 cups of icing

5 Tablespoons meringue powder
4 cups confectioners' sugar, or more to thicken icing
6 Tablespoons water
3 drops glycerin

Clean Ketchup style squeeze bottles work great for piping the frosting!

Note: You can find both meringue powder and glycerin at JoAnn in the baking section.

Add the meringue powder and confectioners’ sugar to a bowl Add water, a few tablespoons at a time and mix with a hand mixer until the consistency looks good. Not too runny but not too thick.  It shouldn't hold peaks. Add more powdered sugar or water, if needed. Beat for 1 minute. Add glycerin and mix thoroughly.

The icing will keep for several days in an airtight container. After you decorate the cookies use sprinkles immediately, if desired.  Otherwise, the frosting will take at least one hour to dry thoroughly so handle carefully until then.

*To paint cookies, use Wilton Gel Food Colors. It's best to wait at least 8 hours or overnight before painting over the royal icing to make sure it's very dry.  Use new, clean, craft paint brushes that have no residue of other paints. Have 1 tablespoon of vodka in a small dish. (Vodka will dry the food coloring more quickly than water and not spoil the icing underneath.)  Dilute or mix gel colors to get desired colors using a small plate as a palate.  


Note: Savoring Time in the Kitchen is a member of the Amazon Affiliate Program. If you purchase a product by following a link that we provide, the price you pay as a consumer does not change, but if you do make a purchase through one of these links, we earn a very small commission for providing that link. Thank you for your support of Savoring Time in the Kitchen!


Thursday, December 19, 2019

Cranberry Lime Tart


I may be the last one in the world to make this pie!  After appearing on the cover of Bon Appetit in the fall, it took the baking world by storm.  I'm sure it appeared on many a Thanksgiving table!  But, in all honesty, it didn't appeal to me.  Cranberries and lime just sounded too tart so I dismissed it. 


Then, thankfully, along came our holiday gourmet group menu, hosted by friends last weekend.  Guess who was assigned this recipe?  Yep.  All I can tell you is, Thank Goodness!  It is absolutely delicious and the cranberries and lime juice are mellowed into a delicious curd with plenty of sugar, butter and eggs to take the 'bite' out of the cranberries.  And, the gingernap/pecan crust is to die for.  It is the most perfect compliment to the curd and delivers a playful crunch in every bite. 


I increased the recipe by half and used one large (9-1/2 inch) and one small (7-inch) tart pan in order to serve 10 and have some left over.  Topped with sweetened whipped cream, sugared cranberries or a sprig of fresh thyme, this needs to be on your Christmas dinner table! 


Speaking of sweetness, we've been enjoying our grandsons this past month decorating Gingerbread houses, visiting our local indoor botanical garden's holiday display, and outdoor adventures and sleepovers.  We love to have them over individually to love and spoil them ♥ We have been so blessed with these three, wonderful boys. 


More sweetness was gifted to me by my dear cyber friend of 20+ years, Monique, of La Table de Nana and @monique_qc on Instagram.  Among other goodies, she sent this beautiful hand-stitched cardinal and two beautiful paintings (the tree was painted on the craft paper in which the package was wrapped.  How stickin' cute is that? 

This likely will be my last post before Christmas and I want to wish each and every one of you peace and happiness this holiday season.  Thank you all for being so supportive to me and my humble little blog all of these years. 


Savoring Time in the Kitchen is a member of the Amazon Affiliate Program. If you purchase a product by following a link that we provide, the price you pay as a consumer does not change, but if you do make a purchase through one of these links, we earn a very small commission for providing that link. Thank you for your support of Savoring Time in the Kitchen!

Cranberry Lime Tart

Printable Recipe

Please see my note about the amount of time required to thicken the curd below:

Crust
4 ounces gingersnap cookies (about 16 if using Nabisco)
1 cup pecans
4 tablespoons unsalted butter, melted
3 tablespoons light brown sugar

Filling
1 12-ounce package fresh (or frozen, thawed) cranberries, plus 4 ounces (about 1¼ cups) for serving
2½ cups granulated sugar, divided
3 large eggs
2 large egg yolks
1 teaspoon finely grated lemon zest
2 teaspoons finely grated lime zest, divided
½ cup fresh lime juice
Pinch of kosher salt
¾ cup (1½ sticks) unsalted butter, room temperature, cut into pieces

Whipped cream (for serving)

To Make The Crust

Preheat oven to 350°. Pulse cookies in a food processor until very finely ground (you should have about 1 cup). Add pecans; pulse until finely ground. Add butter and brown sugar; pulse to combine. Transfer to a deep 9" pie dish. Using a measuring cup, press firmly onto bottom and up sides of dish. Bake until firm and slightly darkened in color, 10–15 minutes. If crust slides down sides, gently press back up. Let cool. Crust can be baked 1 day ahead. Store tightly wrapped at room temperature.

Filling

Bring 12 oz. cranberries, 1 cup granulated sugar, and ¼ cup water to a boil in a large saucepan over medium-high. Reduce heat; simmer until cranberries burst and most of the liquid evaporates, 12–15 minutes. Let cool. Purée in a blender until very smooth.

Cook purée, eggs, egg yolks, lemon zest, lime juice, salt, ½ cup sugar, and 1 tsp. lime zest in a heatproof bowl set over a saucepan of simmering water (bowl should not touch water), stirring with a rubber spatula and scraping down sides of bowl often, until curd thickens and coats spatula, 8–10 minutes. (NOTE:  On my stove this process took at least 20-25 minutes, so go to the bathroom before you start stirring - LOL). Cool until still warm but not piping hot.  It needs to be warm enough for the butter to melt in the next step. 

Using an electric mixer on medium-high, beat curd, adding butter a piece at a time and incorporating after each addition, until curd looks lighter in color and texture, about 5 minutes. Scrape into crust and chill until firm, about 2 hours.

Garnish

Bring ½ cup granulated sugar and ½ cup water to a simmer in a small saucepan over medium heat, stirring to dissolve sugar. Add remaining 4 oz. cranberries and cook until barely starting to soften, about 1 minute. Using a slotted spoon, transfer cranberries to a wire rack set inside a rimmed baking sheet. Chill until no longer sticky, 20–30 minutes.

Toss remaining ½ cup granulated sugar and 1 tsp. lime zest in a small bowl. Toss cranberries in lime sugar. Top pie with cranberries; serve with whipped cream.

Do Ahead: Pie (without topping) can be made 2 days ahead. Cover once filling is firm and keep chilled. Let sit at room temperature 2 hours before serving.

Adapted from Bon Appetit Magazine

Wednesday, April 3, 2019

Sugar Knot Rolls, Easter Preps and Birthdays!


Easter is coming soon and if you're looking for a wonderfully soft and delicious sweet bread for your Easter brunch I have a great recipe for you!  Inspired by my blogging friend, Juliana, at Color Your Recipes, this bread incorporates the Tangzong or water roux method.  I have been wanting to try this method of bread-making for a long time and finally got around to making some this week.


The bread is so soft and fluffy inside it's almost like eating cotton candy! Delicious on it's own with butter or jam, baked with a sugar topping as Juliana did, or drizzled with glaze and sprinkles like mine.  You can visit Juliana's website to get the recipe and her tips by clicking the link above or also see the recipe with my tips below.


The end of March and beginning of April is always such a fun and busy time here as we celebrate three birthdays in our immediate family in the course of 2-1/2 weeks.  Mine is first in March, followed by my husband's, exactly one week later, and then our oldest daughter's birthday is 9 days after that.

We had a big family dinner party last weekend at our home and celebrated all three at the same time.  Gifts and cards from dear friend's arrived early...


Thank you, Dear Monique!  We have been cyber 'Peas in a Pod' for can it be 25 years now?  We share a love of gardening, painting, cooking and baking among many other parallels in our lives. The gift of friendship is the most valuable and cherished.  ♥


Our middle grandson, Dane who just turned seven shortly before my birthday, gifted both my husband and me with one his original pieces of artwork.  I love his artistic expression!


I've also been doing a little painting of my own for Easter.  I got the idea for the flower painted eggs from Lucy at Craftberry Bush.  Hers are so much better than mine!  I tried a few of her poppy designs and then decided to paint some of the spring flowers that grow in my garden.


I found the faux eggs I used at Walmart.  I love to have a few dozen on hand so I can let my grandsons decorate their own eggs and take them home.  No fear of broken or smelly eggs :)

Enjoy!

Sugar Knot Rolls

Printable Recipe

Makes about 12-14 knot rolls, depending on size. It helps to have a digital scale that measures in both grams and ounces.  In parenthesis I tried to give alternate measurements.

Note:  I started making the bread dough in the afternoon and put the dough in the refrigerator for the first rise overnight.  In the morning, it had tripled in size and was ready for forming into rolls.

Tangzhong or water roux:

50 grams (1/3 cup + 1 tablespoon + 1 teaspoon) bread flour
250 milliliters (1 cup) water

Bread dough:

550 grams (3-1/4 cups) bread flour
90 grams (1/3 cup) sugar
7 grams (1-1/4 teaspoon) salt
7 grams (1-1/4 teaspoon or one packet) yeast
20 grams (4 tablespoons) non-fat dry milk
2 very large eggs (minus 1 ½ tablespoon), approximately 100 grams. Save what's left for the egg wash.
65 grams (1/3 not-quite-full cup) heavy cream
70 grams (5 tablespoons) butter, softened

Glaze (Optional)
1 cup powdered sugar
1/2 teaspoon vanilla
Milk stirred in to obtain drizzling consistency. Perhaps 2-3 tablespoons.

First make the water roux. In a small saucepan, whisk together the water and flour until well-blended and free of lumps. Cook over medium heat to the temperature of 65C/150F, whisking constantly, until mixture thickens. This will take 2-4 minutes. When done, it should have the consistency of custard and the whisk should make visible lines in the bottom of the pan. Remove from heat and transfer to a bowl. Cover with plastic wrap to keep a 'film' from forming. Cool. The roux can be kept in the refrigerator for 48 hours until ready to use.

To make the bread dough, in the bowl of a stand mixer with dough hook, place all of the cooled roux. Then add all of the other ingredients for the bread dough, except for the butter. That will be added after the first 'mix'. Turn the mixer on low and stir for 2-3 minutes. Increase mixer speed to level 2 and let it mix for 15 minutes. The dough will be sticky but do not add any more flour. As the dough mixes and the gluten forms it will become less sticky.

Add the softened butter and mix for another 15-20 minutes. To test if the dough is ready, take out of small, golf ball sized portion of dough and slowly stretch in all directions. This is called the windowpane test. If the dough is elastic enough the dough will not tear and you should be able to see light and shadows through the dough. If it tears, return to the mixer and mix for another 2-3 minutes and test again.  Here is a short video on the windowpane dough test:  Click Here.

Remove dough from the mixer and place into a large bowl and cover with plastic wrap. Allow dough to triple in size. This may take quite a while, depending on the temperature in your house. I placed my dough in the refrigerator overnight and the dough had tripled in size by morning.


To make the rolls, remove dough from bowl and deflate by pushing it down. Divide into about 12-14 balls of about 75 grams each pr about 2-1/2 inches round. To make the knots, roll out a rope from one ball of dough, about 12-14 inches long. Then tie the rope into a knot, tucking one end underneath and the other end bring over the top and push through the hole in the center, like a pretzel. Or twist into any shape you wish. Place each roll on a large, rimmed baking sheet lined with parchment or a silicone liner. Cover the rolls with plastic wrap and allow to double in size.

When they are almost fully doubled in size, preheat the oven to 350F. Brush the top of the rolls with the reserved egg with a 1 tablespoon of water added to it. You can either sprinkle the rolls now with sugar before baking, or bake, allow to cool, and then drizzle a glaze over the top and then sprinkle with colored decors or sugar.

Wednesday, December 19, 2018

Chocolate Cake with White Chocolate Buttercream Frosting


If you're hosting Christmas dinner, or having a New Year's Eve party, I have a lovely and delicious dessert for you!  This past weekend, we had a gourmet group gathering at the home of good friends.  This cake was assigned to us (BTW, that means me) to bring as each couple gets an assignment that the host and hostess determine.  


There was a note in the recipe that peppermint extract could be added to make it more festive for the holidays.  Unfortunately, I didn't have any peppermint extract on hand.  What I did have were crushed candy canes from the candy cane cookies I made in my last post.  The problem with crushed candy canes in the frosting was that they kept getting stuck in my piping nozzle, even though I was using the largest star tip.  Next time, I'd use extract or make sure the candy canes are pulverized thoroughly!  


I decorated the cake with Hershey's candy cane kisses and candy candy-dusted star cookies made with the same candy cane cookie dough from my last post for a festive look!


Since I didn't want to slice it before it was served at dinner that evening, I took a few (bad) photos with my phone while we were plating it so you could see what the layers look like and how I served it.  I brought extra cookies and red raspberries for serving.  It was delicious!  


Ho-Ho-Ho!  Wishing all of you who celebrate a sweet and Very Merry Christmas! 


Savoring Time in the Kitchen is a member of the Amazon Affiliate Program. If you purchase a product by following a link that we provide, the price you pay as a consumer does not change, but if you do make a purchase through one of these links, we earn a very small commission for providing that link. Thank you for your support of Savoring Time in the Kitchen!

Chocolate Cake with White Chocolate Buttercream Frosting


Serves 12

3 cups granulated sugar
2-3/4 cups all purpose flour
1 cup unsweetened cocoa powder (I used Ghirardelli)
2 teaspoons baking soda
1-3/4 teaspoon salt
3/4 teaspoon baking powder
1-1/4 cups strong black coffee, cooled to room temperature
1-1/4 cups buttermilk
3/4 cup canola oil
1 tablespoon vanilla extract
3 large eggs, room temperature

Note: I didn't have 9" x 2" pans so used 9" by 1-3/4" pans and my cake spilled over in the oven. If you don't have 2" pans, prepare a collar with parchment paper to make sure your cake won't spill over the top of the pan. Click HERE for a good tutorial on how to make a collar. 

Preheat oven to 350 F degrees. Grease 2 - 9" x 2" round cake pan. Line bottom with parchment - See Note above ^

Sift together sugar, flour, cocoa powder, baking soda, salt and baking powder into large mixing bowl (to make sure there aren't any lumpy bits). 

Mix together cooled coffee, buttermilk, oil and vanilla.

At low speed, beat half of buttermilk mixture into flour mixture until blended and smooth. Add eggs one at a time, beating well after each egg. Beat in remaining buttermilk mixture. Batter will seem thin. Pour evenly into prepared pans.

Bake cakes in the center of the preheated oven until a toothpick inserted in the center comes out clean, about 40-50 minutes, depending on your oven. Start checking at 40 minutes.

Allow cakes to cool in pans for 5 minutes. Loosen cakes by running a metal spatula around the sides of the pans. Remove parchment collar if one was used. Turn cakes out onto wire racks to cool completely and remove parchment paper from bottom.

White Chocolate Buttercream Frosting

1 pound (4 sticks) butter, softened
1 pound white chocolate, chopped up a bit
4-5 cups confectioners sugar (powdered sugar)
1/2 to 1 cup heavy whipping cream
1-2 teaspoons vanilla extract
1 teaspoon peppermint extract, or finely crushed candy canes, if desired

Melt 1 stick butter with chocolate in a double boiler (or a round metal bowl set over a pan of simmering water). Stir and let cool slightly. 

In a mixing bowl, cream remaining 3 sticks butter with confectioners sugar and melted white chocolate mixture. Beat until creamy. 

Add heavy cream, a little at a time, and beat until desired consistency is achieved. Add extracts and/or finely crushed candy cane and blend well, adding more cream if necessary.

Slice each cake in half horizontally, using a very long serrated knife. Some people use taut dental floss! Click HERE to see a tutorial on how to do that. 

Place one layer on a serving plate and spread with about 1/6th of the frosting. Repeat with the next two layers. Top with remaining cake layer and spread sides and top with frosting. 

Decorate cake with piped additional frosting as you wish. Top with Hershey's Candy Cane Kisses, and Christmas Cookies if desired. 

Tuesday, December 11, 2018

Hazelnut Thumbprint Cookies and a Candy Cane Cookie Reprise


It's hard to believe that Christmas will be here in two weeks.  Let's get baking! With all the hustle/bustle and Things-to-Do Lists a mile long, baking is a great stress reliever...not to mention the happiness that biting into a delicious, fresh cookie brings.  


I just started a few days ago and so far have made one new-to-me recipe and one old favorite recipe.  The newbies are these Hazelnut Thumbprint cookies that I found in Scandinavian Baking by Pat Sinclair.  They are buttery, flaky, coated in toasted hazelnuts and filled with your favorite jam or preserves.  For my filling, I chose seedless raspberry jam.


I also made my favorite candy cane cookies this last weekend, knowing one of our daughters and her boyfriend were coming over for dinner.  They are my family's favorite Christmas cookie and they freeze beautifully!  I first shared them in this post in 2008.


They have always been Santa's favorite also and when our daughters were little we would always leave some out for him on Christmas Eve along with carrots for his reindeer :)  As you can see, Santa has a new holiday camper!


They are especially delicious with a cup of Candy Cane tea in a Candy Cane teacup/brewer.  The candy canes on the tea cup turn to red from black when hot water is poured in! By David's Teas...So cute!  Both Santa's camper and the tea cup/brewer were gifts from a very special friend.  A friendship that has been ongoing for 16-17 years, although we've never met.  A friendship that began with gardening in garden forums, continued with cooking and baking, painting and crafts.  Fueled by many similarities in that we both have husband's who were both golfers and names start with the letter J, two daughters - one with light hair and one with dark, and years later, we were both blessed with adorable grandsons.


Delightful Christmas offerings from my friend, Monique ♥  May your holiday season be filled with friendship.....and baking!

Hazelnut Thumbprint Cookies

Printable Recipe

Makes about 4 Dozen Cookies

2 cups all-purpose flour
1/4 teaspoon salt
1 cup softened butter
1/2 cup sugar
2 large eggs, separated
1 teaspoon almond extract
2 tablespoons water
1 cup toasted and finely chopped hazelnuts
2/3 cup seedless raspberry jam (you may substitute any jam or preserves you prefer, but red is pretty for Christmas)

Notes: Look for Eileen's brand of hazelnuts if you can find them. I found an 8-oz bag for just over $3.00. 

Preheat the oven to 350 degrees F. Line two baking sheets with silicone mats or parchment paper.

Toast whole hazelnuts on a small baking pan for about 6 minutes. Remove to a large plate and allow to cool. Rub nuts between your hands to remove as much of the skins as possible, then place in a food processor and pulse until finely ground. Be careful not to over process or you will make hazelnut butter ;) Remove to a bowl and set aside.

Combine flour and salt in a bowl and stir until blended.

Beat the butter in a large mixing bowl with an electric mixer on medium speed until light and creamy. Add the sugar and egg yolks and mix well. Scrape down the bowl, once or twice with a spatula. Add the flour mixture with the mixer running at slow speed and beat until a soft dough is formed. Scrape the bottom of the bowl to incorporate all of the flour.

In a small bowl, beat the egg whites and water with a whisk or fork until frothy.

Take rounded teaspoons on dough and shape into balls. Dip the bottom half into the egg whites and then into the chopped nuts rolling slightly to cover the bottom and sides. Place on cookie sheet and press down slightly. Make an indentation in each one with your thumb or back of a small spoon. (I used a rounded cork that I saved from a bottle of wine).

Bake cookies for 10 minutes or, until the edges are light brown. Remove from oven and reshape indentation. Fill each cookie with 1/2 teaspoon of jam or preserves.

Continue baking for another 6-8 minutes or until the edges are browned. Cool cookies on the baking sheet for 1 to 2 minutes before removing to a wire rack to completely cool.

Adapted from Scandinavian Baking by Pat Sinclair.

Candy Cane Cookies

Printable Recipe

Makes about 4 dozen

Note: I usually double this recipe because I like the canes a little larger. If making separate ropes is too time-consuming just take a about a teaspoon or so of each color dough and roll each into a short log. Then place the two colors together and roll them into a longer rope. While holding onto one end of the rope to keep it stationary, twist the other end to swirl the colors.

½ cup butter or margarine, softened
½ cup shortening
1 cup confectioners’ sugar
1 egg
1-1/2 tsp almond extract
1 tsp vanilla
2-1/2 cups all-purpose flour
1 tsp salt
½ tsp red food coloring
1/2 cup crushed peppermint candy
1/2 cup granulated sugar

Heat oven to 375 F. Mix thoroughly butter, shortening, confectioners’ sugar, egg, almond extract and vanilla; blend in flour and salt. Divide the dough in half and blend food color into one half.

For each candy cane, shape 1 tsp of dough from each half into a 4-inch rope (for smooth, even ropes, roll the dough back and forth on a lightly floured surface.) Place the ropes side by side and press together lightly; twist. Place on a Silipat or parchment-lined baking sheet and curve the top of each twist to form the handle of the cane.
Bake about 9 minutes or until set and very light brown. Mix candy and granulated sugar (food processor works best); sprinkle on the hot cookies when they come out of the oven. Allow to cool on sheet at least 5 minutes before trying to remove.

Adapted from Betty Crocker's All-Time Favorites

Thursday, March 29, 2018

Pasta à la Monique and Sourdough Bread!


Even though the first week or so of spring has been challenging weather-wise, I have had a delicious, savory time in the kitchen!

Recently, Monique at La Table de Nana, shared this delightful pasta dish with rapini, bacon and pine nuts that included dry sherry.  I had just used sherry in a stir fry recipe not that long ago, and when she mentioned using sherry in her pasta dish I knew it would taste terrific.  And it did :)


I didn't have any penne pasta which Monique uses, but the campanelle pasta that I did have in the pantry worked fine and I love the spirally trumpet shape.

My pea shoots are still going strong so decided to add some as a garnish. It would be nice to stir them into the dish right at the end so they wilt slightly too. Such a good dish!  My husband loved it too.

I added a little more sherry and pasta water to make it even more saucy and tossed in lots of grated parmesan, as Monique suggests.  You can see Monique's instructions here.  I served it with some freshly made sourdough bread.


See that rabbit shape on the far right? That's the shape I was happy to finally create  :)

I've been keeping my sourdough starter alive for over a year but I've never been able to achieve the type of bread I'd been longing for until after I ordered a couple of books to read.  The bread above was made with Ken Forkish's levain ingredients and ratios from his book Flour Water Salt Yeast.  The whole wheat flour added to my starter feeding really made a difference.


Sort of fitting for Easter, don't you think?  My rabbit even has eyes and what looks like a hind leg :)

I used the techniques I found in Emilie Raffa's book Artisan Sourdough Made Simple.   She really does simplify the long process.  So far, I've tried two of her recipes and both worked very well with the greatest success coming from the 'high hydration' recipe.  It was so good I couldn't stop eating it myself :) The crust was amazing. Still not as 'holey' as some breads I see on Instagram but I'm happy with my first new results so far and I'll keep working on it!  I know a lot of people aren't into nurturing sourdough starters, and making bread, but if you are, just send me a private email and I can tell you what I did.


The past couple of weeks we've celebrated two birthdays in our family (including yours truly) and have two more coming up in the next two weeks with my husband's birthday falling on Easter Sunday this year.  Fun times ♥ 


Wishing you and your family a safe and joyous Easter or Passover weekend!

Monique's pasta would make a delicious side dish for your holiday menu :)


Pasta à la Monique for Two - 

1 diced shallot
3 or 4 cloves of minced garlic
1 small bunch of rapini, cleaned and cut into 1-2" pieces, discarding the tough ends
Toasted pine nuts
Cooked bacon, as much as you like - perhaps 2-3 pieces per person, diced
Cooked pasta, perhaps 1/2 pound of dry pasta - save a half cup of pasta cooking water before draining
1/8 cup dry sherry...or more :)
Lots of grated Parmesan - perhaps 4 oz or to your liking
Red Pepper Flakes, a pinch
Salt and Pepper to taste
Fresh basil, parsley or pea shoots for garnish :)

Heat a tablespoon or two of olive oil in a large saute pan over medium to medium high heat. Saute the shallot and garlic about a 30 seconds or so being careful not to burn.  Add rapini and cover pan to let it steam-cook for about 3 minutes until just barely tender.  Remove cover and toss in the rest of the pasta, pine nuts and bacon. Add the sherry and a splash of pasta cooking water and toss.  Add the parmesan and seasonings and toss.  Add more sherry or cooking water if you like.  Pass the Parmesan and red pepper flakes at the table.  Simple and tasty!!

Savoring Time in the Kitchen is a member of the Amazon Affiliate Program. If you purchase a product by following a link that we provide, the price you pay as a consumer does not change, but if you do make a purchase through one of these links, we earn a very small commission for providing that link.  Thank you for your support of Savoring Time in the Kitchen!