Showing posts with label Asian Cuisine. Show all posts

Tuesday, February 13, 2018

Barbara's Stir Fry (Pork Fried Rice)


Pork fried rice is one of our favorite things to order in a Chinese restaurant. With just a little prep work, this wonderful stir fry can be made in less than 15 minutes. 

Loaded with veggies, this delicious and easy recipe was inspired by my friend, Barbara, at Moveable Feasts.  Although Barbara doesn't actively blog any longer, you can still find her on Instagram where she shares the wonderful archive of recipes from her website.  Recently, she shared this stir-fry recipe, which she learned from a Chinese women during her family's Air Force years in the 50's.


I adapted the recipe slightly and used frozen peas and fresh pea shoots.  I also added diced, slow-roasted pork shoulder (a great recipe which lends itself perfectly to stir fry recipes). Recipe below.

Chinese New Year is coming soon (The Year of the Dog) and begins on February 16!

Barbara's Stir Fry


3 cups cooked brown rice (or any rice you have left over) 
2 or 3 eggs 
2 tablespoon canola or peanut oil, divided
1 large shallot, chopped, or regular onion - about 1/4 cup
2 cloves garlic, diced or minced
6 scallions, sliced very thinly  
1/2 cup shredded carrots (I use a box grater)
1/2 cup diced water chestnuts (optional)
1 cup peas, (defrosted if frozen) or ready-to-eat edamame 
1 cup diced, previously roasted pork shoulder (you may also use diced shrimp or chicken) 
2 tablespoons soy sauce 
salt and freshly ground black pepper 

Garnish with Fresh Pea shoots, if available, or, with thinly sliced green onion tops

Note:  Diced bok choy or small broccoli florets would also be great vegetable choices in the stir fry.  Add when adding the shredded carrot.  

Heat a saute pan or wok large enough to hold all the above ingredients over medium-high heat and add a little neutral flavored oil. When the oil is heated, add the eggs and scramble them briefly, breaking into small pieces. Remove the cooked eggs from the pan and set aside. 

Reheat the pan until hot. Add a little more oil, then add the shallots, scallion whites, carrots and garlic. Cook, stirring, for about a minute. Add the cooked meat and rice and continue to stir for another few minutes until the rice and meat are hot and begin to brown slightly. 

Add the soy sauce, water chestnuts, scallion greens and peas or edamame, salt and pepper to taste and fry together for another minute or two. 

Garnish with some fresh pea shoots, scallion greens or other micro greens, if available. 

Pass additional soy sauce at the table when serving.

Slow Roasted Pork Shoulder with Brown Sugar

SERVES: 10-12

1 3-1/2 to 5 pound pork shoulder (butt) roast
2 whole garlic cloves, sliced or minced (optional)
1/3 cup Worcestershire Sauce
3/4 cup light brown sugar
1/2 teaspoon dried thyme or oregano
1 cup unsweetened apple juice (I didn't have juice so I used 2 fresh apples, peeled and diced) 
1/2 teaspoon salt, and 
1/2 teaspoon fresh ground black pepper, or to taste

Make small slits all over the roast then insert a slice of garlic into each slit. Alternately, you can mince the garlic and rub it over the meat). Place the roast in a Dutch oven with lid.  I used my enameled cast iron Dutch oven.

Sprinkle the roast on all sides with Worcestershire sauce. Let sit at room temperature for 1 hour.

Preheat oven to 425 F.

At the end of the hour, spoon any Worcestershire sauce that has accumulated on the bottom of the pot back over the meat. Mix together the brown sugar, black pepper and thyme or oregano and press the brown sugar mixture firmly onto the top and sides of the meat. Pour the apple juice into the bottom of the pot and cover tightly.

Place the roast in the oven and immediately reduce the temperature to 225 F.

Roast for about 4 to 4-1/2 hours or until the meat is fall-apart tender (cooking time will vary depending on the size of the roast).

Remove the meat to a platter, tent with foil and set aside.  Stir the salt into the pan juices and taste test. Adjust seasonings if necessary. Strain juices and reserve. 

Slice meat as desired and pour strained juices over the top of the meat.  

Note:  This can easily be made a day or two ahead and refrigerated.  Juices can be easily defatted after chilling by scraping congealed fat off the top.  When ready to serve, warm meat in a 350F oven in a covered pot for about 30 minutes, adding the reserved juices.  

Adapted from Genius Kitchen 

Tuesday, April 12, 2016

Spring Rolls with Shrimp ~ Spring Celebrations


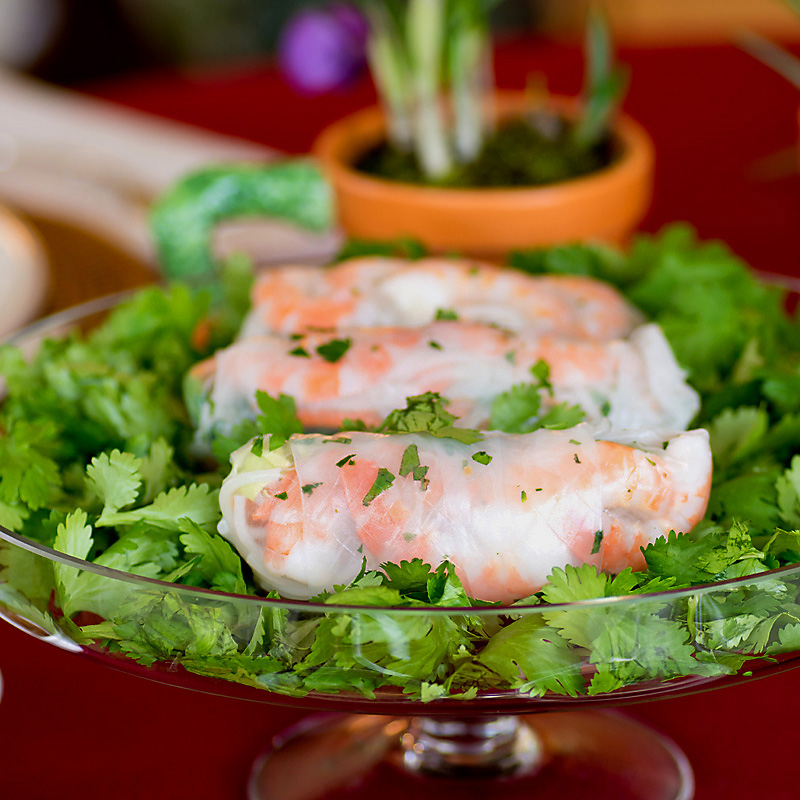
What can be more fitting for a special luncheon in spring than Spring Rolls with Shrimp!  

Hello, Friends! We have just finished celebrating three family birthdays and a return-to-work celebration over the past three weeks! Fun times, busy times, special family times!  The first celebration started with our daughter's last maternity leave luncheon with us.  I wanted to make it very special for her, so I chose these delicious spring rolls with two kinds of dipping sauce. Recipes to follow.


The next celebration was a combination birthday party for yours truly (last week of March) and my husband, whose birthday follows exactly one week later. The most recent party was this past weekend, for our oldest daughter's birthday (one week after my husband's), which was also combined with a belated Easter egg hunt for our two oldest grandsons who were out of town over Easter.


Needless to say,  that's a lot of celebrating and a lot of cooking and entertaining! The most memorable recipe from the birthday dinners was the Grilled Beef Tenderloin with Cabernet Sauce with Frizzled Leeks.  Desserts included Lemon Tart with Pine Nut Crust for and Strawberry Lemonade Cake made this time with a Chiffon Cake base.  (Click on links for recipes). We have been eating very well!

The next week or so we will be eating lighter meals and salads such as these wonderful spring rolls, that I can't wait to make again.  We all loved them, especially with the Hoisin dipping sauce with chopped peanuts. Delicious!


The nice thing about spring rolls as you can fill them with whatever ingredients that sound good to you!  A combination of finely sliced vegetables and lettuces or cabbage, chopped herbs, and either cooked shrimp or chicken. Or, keep them vegetarian if you like!


Please don't place your spring rolls on a bed of cilantro as I did!  The cilantro stuck to the spring rolls and had to be picked off by hand. Lesson learned!


Spring Rolls with Shrimp

Printable Recipe

Serves approximately 4-5
Makes about 10-12 spring rolls, depending on how much filling you use.

6 ounces of dry rice vermicelli (rice sticks), cooked
About 20 large shrimp, cook, peeled, deveined and sliced in half cross-wise (I use Ina Garten's cooking method)
10 rice paper wrappers (round or square, round makes slightly smaller rolls)
3/4 cup carrots, peeled and coarsely shredded
3/4 cup seedless cucumber, peeled and finely julienned
3/4 cup of snow peas, thinly sliced on the bias
1-1/2 tablespoons olive oil
8 ounces of shiitake mushrooms, stemmed and caps thinly sliced
1 large shallot, diced
1/4 cup fresh mint leaves, thinly sliced
1/4 cup fresh cilantro, thinly sliced
1/4 cup fresh basil, thinly sliced
1 cup of baby lettuce leaves or finely sliced Napa cabbage (which I used)

Chopped peanuts for garnish
Hoisin Sauce (recipe follows) for dipping
Fish Sauce (recipe follows) for dipping

Cook and prepare shrimp (can be done the day before).

Clean and slice all vegetables and herbs.

Add water to a medium saucepan (large enough to hold rice sticks) and bring to a boil. Boil rice vermicelli 4 to 5 minutes, or until al dente. Drain, rinse starch off with cold water, and drain again. Cut into 4-5 inch lengths. Cover and set aside.

Heat the olive oil in a medium skillet. Saute mushrooms until soft, about 5 minutes. Remove to a bowl. Saute the chopped shallot in the same pan until soft and slightly browned. Toss with the mushrooms and set aside.

Have all of the fillings on the counter-top, ready to use when you start making the spring rolls.

Fill a large frying pan or bowl with warm water. Take one rice wrapper and dip it into the water for a second or two and remove to a cutting board. Do not leave in water longer than necessary or it could disintegrate.

Wait a few seconds for the wrapper to soften. Then, in the lower third half of the rice wrapper, closest to you, stack the ingredients in a horizontal row across, leaving about 2 inches uncovered on each side. Start with 3 shrimp halves, then add a few strands of vermicelli, 1 tablespoon each shredded carrots, cucumbers, snow peas and mushrooms/shallots, then add 1/2 teaspoon each of mint, cilantro, basil, then 2-3 baby lettuce leaves. Fold uncovered sides inward over the filling, then tightly roll the wrapper away from you.

Repeat until the ingredients are used. Place each roll into a covered storage container as you work so they do not dry out. Refrigerate until time to serve.

Serve with chopped peanuts and either or both of the dipping sauces below.

Hoisin Dipping Sauce (our favorite)

1 cup (8 oz) Hoisin sauce
1/4 cup smooth peanut butter
1 Tbs rice vinegar
2 garlic, crushed
1 heaping teaspoon Thai Garlic Chili Sauce to taste

Fish Sauce Dressing

2 tablespoons fish sauce
1 1/2 tablespoon fresh lime juice
1 tablespoon water or rice vinegar
1 1/2 tablespoons sugar
1 teaspoon chopped cilantro
1 garlic clove - mined
1 generous teaspoon Thai Garlic Chili Sauce to taste

Notes: This recipe is adapted from several recipes to include the ingredients we like. Feel free to add bean sprouts, diced green onions, or whatever vegetables you like. Spring rolls may be slice in half diagonally to serve.

Friday, February 5, 2016

Mongolian Beef Stir Fry


My husband and I love the flavors of Chinese and Asian cuisine.  One of the first recipes I ever made in a wok years ago was Beef and Snow Peas. When I saw this recipe for Mongolian Beef on The Woks of Life (a wonderful site if you enjoy Chinese and Asian food), I knew the piece of beef tenderloin in my freezer had a purpose! Although flank steak is traditionally used to make Mongolian Beef, the beef tenderloin was tender and delicious. I added snow peas to the stir fry and cooked my favorite brown rice to round out the meal.


It was a delicious meal! The meat was all at once sticky, sweet and sour with just amount of sauce coating the perfectly seared and tender meat.  My husband's comment after dinner was "We can have this anytime."  I love to hear that!


Mongolian beef is actually a Chinese-American restaurant creation and has nothing to do with real Mongolian cuisine, I found.  It became very popular served in one of the more well-known changs...oops,l I meant chains :) You will find that it is very similar to Chinese Orange Beef, without the orange.  


Chinese New Year 2016 is officially celebrated from February 8 - 13.  While the United States prepares for the big Superbowl game on Sunday, China will be preparing for the Lunar New Year - The Year of the Fire Monkey.  Many Chinese people travel to their home towns during the annual celebration to visit their families. Recently, a rare snowstorm resulted in over 100,000 (yes, that number is right!) people stuck in the Guangzhou train station. Talk about a travel nightmare! Hopefully, they've all made it to their destinations and will soon be enjoying their favorite authentic Chinese meals with family.

Mongolian Beef Stir Fry

Printable Recipe

Serves 2

8-10 ounces tenderloin of beef or flank steak, sliced against the grain into 1/4-inch thick slices (it's easier to cut if the meat is slightly frozen)
1 teaspoon vegetable oil
1 teaspoon reduced sodium soy sauce
1 tablespoon cornstarch, plus 1/4 cup for coating meat
1-2 cups of snow peas, cleaned
1 tablespoon oil, for stir-frying the snow peas

1/3 cup vegetable oil, for frying the beef
1/2 teaspoon minced fresh ginger
1/2 teaspoon red pepper flakes
2 cloves garlic, minced
1/4 cup low sodium soy sauce
1/4 cup water or low sodium chicken stock
1 slightly rounded tablespoon brown sugar
1 tablespoon cornstarch, mixed with 1 tablespoon water
2 scallions, cut into 1-inch long slices on the diagonal
Additional scallion for garnish, if desired

Rice or noodles for serving

Marinate the beef for 1 hour in 1 teaspoon oil, 1 teaspoon soy sauce, and 1 tablespoon cornstarch. Add the remaining 1/4 cup of cornstarch and toss with your fingers until lightly coated.
Meanwhile, prepare the rice or noodles of your choice according to package directions.  Set aside while cooking the beef.

Heat 1 tablespoon oil in a wok or large skillet over high heat. Add the snow peas and toss until still bright green and just slightly browned - about 1 minute. Season with a pinch of salt and pepper and remove with a slotted spoon to a platter and set aside.

Add 1/3 cup of oil to the same pan and heat again. Just when the oil starts to smoke, spread the pieces of beef evenly in the pan, and sear for 30 seconds to 1 minute (depending upon the heat of your pan) until you see a crusty coating. Turn over and let the other side sear for another 30 seconds or so. The beef should be well-seared and browned. Remove to a baking sheet lined with paper toweling. Prepare in two batches if increasing the recipe. 

Drain the oil from the wok, leaving 1 tablespoon behind, and turn the heat to medium. Add the ginger and red pepper flakes. After about 15 seconds, add the garlic. Stir for another 10 seconds and add the soy sauce and chicken stock (or water). Bring the sauce to a simmer, add the brown sugar, and stir until dissolved.

Let the sauce simmer for about 2 minutes and slowly stir in the cornstarch/water mixture and stir until thickened. Add the seared beef and scallions and toss everything for another 30 seconds or until there is almost no liquid left.  Add the beef mixture to the platter with the snow peas, garnish with the additional scallions, if desired, and serve. 

My Notes:  I added a splash of Cabernet wine when adding the liquids to the stir fry as I had an open bottle handy and it felt like a good idea!. 

Adapted from The Woks of Life

Thursday, March 5, 2015

Shrimp Pad Thai and a Delicious Side Salad


Genes are funny things. A gene can be lurking in a parent who doesn't even know it's there and then, years later, a child finds out through a blood test that she's inherited one gene from each parent that has given her some gluten intolerance. That child would be my daughter and both my husband and I each gave her a gene that was recessive in us but in her...not so much. Thankfully, it's not a severe intolerance.  She had complained about some digestive issues ever since college and recently had a blood test done to find out what was causing it.
 

So why do I have a plate full of pasta pictured as I'm talking about gluten intolerence?  That's because it's not pasta at all but wide rice noodles. For all of you who have family members or friends who have a gluten intolerance and still want to serve them a delicious meal, this is a recipe that will satisfy everyone at the table.  It was pictured in a recent Williams Sonoma catalog and found on their website.


I served this Asian-style salad that I found on Food and Wine with our meal and also some roasted asparagus.  The dressing is slightly creamy and the toasted macadamia nuts and sesame seeds gave it a nice crunch.  The salad was supposed to include Enoki mushrooms but, since I couldn't find them, I substituted cucumber which gave the salad a nice refreshing flavor. 


The dinner was a wonderful combination of flavors! 

Shrimp Pad Thai

Serves 4

Wide Rice Noodles (found in the Asian aisle of your food store), 14-16 oz package

1 Tbs. canola oil
1 lb. (500 g) large shrimp, peeled and deveined (I used about a half pound more)
3 eggs, lightly beaten
1/2 cup Pad Thai noodle sauce, plus more, to taste (I used Annie Chun brand)
2 green onions, white and light green portions, sliced
2 carrots, peeled and julienned
1 cup (4 oz./125 g) bean sprouts

1/4 cup (1 oz./30 g) chopped unsalted roasted peanuts
Chopped cilantro leaves for garnish
Lime wedges for serving

Bring a large pot of salted water to a boil over high heat.

Meanwhile, in a very large nonstick sauté pan or wok over medium-high heat, warm the oil. Add the shrimp and stir-fry until opaque throughout, 2 to 3 minutes. Using a slotted spoon, transfer the shrimp to a bowl.

Add a little more oil to the same pan to heat and then add the eggs, stirring occasionally, until lightly set but still soft, about 1 minute. Transfer the eggs to the plate with the shrimp. Remove the pan from the heat.

Add the rice noodles to the boiling water and cook until barely al dente, 3-4 minutes. Drain the noodles thoroughly and transfer to the pan or wok.

Place the pan over medium heat and return the shrimp and eggs to the pan. Add the noodle sauce, green onions, carrots and the bean sprouts. Cook, using tongs to lift and toss the noodles constantly, until the ingredients are well blended and heated through, about 1-2 minutes Taste and add more noodle sauce if desired, tossing to combine.

Transfer the noodles to a platter or serve right from the pan.

Pass the chopped peanuts, extra cilantro leaves and lime wedges at the table.

Mixed Asian Salad with Macadamia Nuts

Adapted from Food and Wine
Printable Recipe

SERVINGS: 6

2 tablespoons mayonnaise
1 tablespoon rice vinegar
1 tablespoon white wine vinegar
1 tablespoon soy sauce
2 teaspoons honey
1 teaspoon finely grated fresh ginger root
1 teaspoon Asian sesame oil
1 large garlic clove, minced
1/2 teaspoon Sriracha chili sauce or other hot chili sauce (I used Cholula Chili Lime sauce)
1/4 cup vegetable oil
Salt and freshly ground pepper
1/2 cup macadamia nuts (3 ounces)
1 tablespoon sesame seeds
A clam shell of organic baby mixed greens - about 1/2 to 3/4 pound
1 large cucumber, seeded and sliced

In a blender, combine the mayonnaise, rice and white wine vinegars, soy sauce, honey, ginger, sesame oil, garlic and chili sauce and process to mix. With the machine on, blend in the vegetable oil in a thin stream. Scrape the dressing into a small bowl and season with salt and pepper.

In a medium skillet, cast iron preferably, toast the macadamia nuts over moderately low heat, shaking the skillet, until the nuts are a deep golden brown, 4 to 5 minutes. Transfer the nuts to a plate to cool. Add the sesame seeds to the skillet and toast until a deep golden brown, about 3 minutes. Transfer the sesame seeds to a plate to cool. Coarsely chop the macadamia nuts and mix with the toasted sesame seeds.

In a large salad bowl, toss the baby greens with the sliced cucumbers. Pour the dressing over the salad and toss well. Scatter the toasted macadamia nuts and sesame seeds all over the salad and toss briefly once more and serve.

Wednesday, January 28, 2015

"Ancient" Chinese Chicken with Green Beans and Caramelized Shallots


I use the term 'Ancient' loosely here.  It's not an authentic ancient Chinese recipe but the name given the recipe in an old cookbook of mine from 1986 called "Noteworthy - A Collection of Recipes from the Ravinia Festival"  It's still one of my all-time favorite cookbooks and I love pulling it off the bookshelf every now and then to see if there's anything I may have missed. My original copy was so worn that the pages were falling out but I was lucky enough to find an almost new copy at the local used book store. 

FYI, the Ravinia Festival in northern Illinois is the oldest outdoor music festival in the United States, with a series of outdoor concerts and performances held every summer from June to September. It has been the summer home of the Chicago Symphony Orchestra since 1936 and the cookbook was the project of the Women's Board of the Ravinia Festival Organization. 


I was in the mood for some Asian BBQ chicken, and found this recipe in my cookbook.  I thought I might have a hard time finding the currant jelly and plum jam but luckily, no problem thanks to the popular store brand. The original recipe calls for chicken legs and breasts but I substituted bone-in chicken thighs because they stay so tender and juicy, even after a long cooking time.

Since my husband and I are trying to watch our carb intake during the week, I served the chicken with some sauteed mushrooms (to which I added a little of the chicken spice mixture) and my favorite recipe for green beans with caramelized shallots which I'll also share.  It's a fool proof method for getting tender but not over-cooked green beans, just like you'd get in a restaurant.


Did you know that Chinese New Year is starting on February 19!  It will be the Year of the Goat!  Some interesting facts on the Chinese Zodiac


I also want to thank my friend, Maris, at In Good Taste Magazine and Wüsthof for the opportunity to win two beautiful Wüsthof knives in December.  Thank you, both very much!  I am thrilled with them and the boning knife is perfect for cutting up chicken parts.


"Ancient" Chinese Chicken with Green Beans and Caramelized Shallots

Printable Recipe

Serves 6

12 bone-in chicken thighs trimmed of excess skin (you may use other chicken parts if you prefer)
1/2 cup Canola oil
2 teaspoons Herbes de Provence
2 teaspoons coarse salt (I like to use coarse sea salt)
1 teaspoon freshly ground pepper
2 tablespoons lemon juice

Note: I ground the dry seasonings together in my spice grinder (which is a coffee grinder I use just for spices).  Save any leftover spice mixture to use on sauteed mushrooms or green beans.

For the Sauce:

1-1/3 cups ketchup
2/3 cup red currant jelly
3 tablespoons Worcestershire sauce
2 tablespoons Chinese rice vinegar
1 tablespoon light soy sauce
1/2 teaspoon Tabasco (or Sriracha)
1 teaspoon grated fresh ginger root (or 1/2 teaspoon dry ginger)
1/4 teaspoon Chinese Five Spice powder
1-2 cloves garlic, minced
1/4 cup plum jam (strained if it has large bits of plum)

Preheat oven to 350F.

Arrange the chicken on a rimmed baking sheet. Rub the chicken pieces with oil and then sprinkle the lemon juice, Herbes de Provence, salt and pepper over chicken and cover with aluminum foil. Bake in the preheated oven for about 45 minutes to an hour.

While the chicken is baking, combine all of the sauce ingredients in a heavy saucepan and whisk together. Bring to a boil, reduce heat and cook for 10-15 minutes, stirring occasionally. Set aside.

When the chicken is done, remove from oven, uncover, and drain the juices.

Increase the oven temperature to 400. Baste the chicken generously with the sauce and bake, uncovered for 30 minutes, or until browned. Serve with remaining sauce.

You may also grill the chicken on a medium heat grill, basting frequently with the sauce until browned for about 10 minutes, turning frequently.

Serve with sauteed mushrooms, and,

Green Beans with Caramelized Shallots
Adapted from Epicurious

Serves 4

1 pounds slender green beans, stem ends trimmed
3-4 shallots
1 tablespoons butter
1 tablespoons olive oil
1/4 teaspoon dried thyme (or 1/2 teaspoon freshly chopped thyme leaves are even better)
Have a large bowl of ice water ready.

Bring a large saucepan of water to boil.  Add the green beans and return to a boil.  Cook until just tender, about 6 minutes. Drain and transfer immediately to bowl of ice water to cool. Drain well. (Can be made 1 day ahead. Wrap in several layers of paper towels. Seal in plastic bag and chill.)

Trim ends and peel shallots. Cut lengthwise in half, then slice thickly. Melt butter with oil in heavy large skillet over medium-high heat. Add shallots and sauté 1 minute. Reduce heat to medium-low; sauté until shallots are browned and tender, about 20 minutes. Sprinkle with thyme. Season to taste with salt and pepper. (Shallots can be made 2 hours ahead. Cover loosely with foil and let stand at room temperature).

Add pre-cooked and drained green beans to the shallots in skillet and stir over medium-high heat until heated through, about 6 minutes. Season to taste with salt and pepper.
 

Thursday, March 20, 2014

Mu Shu Pork with Chive Mu Shu Pancakes


Happy first day of Spring everyone!!!

I told you I liked cabbage in my last post so here I am with another delicious recipe loaded with vegetables and another variety of cabbage - this time, Napa cabbage.  Also known as celery cabbage, Napa is a type of Chinese cabbage which originated near the Beijing region of China, and is widely used in Asian cooking.


Mu Shu Pork is made with slow-roasted and shredded pork, an abundance of cabbage, carrot, green onions, mushrooms, bean sprouts and cooked egg, A wrapper is spread with hoisin sauce and the cooked medley is placed over the pancake with more green onion or chives added as a garnish. Roll up and enjoy. It is delicious!

If you think making Mu Shu takes too much shredding, slicing and preparation, do as I did and get most of the prep done the day before.  I slow-roasted the pork, sliced and shredded all of the vegetables and made the Mu Shu pancakes on Sunday afternoon so I could put this meal together quickly on Monday night when my daughters came for dinner.

Mu Shu can also be made with chicken but Mu Shu Pork is a much more authentic Chinese preparation.  You could use a rotisserie chicken if you need a time-saver.  The dark meat would be tastiest in this recipe.


Some people even use flour tortillas as Mu Shu wrappers which is another shortcut and one I used when our girls were in high school and we were all very busy.  I though making them from scratch was fun and much tastier - especially with the addition of chives. I had some chives left from my Colcannon Soup in my last post and though this was a great way to use them.

Click here to watch a great video on making Mu Shu Pancakes.  The method in the video is very similar to the directions I've posted below.


It won't be too long before the chives in my garden start poking out of the ground as well as the first spring-flowering bulbs. Big smile.

Early spring is also a time of several back-to-back birthdays in our family, including our youngest grandson, me, my husband and our oldest daughter - in that order and all within 4 weeks of each other. Mr. Dane just turned two. We celebrate spring in a big way here :)

  
Mu Shu Pork with Chive Mu Shu Pancakes

Serves: 4 to 6

2 tablespoons soy sauce
1 tablespoon dry sherry
1 teaspoon hoisin sauce 

1/2 pound boneless lean pork, slow-roasted and shredded  (see note)
4 dried black mushrooms, soaked for 20 minutes and thinly sliced (I used dried Shiitake mushrooms but use wood ear if you can find them)
2 cups finely shredded Napa cabbage, hard stem removed
1 carrot, julienned
3 scallions, white and light green parts, slivered
1 cup bean sprouts, drained if using canned sprouts

3 tablespoons peanut oil
2 eggs, lightly beaten with 1/2 teaspoon salt
3 cloves garlic, minced
3 teaspoons freshly grated ginger
3 tablespoons chicken stock
2 tablespoons soy sauce
1 tablespoon dry sherry
2 teaspoons sesame oil
1 teaspoon sugar (I omitted)
 

Hoisin sauce for serving

Notes:  The day before, I slow-roasted a small pork shoulder which I had brushed with a Hoisin/Soy mixture (about 1/8 cup each) in my slow cooker for about 5 hours until tender and easy to pull apart.  I shredded the meat and refrigerated in a covered bowl until ready to make the Mu Shu.  I also sliced and shredded all of the vegetables (including the mushrooms and drained bean sprouts) the day before.  I placed them all together in a tea towel and put that inside a plastic bag and refrigerated overnight. I prepared the Mu Shu Pancakes the day before also and when cooled, placed them in a plastic zipper bag in the refrigerator.  Before dinner, I wrapped them in foil and into a warm oven for about 10 minutes.

Combine soy sauce, sherry and hoisin sauce in a bowl. Add the pork, toss to coat evenly, cover, refrigerate and marinate for 30 minutes.   Meanwhile, soak the mushrooms in enough hot water to cover for 20 minutes. Drain and thinly slice.

Heat a wok or very large skillet over medium/high heat. Add 1 tablespoon of the peanut oil and swirl to coat. Pour in the eggs, swirling and tilting the wok to form a thin film. Cook just until the eggs are set and feel dry on top, about 1 minute. Transfer to a platter, let cool slightly and cut into strips about 1/4 inch by 1 inch.


Return the wok to high heat, and swirl in the remaining 2 tablespoons oil. Add the garlic, and ginger, and stir-fry to release the aromas, about 1 minute. Add the pork and stirfry until lightly browned, about 2 minutes. Add the reserved mushrooms, cabbage, carrot, bean sprouts, and scallions, along with the chicken stock, and stir-fry another 2 minutes. Stir in soy sauce, sherry, sesame oil, and sugar, and cook, stirring until sauce boils, about 1 minute. Add egg strips and mix well. 


To serve, spread a small amount of hoisin sauce on a warm Mandarin Pancake. Spoon about 1/2 cup mu shu mixture in center of pancake, wrap like a burrito, folding the ends to close, and serve.

MANDARIN PANCAKES:

Makes 16 pancakes

2 cups sifted flour
Pinch of Salt
1/8 cup finely snipped chives, if desired
3/4 cup boiling water
1 to 2 tablespoons sesame oil


Place flour in a medium bowl and stir in the salt and chives, if using.  Make a well in the center. Pour in the boiling water.  Use a wooden spoon or chopsticks to mix until a soft dough is formed. On a lightly floured surface, knead the dough gently until it is smooth and elastic, about 5 minutes. Cover with plastic wrap and let rest for 20 minutes.


On a lightly floured surface, roll dough into a log, 16 inches long. Cut the log crosswise into 1 inch pieces, shape each piece into a ball, then use your hands to flatten each ball into a pancake. Brush the tops of the pancakes lightly with the sesame oil. Then, place one pancake on top of a second pancake, oiled sides together, so that there are 8 pairs. (Keep covered with plastic wrap until ready to roll). With a rolling pin, flatten each pair into a 6 inch circle. (A tortilla press also works well for this.) Cover the pancakes with a damp towel or plastic wrap to rest.


Heat an ungreased, nonstick skillet over medium heat (I sprayed the pan lightly with nonstick spray). Cook the pancakes, one at a time, turning them over as they puff and little bubbles appear on the surface, until lightly browned, about 1-2 minutes on each side. As each pancake is finished, remove from the pan and gently separate the halves into 2 pancakes while still hot. Stack cooked pancakes on a plate, covered with a towel, while cooking the remaining pancakes.


Serve pancakes warm with Mu Shu Pork. Pancakes may be prepared up to 1 day in advance, wrapped in plastic, and refrigerated. Pancakes may also be frozen. Reheat them by steaming for 5 minutes, or warming them in a 350 degree F oven, wrapped in foil, for 10 minutes.

Tuesday, January 28, 2014

Won Ton Soup with Noodles and Bok Choy


As you may know, this Friday, January 31st, kicks off Chinese Lunar New Year or 'Spring Festival' which lasts until February 14.  This new Chinese Lunar New Year will be the Year of the Horse. You can find some interesting and fun facts about Lunar New Year here. To find out if you were born in a Year of the Horse or what your Chinese astrological sign is, look here.

If you have a favorite team in the Super Bowl this Sunday, whose mascot is a horse,  this may be your lucky year :) 

In honor of the Chinese Lunar New Year, I decided to try making Wonton Soup.  I had never made wonton soup before but was inspired by a lovely post from my friend, Monique, at La Table de Nana.

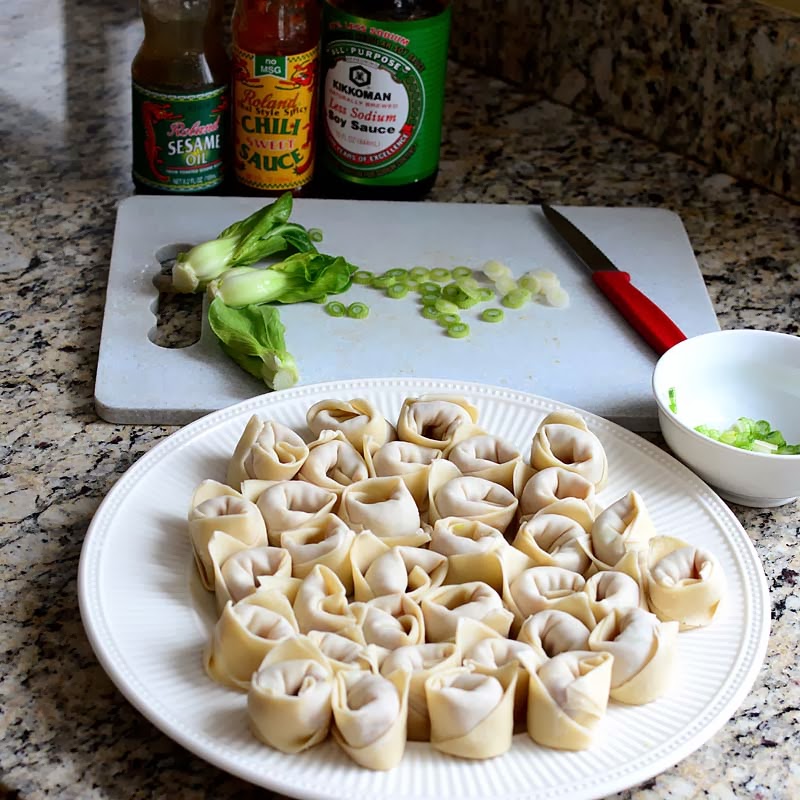
I did a Google search to find out how to wrap wontons and chose the' flower bud' fold simply because I have major spring fever with the brutally cold winter we are having. Thinking of flower buds while making them just made me smile.  The fold is demonstrated in this video along with two other folds.  Making wontons is a little labor intensive but it's relaxing if you do it on the weekend, which I did. 


I also did a few internet searches on wonton soup recipes and, since I wanted a slightly 'heartier' soup for my husband, picked parts of the recipe Monique shared and the one for wonton noodle soup that I found at Steamy Kitchen. I enjoyed the addition of the baby bok choy and the suggestion to serve it with chili garlic sauce on the side.  Delicious!  I had a hard time finding ground pork that I felt was lean enough.  Next time, I may grind my own or have the butcher grind a leaner piece of pork for me.


I am so glad I was inspired to try making wonton soup.  There are many variations you can find and I don't think you can go wrong with any of them. You could even make it totally vegetarian and use a hearty vegetable stock and fill the wontons with a variety of vegetables such as cabbage, carrot, mushrooms, bean sprouts and tofu. Also, if you decide you like it, you can freeze wontons after cooking them and freeze them for a quick meal in the future.  Steamy Kitchen has excellent tips for freezing. 


Happy Lunar New Year to all of my friends and followers and may it be a lucky one for all of you. 

Wonton Noodle Soup with Baby Bok Choy

Adapted from La Table de Nana and Steamy Kitchen

Serves 4-6

¼ pound lean ground pork
¼ pound large shrimp, deveined and chopped
5-6 strands of fresh chives, or 4 green onions, sliced thin (2 for the wontons and 2 for garnish)
1 teaspoon cornstarch (or 1 beaten egg white) as a binder
1 teaspoon sesame oil
1 teaspoon soy sauce
1 teaspoon rice vinegar
1/2 teaspoon sugar
1/2 teaspoon fresh grated ginger root
Cornstarch slurry made with 1 tablespoon cornstarch and ¼ cup water
1 lb of won ton wrappers thawed
6 ounces dried wonton noodles or thin egg noodles
½ pound baby bok choy, rinsed well
2 quarts chicken broth or stock (I always have Kitchen Basics Unsalted Chicken Stock on hand)
salt and pepper

Optional garnishes:
Sesame oil for drizzling over soup
Chili Garlic sauce
Sliced green onions or chives

In a large bowl, combine the pork, shrimp, green onion or chives, cornstarch or egg, sesame oil, soy sauce, rice vinegar, sugar and grated ginger. Mix well. Put a scant teaspoon of filling in the middle of a wonton wrapper, brush cornstarch slurry on all edges. Fold corners together to make a triangle, pressing outward gently to remove any air bubbles. Finish using whatever wonton fold that you wish using extra slurry to secured. Place on clean, dry plate in one layer and cover loosely with plastic wrap or a damp paper towel to prevent drying. Repeat with remaining filling and wontons. My recipe made 32 wrapped wontons.

In a large stockpot, add all the stock and bring to a gentle boil. Add filled wontons and cook for about 2-3 minutes, or until they float to the top. Remove with a spider or sieve and place on a large dish with sides and cover with a damp paper towel.

Return the stock to a boil and add the noodles. Cook according to package directions. During the last 3 minutes, add the bok choy. Add any loose leaves during the last minute. Add salt and pepper to taste.

Return as many wontons that you wish to serve back into the pot to reheat for a minute. Ladle the wontons, noodles, stock and boy choy into serving bowls. Garnish with more chives or chopped green onions, drizzle with a little sesame oil and serve with chili garlic sauce, if desired.

Thursday, May 16, 2013

Sweet and Spicy Cashew Chicken with Quinoa


Here is another quick and delicious meal that I prepared recently when we had our two little grandsons all day and our daughter came for dinner later.  I had seen it on two of my fellow blogger's sites - Highlands Ranch Foodie and Saving Room for Dessert and thought it looked delicious.  It was!


The recipe is originally from Cooking Light and called Honey Cashew Chicken with Rice but the Sriracha adds a nice kick to this dish so I renamed it Sweet and Spicy Cashew Chicken.  Rather than edaname, I used snow peas and instead of rice, I served it with quinoa which made it even more healthy.


I'm a firm believer in getting as many things done in advance as I can on our days with The Boys. I had the vegetables cleaned and cut and the chicken breast cut into pieces the night before. I measured the spices and kept those covered in little prep bowls.  I also had the sauce ingredients mixed together in advance. I made the quinoa in between play times :) All that was left to do was the saute part of the recipe and that is doing is a jiffy!


Sweet and Spicy Cashew Chicken


Serves 4 (serving size: 1/2 cup quinoa or rice and 1 cup chicken mixture)
 
1 cup rice, or quinoa (I use Ancient Harvest brand because it does not need pre-rinsing)

2 (6-ounce) skinless, boneless chicken breast halves, cut into 1-inch cubes (I used 3 breast halves)
2 tablespoons cornstarch
1/2 teaspoon salt
1/2 teaspoon freshly ground black pepper
1 tablespoon canola oil
1 tablespoon dark sesame oil
2 cups broccoli florets
1 cup frozen shelled edamame (green soybeans) (I used Snow Peas)
Water chestnuts - optional
2 garlic cloves, minced
1 medium yellow onion, finely chopped
1 red bell pepper, sliced
1/2 cup dry-roasted cashews, unsalted
1 tablespoon rice vinegar
3 tablespoons honey
2 tablespoons lower-sodium soy sauce
1 tablespoon Sriracha

Cook quinoa or rice according to package directions, omitting salt and fat.

Combine chicken and next 3 ingredients in a bowl; toss to coat.

Heat a large skillet over medium-high heat. Add canola and sesame oils. Add chicken mixture, and sauté for 4 minutes or until lightly browned. Increase heat to high, and add broccoli and the next 4 ingredients (through red bell pepper). Cook 5 minutes or until vegetables are crisp-tender and chicken is done, stirring frequently. Stir in cashews.

Combine vinegar and remaining ingredients in a small bowl; stir with a whisk. Add vinegar mixture to chicken mixture; toss to coat.

Serve with cooked quinoa or rice.

Notes:  The serving sizes noted in the recipe are quite small so for 4 people you may wish to double this recipe.  I used a very large saute pan to accommodate all of the ingredients.

Sunday, February 10, 2013

Chinese Egg Rolls for The Year of the Snake


It's the start of Chinese New Year today - the Year of the Snake. The celebration starts today and goes through the Lantern Festival in 15 days.


To honor the new year, I decided to make homemade Chinese egg rolls. Something I've never attempted before.

I made my own Chinese BBQ pork or Char Siu, to add to the filling. I bought about a pound of 'country style' pork ribs and slow roasted them in the oven. I marinated the pork overnight and cooked the pork yesterday and proceeding with the rest of the egg roll recipe today. It's a process but so worth it! Also great for when the weather outside isn't so nice.


If you don't like pork, you could also add shrimp or chicken or even leave them vegetarian. The filling consists mainly of cabbage and carrots, green onions, re-hydrated mushrooms and fried egg.


After the filling is cooked and cooled, the egg rolls are wrapped. As you can see above, I placed about 1/4 cup of filling at the far end of the egg roll wrapper. An egg white wash is brushed on the two sides closest to you and then you start by wrapping from the far end toward you. Once you get half-way (keep tucking the filling in with your thumbs), bring the two side corners to the center and overlap them. I like to tug the edges together as in picture #5. Then you finish rolling toward you. The egg wash keeps the wrapper together beautifully.  I didn't have any break apart during deep-frying.


I deep-fried mine in my old Presto Fry Baby but you could also spray the outsides with cooking oil and roast them in a very hot oven. I haven't done that but when I share the link to the recipe there will be lots of comments telling you how.


My husband bought some Tsingtao beer for us to drink with our egg rolls tonight :) It came in a beautiful commemorative carrier. I served the egg rolls with purchased Duck Sauce and my favorite soy dipping sauce. I'll share the recipe at the end.

I read that the cooked egg rolls can be frozen very successfully and they reheat beautifully in the oven.


Happy Chinese New Year!

Chinese Egg Rolls

Adapted from Allrecipes
Printable Recipe

Notes: I purchased cole slaw mix as a time saver and added a little extra shredded carrot. Also, I did not use MSG and did not miss it. I used bean sprouts instead of bamboo shoots. My egg rolls cooked faster than the 5-7 minutes stated in the recipe so watch carefully.

4 teaspoons vegetable oil
3 eggs, beaten
1 medium head cabbage, finely shredded
1/2 carrot, julienned
1 (8 ounce) can shredded bamboo shoots or bean sprouts
1 cup dried Chinese mushrooms, rehydrated and sliced thin
1 pound Chinese barbequed or roasted pork, cut into matchsticks
2 green onions, thinly sliced
2 1/2 teaspoons soy sauce
1 teaspoon salt
1 teaspoon sugar
1/2 teaspoon monosodium glutamate

1 (14 ounce) package egg roll wrappers
1 egg white, beaten
4 cups oil for frying, or as needed

Heat 1 teaspoon vegetable oil in a wok or large skillet over medium heat. Pour in beaten eggs and cook, without stirring, until firmed. Flip the eggs over and cook for an additional 20 seconds to firm the other side. Set egg pancake aside to cool, then slice into thin strips.

Heat the remaining vegetable oil in a wok or large skillet over high heat. Stir in cabbage and carrot; cook for 2 minutes to wilt. Add bamboo, mushroom, pork, green onions, soy sauce, salt, sugar, and MSG (if using); continue cooking until the vegetables soften, about 6 minutes. Stir in sliced egg, then spread mixture out onto a baking sheet and refrigerate until cold, about 1 hour.

To assemble the egg rolls, place a wrapper onto your work surface with one corner pointing towards you. Place about 3 tablespoons of cooled filling in a heap onto the bottom third of the wrapper. Brush a little beaten egg white onto the top two edges of the wrapper, then fold the bottom corner over the filling and roll firmly to the halfway point. Fold the left and right sides snugly over the egg roll, then continue rolling until the top corners seal the egg roll with the egg white. Repeat with remaining egg roll wrappers, covering finished egg rolls with plastic wrap to keep from drying out.

Heat about 6-inches of oil in a wok or deep-fryer to 350 degrees F (175 degrees C).

Fry egg rolls 3 or 4 at a time until golden brown, 5 to 7 minutes. Drain on paper towels

Char Siu (Chinese Barbecue Pork)
http://rasamalaysia.com/bbq-pork-recipe-char-siu/2

1 lb pork butt (cut into 4 pieces)
3 clove garlic (finely chopped)
1 1/2 tablespoons cooking oil

Char Siu (Char Siew) Sauce:

1 1/2 tablespoons maltose (I used Agave Syrup)
1 1/2 tablespoons honey
1 1/2 tablespoons hoisin sauce
1 1/2 tablespoons soy sauce
1 tablespoon Chinese rose wine (I used Rice Wine mixed with a few drops of Rose Water)
3 dashes white pepper powder
3 drops red coloring (optional)
1/2 teaspoon five-spice powder
1/2 teaspoon sesame oil

Add all ingredients in the char siu sauce in a sauce pan, heat it up and stir-well until all blended and become slightly thickened and sticky. (It will yield 1/2 cup char siu sauce.) Transfer out and let cool.

Marinate the pork butt pieces with 2/3 of the char siu sauce and the chopped garlic overnight. Add 1 1/2 tablespoons cooking oil into the remaining char siu sauce. Keep in the fridge.

The next day, heat the oven to 375 degree F and roast the char siu for 15 minutes (shake off the excess char siu sauce before roasting). Transfer them out of the oven and thread the char siu pieces on metal skewers and grill them over fire (I used my stove top). Brush the remaining char siu sauce while grilling until the char siu are perfectly charred. Slice the char siu into bite-size pieces, drizzle the remaining char siu sauce over and serve immediately with steamed white rice.

My Note:  I slow-roasted 'country style' ribs in a covered enameled cast iron pot for about 90 minutes.  I then placed them on a baking sheet, brushed them with the remaining sauce and broiled them until nicely charred.

Soy  Dipping Sauce 

1/4 cup soy sauce
1/8 cup rice wine vinegar (or red wine or black)
1/2 teaspoon sesame oil
1 teaspoon chili garlic sauce
1/2 teaspoon minced fresh ginger
1 small clove minced garlic
1 minced green onion
1/2 teaspoon sugar

Stir until blended and serve


Thursday, February 16, 2012

General Tsao's Chicken


I prepared General Tsao's Chicken to honor the start of the Chinese Lunar New Year and found out later that it's not an authentic Chinese recipe at all! 


It was most likely developed in the United States by a Chinese chef and it became an instant success!


Maybe you have ordered this dish at a Chinese restaurant or ordered it to 'Take Out' at some time - I know we have. The fact that it isn't an authentic recipe direct from Asia doesn't diminish how delicious it tastes!

I will warn you that making this dish as written is a rather lengthy process but well worth the effort.  Please see my notes at the end to see how you can prepare this without deep-frying and also be sure to double the sauce in the recipe.  You won't be sorry :) This would also make a delicious appetizer and could be served as you would mini meatballs.

General Tsao's Chicken

Adapted from Allrecipes
Printable Recipe

Servings: 6

Orange zest and whole dried chiles give the sauce a delightful, restaurant quality flavor.

For the chicken - please see my note below if you wish to avoid the deep fry method*

4 cups vegetable oil for frying
1 egg
1 1/2 pounds boneless, skinless chicken thighs, cut into 1/2 inch cubes (you may substitute chicken breast)
1 teaspoon salt
1 teaspoon white sugar
1 pinch white pepper
1 cup cornstarch

For the sauce - please see my note below**

2 tablespoons vegetable oil (or olive oil)
3 tablespoons chopped green onion
1 clove garlic, minced
6 dried whole red chilies
1 strip orange zest
1/2 cup white sugar
1/4 teaspoon ground ginger
3 tablespoons chicken broth
1 tablespoon rice vinegar
1/4 cup soy sauce
2 teaspoons sesame oil
2 tablespoons peanut oil

2 teaspoons cornstarch
1/4 cup water

Heat 4 cups vegetable oil in a deep-fryer or large saucepan to 375 degrees F (190 degrees C).  Using olive oil for the deep frying would be a slightly healthier option.

Beat the egg in a mixing bowl. Add the chicken cubes; sprinkle with salt, 1 teaspoon sugar, and white pepper; mix well. Mix in 1 cup of cornstarch a little bit at a time until the chicken cubes are well coated.

In batches, carefully drop the chicken cubes into the hot oil one by one, cooking until they turns golden brown and begin to float, about 3 minutes. Remove the chicken and allow to cool as you fry the next batch. Once all of the chicken has been fried, refry the chicken, starting with the batch that was cooked first. Cook until the chicken turns deep golden brown, about 2 minutes more. Drain on a paper towel-lined plate.

Heat 2 tablespoons vegetable oil in a wok or large skillet over high heat. Stir in the green onion, garlic, whole chiles, and orange zest. Cook and stir a minute or two until the garlic has turned golden and the chiles brighten. Add 1/2 cup sugar, the ginger, chicken broth, vinegar, soy sauce, sesame oil, and peanut oil; bring to a boil and cook for 3 minutes.

Dissolve 2 teaspoons of cornstarch into the water, and stir into the boiling sauce. Return to a boil and cook until the sauce thickens and is no longer cloudy from the cornstarch, about 1 minute. Stir the cooked chicken into the boiling sauce. Reduce heat to low and cook for a few minutes until the chicken absorbs some of the sauce.

Serve with rice or with steamed broccoli, as I did.  Or both!  Top with additional orange zest and thinly sliced green onions, if desired.

If you wish to avoid the deep-frying method, use chicken breast cubed and seasoned.  Saute in a little oil until cooked, about 5-10 minutes, depending on the size of the cubes. Simply add the sauteed cubes to the finished sauce as stated above.

**The sauce it so good, I advice doubling the sauce ingredients!

Thursday, January 26, 2012

Glazed Asian Drumsticks


If you love chicken legs but don't like all of the fat contained in the skin, here is a wonderfully delicious recipe for low fat drumsticks with an Asian flair. Browsing through the list of ingredients in the recipe, I just knew that the sauce and glaze on these was going to be fabulous and oh my, it was! I first found this recipe on the blog, Six Sisters' Stuff, but the original recipe comes from Skinnytaste - a great source for low fat recipes.  I served the drumsticks with a quinoa pilaf and steamed broccoli, rounding out a great-tasting and healthy dinner.


I found the easiest way to pull off the skin from the drumsticks was to loosen the skin from the wide part of the drumstick and grab it with a piece of paper toweling over my fingers then pull down and over the small end of the drumstick.  Then, I used my kitchen scissors to cut the skin away.


Sticky, moist and delicious!

Glazed Asian Drumsticks

Adapted from Asian Glazed Drumsticks at Skinnytaste
Printable Recipe

8 medium chicken drumsticks, skin removed
Non-stick cooking spray or 1 Tablespoon of Olive Oil
1 cup water
1 tablespoon Sriracha hot sauce*
1/2 cup balsamic vinegar
1/2 cup soy sauce
1 tablespoon sugar
3 cloves garlic, minced
1 teaspoon fresh ginger, grated**

2 tablespoons chives or green onions, chopped
1 teaspoon sesame seeds

*You can find Sriracha Sauce at most grocery stores and at Walmart.
** Tip - you can keep whole pieces of ginger frozen. Simple peel away the skin and grate. Place remaining ginger back in the freezer for next time!

Spray a large, heavy saucepan with non-stick spray or add 1 tablespoon of olive oil and place over medium high heat. Brown chicken legs for about 10 minutes, turning to brown all sides.

Add water, balsamic, soy sauce, sugar, garlic, ginger, hot sauce and cook on high until liquid comes to a boil. Reduce heat to low and simmer, covered for about 20 minutes.

Remove cover and bring heat back to medium high, allowing sauce to reduce down, about 10-15 minutes, or until it becomes a thick glaze, turning chicken occasionally. Be careful that the glaze doesn't burn during this last step.

Transfer chicken to a platter and top with remaining glaze from pan. Sprinkle with chopped chives or green onions and sesame seeds.