Showing posts with label sweet breads. Show all posts

Monday, February 10, 2020

Chocolate Babka with Caramelized Oranges


I'm proud to say that I've made my first babka!  This babka recipe is seriously Valentine worthy should you be so inclined to treat the loves in your life!

I'm a little late to the babka party but I had never tasted one until recently.  There is a wonderful bakery where I buy the best bread in town when I entertain.  I follow them on Instagram @rocketbabybakery and noticed that they were selling individual-sized chocolate and orange babkas so I ordered one the last time I needed bread for company.  It was love at first bite!  Theirs was filled with candied orange peel and chocolate chips, a delicious combination.


I tried in vain to find good candied orange peel.  The huge bags sold on Amazon didn't appeal (pun attended).  Then, in my online search, I found a great YouTube video (click on link) on how to make caramelized orange slices at home.  I must say they turned out great and I was able to use organic oranges and felt better about eating orange peel without any residual pesticides.


The only minor mishap with the babka recipe was the melted chocolate filling.  It was so runny that when I tried rolling up the dough after adding the filling, much of the filling pooled at the end of the roll, making distribution of the filling uneven.  Next time, I would let the filling cool enough to thicken but still remain spreadable so it stays in place better, or just use chocolate pieces as the bakery did.


This recipe makes two large loaves and one mini loaf, using the scraps of dough.  If you don't have a mini loaf pan, you could use another other small baking vessel, or use muffin cups.


Babka, or Kranz cake, is originally from Poland and a traditional filling is made with cinnamon sugar and raisins, as well as chocolate, which became very popular in New York bakeries. The name babka means Grandmother in Polish. If you are my age, you probably remember the Seinfeld television comedy series episode where Jerry and Elaine go to the local New York bakery to buy a chocolate babka to give as a gift at party they were going to,,,but the person in line ahead of them buys the very last babka.  So funny. Even saying the name babka makes me smile.

Speaking of loves, my two daughters are great skiers.  The first one loves Jackson Hole, Wyoming and the second loves teaching her sons how to ski at the local ski hill.  We just received a lot more snow to keep the family fun going!


I hope this recipe makes you smile!  Happy Valentine's Day!

Chocolate Babka with Caramelized Oranges


Printable Recipe

My Notes:

I made the dough through the first rise in my bread machine.  If you don't have one, just use the instructions below.

To make the lukewarm milk/water mixture, place milk, 1/4 cup cold water in a bowl. Add 1/4 cup boiling water.

It's best to make the babka dough, fill it and roll it the day before and refrigerate overnight, if possible.  If not, freeze the rolled logs for 15 minutes before cutting.

5 cups all-purpose flour (divided)
1 package (2¼ teaspoons) instant yeast
1/2 cup cold milk
1/4 cup cold water
1/4 cup boiling water
1 tablespoon kosher salt
¼ cup honey
½ cup avocado oil or other neutral oil
2 eggs, at room temperature
2 teaspoons vanilla extract

Filling:

Note:  I suggest letting the chocolate mixture cool until it is thicker and therefore stay in place inside the dough better when rolling.

¾ cup (130 grams) dark chocolate chips or chopped dark chocolate
½ cup (1 stick | 120 grams) unsalted butter
½ cup (50 grams) powdered sugar
⅓ cup (30 grams) cocoa powder
1/3 cup diced caramelized oranges (See recipe below) or dehydrated orange peel

Syrup:

⅓ fresh-squeezed orange juice
6 tablespoons sugar

First make the lukewarm milk/water mixture by placing 1/2 cup cold milk and 1/4 cup cold water in a large bowl such as an 8 cup pyrex bowl .  Add 1/4 cup boiling water to make lukewarm mixture.

Whisk one cup (128 g) of the flour with the yeast and stir in the lukewarm milk/water mixture until combined. Cover with plastic wrap or dish towel and let rise about 30-45 minutes or until it looks bubbly.

Add the yeast mixture and the rest of the dough ingredients to your bread machine and set to dough cycle (about 1-1/2 hours).  If you're not using a bread machine, proceed as follows:

Directly into the yeast mixture bowl, add the salt, honey (or sugar), oil, eggs, zest and vanilla. Stir with a spatula or spoon until well mixed, then add the remaining four cups (486 g) of flour. Stir with a spoon until dough forms a sticky mass. Turn dough onto lightly floured work surface and knead for just a few minutes, until dough becomes smooth. Transfer to a lightly oiled bowl, cover it with dish towel or plastic wrap and let it rise in a warm spot until doubled in bulk, one to two hours or longer depending on the temperature of your kitchen. (To create a warm place to rise, see notes above.)

Make the filling: Melt butter and chocolate together until smooth.  I prefer using a microwave, stirring after 30 second intervals until chocolate is melted, this should only take 1 minute, 30 seconds.  Stir in powdered sugar and cocoa until smooth. Cool until thickened slightly.

Punch down the dough and divide it in two equal parts.  Using a rolling pin, roll one half into a rectangle about 10- to 11-inches in width by 14- to 16-inches in length. Spread half of filling over top leaving ½-inch border all the way around. Starting from the short end, roll into a tight coil. To help keep coil bound, I wrap it in parchment paper and transfer it to a rimmed baking sheet. Repeat with remaining dough and filling. At this point, I place the logs in a glass baking dish and cover loosely with plastic wrap as the dough will continue to expand.  Chill overnight.   If you don't have time to refrigerate, place loaves in the freezer for 15 minutes .  Rub two 9-by-4-inch loaf pans and one small vessel such as a mini loaf tin, with butter.  Place parchment paper in each pan from side to side with a slight hangover, so make removing baked bread easier.

Place chilled logs on a cutting surface. Trim last inch (or less) off each log and reserve. Cut the logs in half lengthwise and lay them next to each other cut sides up. Lift one half over the other and twist each around the other.  Here is a great video on how to fill, cut and braid the logs. You can also see the proper way to place the parchment in the pans from the video. Transfer the twist into the prepared loaf pan. Don't worry if they're not perfect, just tuck under the ends. Repeat with remaining two halves. Place trimmed ends next to each other into the mini loaf or other small baking dish. Cover pans with plastic wrap and let rise 1 to 1½ hours at room temperature or until dough has risen and is filling the pan.  If your kitchen is cool, just start your oven for 1 minute, turn off, and place the loaves inside until time to bake. Remove plastic wrap.

Heat oven to 375°F and place a large sheet pan on the center rack. Place loaf pans on the sheet pan and bake for about 30-35 minutes. The mini loaf will only take about 20 minutes.  Cover the loaves with foil if they are browning too quickly.

Make the syrup while the babkas are baking.  Mix orange juice, water and sugar in a small saucepan and bring to a low boil to dissolve sugar, stirring occasional. Remove from heat and reserve. Remove babkas from oven, and evenly brush the syrup over the loaves.  Let loaves cool completely in loaf pan.  They will be easier to slice if refrigerated for 15 minutes to allow the chocolate to harden a bit.

Recipe adapted from Alexandra Cooks, Epicurious and inspired by Rocket Baby Bakery.

Caramelized Oranges

Adapted from an Instru ctional Video on YouTube

2 oranges (organic preferred to avoid pesticides)
1 cup (200g) sugar
1 teaspoon vanilla extract
2/3 cup (150 ml) water

Bring a saucepan of water to boil.  Cut oranges into slices about 1/4 inch thick place them in a bowl. Pour the boiling water over them and let the slices sit in the hot water for 2-3 minutes.

Remove slices from the water and arrange orange slices on a paper towel and pat dry. Place slices into a large saucepan or frying pan large enough to fit the orange slices.

Add the sugar, vanilla extract and water to a small saucepan and cook until the sugar dissolves. Pour the syrup into the saucepan with the orange slices and cook on medium heat until the white part of the orange peel is transparent and much of the syrup evaporates.

Preheat oven to 210°F/100°ะก.  Remove orange slices and spread them out a baking sheet lined with foil, parchment paper or silicone liner.

Dry the orange slices in the preheated oven for 20 to 30 minutes.

After slices are cool, place them in a container in single layers separated by wax paper or parchment paper and refrigerate until ready to use.

Tuesday, October 8, 2019

Pumpkin, Date and Nut Bread


I know you've likely been inundated with pumpkin recipes at other blogs you visit, Instagram, Pinterest or your local newspaper ever since fall arrived, so I apologize...a little :)  Because, if you make one pumpkin bread this season, I'd really like you to try this one.  Not a fan of dates or can't eat nuts?  Just leave them out.  The bread is delicious on it's own.  


I first became aware of this recipe when Barbara, an Instagram friend of mine, shared it recently.  Since I love dates and nuts, and pumpkin of course, I was excited to make it.

The recipe was published in Maida Heatter's Cakes cookbook.  I adapted it slightly by using less cloves and adding a generous sprinkle of raw sugar on top of the unbaked loaves.  I also used my Wilton 4-cavity mini loaf pan.  The small loaf size is perfect for my husband and I can freeze the other loaves to enjoy later. 

Delicious with a cup of coffee in the morning or tea in the afternoon!  It's a keeper!


I have to share some photos of an exhibit we visited last weekend.  We are so fortunate to have China Lights, also known as the Asian Lantern Festival on display near us right now.  The gorgeous displays are handcrafted by Chinese artisans, some of which are 150 feet high.  This year, the theme is Chinese Treasures and Endangered and Extinct Animals. One of the exhibits was a replica of the Terra Cotta Warriors discovered buried in an emperor's tomb, and another spectacular exhibit is of a huge dragon and baby dragon. We were so happy we chose of the few nights it didn't rain last week! 


If you have the opportunity to visit this exhibit on display near you, do not hesitate.  It's beautiful!  

Then, have some pumpkin bread when you return home :)  

Pumpkin Date and Nut Bread


2-1/2 cups AP flour
2 teaspoons baking soda
1/2 teaspoon salt
1-1/2 teaspoons cinnamon
1/4 teaspoon ground cloves
2 eggs
3/4 cup white sugar
3/4 cup light brown sugar, firmly packed  
1/2 cup avocado oil, or other healthy oil
1 can of your favorite brand of canned pumpkin (15 oz)
8 ounces (1 cup) pitted dates, cut up (see note)
4 ounces (1 cup) walnuts, broken or coarsely chopped

1-2 tablespoons of raw sugar for sprinkling on top of the loaves, optional

Notes.  I used a kitchen shears to first cut the dates in half lengthwise and then cut each half into 2-3 crosswise pieces. I used my Wilton 4-cavity mini loaf pan and had just the right amount of batter to fill the 4 cavities.  

Preheat oven to 350 and place rack to the lower third of the oven. Butter or spray a 10x5x3 inch loaf pan  and dust with fine bread crumbs. (I used Baker's Joy baking spray and did not use bread crumbs).  

Sift together the flour, baking soda, salt, cinnamon and cloves and set aside. 

In a large bowl, with a hand mixer set on low, beat the eggs just until combined.  Add the sugar, beating just to blend. Add the oil, beat just to blend. Mix in the pumpkin, then add the dates. Add the flour mixture and stir or beat only until it is blended, then stir in the nuts.  Pour the mixture into the prepared pan(s) and smooth the top.  Sprinkle with a little raw sugar over the top of each loaf.  

If you are using a large pan, bake for 70-80 minutes. If using smaller pans, baking time will be less, about 45-55 minutes. Start checking the loaves with a clean toothpick before the recommended time is over as all ovens are different.  The toothpick inserted in the center of the loaf should come out clean. Cool in the pan(s) for 15 minutes before removing to cool on a rack.

Cover and store at room temperature or refrigerator for several days or wrap in plastic wrap and freeze for up to 2-3 months.  

Recipe adapted from Maida Heatter's Cakes cookbook.

Note: Savoring Time in the Kitchen is a member of the Amazon Affiliate Program. If you purchase a product by following a link that we provide, the price you pay as a consumer does not change, but if you do make a purchase through one of these links, we earn a very small commission for providing that link. Thank you for your support of Savoring Time in the Kitchen!

Wednesday, April 3, 2019

Sugar Knot Rolls, Easter Preps and Birthdays!


Easter is coming soon and if you're looking for a wonderfully soft and delicious sweet bread for your Easter brunch I have a great recipe for you!  Inspired by my blogging friend, Juliana, at Color Your Recipes, this bread incorporates the Tangzong or water roux method.  I have been wanting to try this method of bread-making for a long time and finally got around to making some this week.


The bread is so soft and fluffy inside it's almost like eating cotton candy! Delicious on it's own with butter or jam, baked with a sugar topping as Juliana did, or drizzled with glaze and sprinkles like mine.  You can visit Juliana's website to get the recipe and her tips by clicking the link above or also see the recipe with my tips below.


The end of March and beginning of April is always such a fun and busy time here as we celebrate three birthdays in our immediate family in the course of 2-1/2 weeks.  Mine is first in March, followed by my husband's, exactly one week later, and then our oldest daughter's birthday is 9 days after that.

We had a big family dinner party last weekend at our home and celebrated all three at the same time.  Gifts and cards from dear friend's arrived early...


Thank you, Dear Monique!  We have been cyber 'Peas in a Pod' for can it be 25 years now?  We share a love of gardening, painting, cooking and baking among many other parallels in our lives. The gift of friendship is the most valuable and cherished.  ♥


Our middle grandson, Dane who just turned seven shortly before my birthday, gifted both my husband and me with one his original pieces of artwork.  I love his artistic expression!


I've also been doing a little painting of my own for Easter.  I got the idea for the flower painted eggs from Lucy at Craftberry Bush.  Hers are so much better than mine!  I tried a few of her poppy designs and then decided to paint some of the spring flowers that grow in my garden.


I found the faux eggs I used at Walmart.  I love to have a few dozen on hand so I can let my grandsons decorate their own eggs and take them home.  No fear of broken or smelly eggs :)

Enjoy!

Sugar Knot Rolls

Printable Recipe

Makes about 12-14 knot rolls, depending on size. It helps to have a digital scale that measures in both grams and ounces.  In parenthesis I tried to give alternate measurements.

Note:  I started making the bread dough in the afternoon and put the dough in the refrigerator for the first rise overnight.  In the morning, it had tripled in size and was ready for forming into rolls.

Tangzhong or water roux:

50 grams (1/3 cup + 1 tablespoon + 1 teaspoon) bread flour
250 milliliters (1 cup) water

Bread dough:

550 grams (3-1/4 cups) bread flour
90 grams (1/3 cup) sugar
7 grams (1-1/4 teaspoon) salt
7 grams (1-1/4 teaspoon or one packet) yeast
20 grams (4 tablespoons) non-fat dry milk
2 very large eggs (minus 1 ½ tablespoon), approximately 100 grams. Save what's left for the egg wash.
65 grams (1/3 not-quite-full cup) heavy cream
70 grams (5 tablespoons) butter, softened

Glaze (Optional)
1 cup powdered sugar
1/2 teaspoon vanilla
Milk stirred in to obtain drizzling consistency. Perhaps 2-3 tablespoons.

First make the water roux. In a small saucepan, whisk together the water and flour until well-blended and free of lumps. Cook over medium heat to the temperature of 65C/150F, whisking constantly, until mixture thickens. This will take 2-4 minutes. When done, it should have the consistency of custard and the whisk should make visible lines in the bottom of the pan. Remove from heat and transfer to a bowl. Cover with plastic wrap to keep a 'film' from forming. Cool. The roux can be kept in the refrigerator for 48 hours until ready to use.

To make the bread dough, in the bowl of a stand mixer with dough hook, place all of the cooled roux. Then add all of the other ingredients for the bread dough, except for the butter. That will be added after the first 'mix'. Turn the mixer on low and stir for 2-3 minutes. Increase mixer speed to level 2 and let it mix for 15 minutes. The dough will be sticky but do not add any more flour. As the dough mixes and the gluten forms it will become less sticky.

Add the softened butter and mix for another 15-20 minutes. To test if the dough is ready, take out of small, golf ball sized portion of dough and slowly stretch in all directions. This is called the windowpane test. If the dough is elastic enough the dough will not tear and you should be able to see light and shadows through the dough. If it tears, return to the mixer and mix for another 2-3 minutes and test again.  Here is a short video on the windowpane dough test:  Click Here.

Remove dough from the mixer and place into a large bowl and cover with plastic wrap. Allow dough to triple in size. This may take quite a while, depending on the temperature in your house. I placed my dough in the refrigerator overnight and the dough had tripled in size by morning.


To make the rolls, remove dough from bowl and deflate by pushing it down. Divide into about 12-14 balls of about 75 grams each pr about 2-1/2 inches round. To make the knots, roll out a rope from one ball of dough, about 12-14 inches long. Then tie the rope into a knot, tucking one end underneath and the other end bring over the top and push through the hole in the center, like a pretzel. Or twist into any shape you wish. Place each roll on a large, rimmed baking sheet lined with parchment or a silicone liner. Cover the rolls with plastic wrap and allow to double in size.

When they are almost fully doubled in size, preheat the oven to 350F. Brush the top of the rolls with the reserved egg with a 1 tablespoon of water added to it. You can either sprinkle the rolls now with sugar before baking, or bake, allow to cool, and then drizzle a glaze over the top and then sprinkle with colored decors or sugar.

Sunday, March 17, 2019

Banana Date Muffins and California Dreamin'


Here we are in the last few days of winter! Even though it will officially be spring by the end of this week, and temperatures are starting to warm a bit, our heat is still on and evening temps hover around freezing. There are signs of spring, however, and I see tiny sprouts of scilla and crocus popping up through the cold, wet soil, which is a feast for the eyes after our long, snowy winter. 

The last week of February and first week of March, my husband and I were very fortunate to escape the Wisconsin winter and traveled to Palm Desert, California where we enjoyed golfing, hiking, green grass, flowers and palm trees with a group of close friends.  This trip to California and California dates were the inspiration for my recipe, which you will find below.  


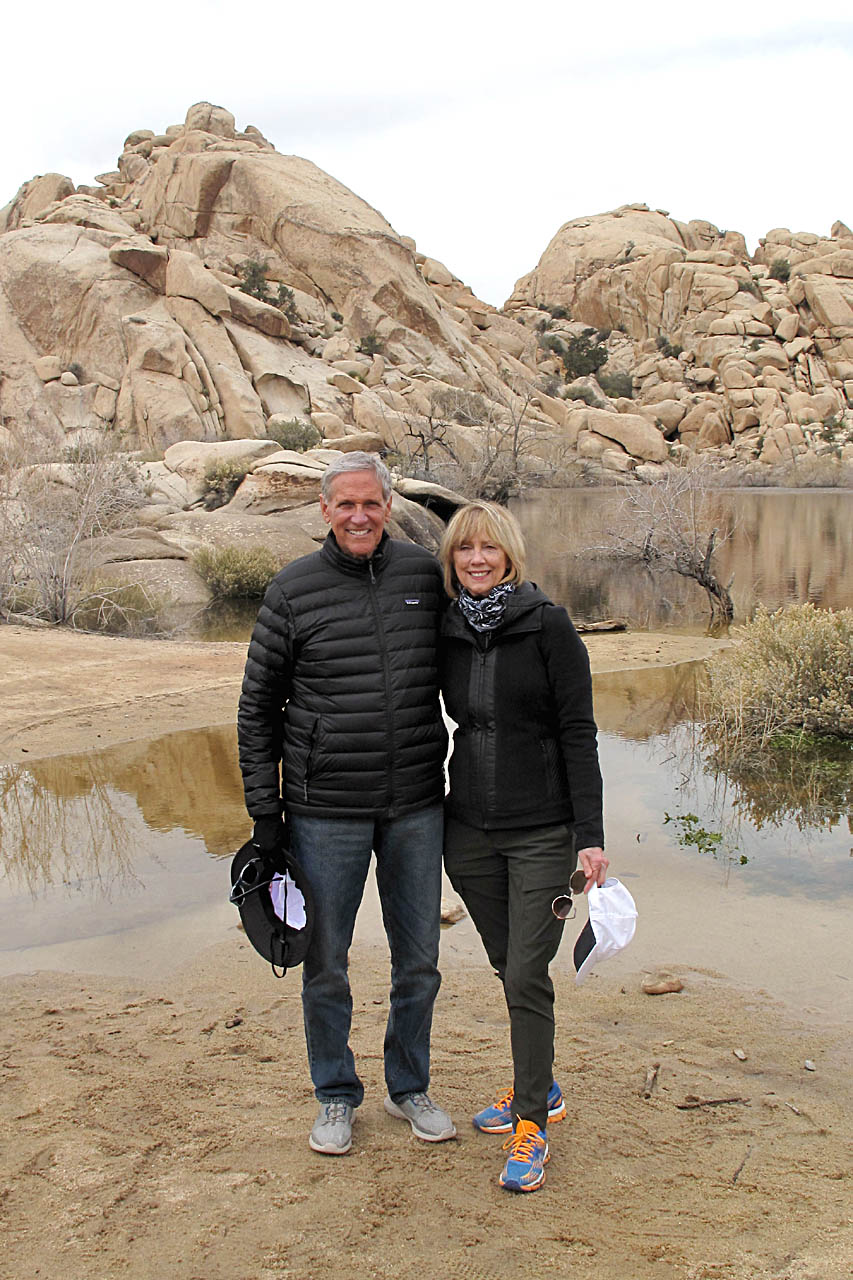
On our first hike, we returned to one of our favorite places to visit, Joshua Tree National Park.  Last year, we hiked the Hidden Valley Trail and this year we decided on the Barker Dam Trail.  Here we are in front of the pond created by Barker dam which was built by local cattlemen in 1900.  The water was originally a catch basin for natural rainfall and springs and the dam helped to retain the water.  The water attracts a variety of desert wildlife and birds.  Cattle ranching is not longer viable in this area since rainfall has decreased and springs have dried up.      

As you can see by the way we're dressed, it's much cooler in Joshua Tree than in the valley where we were staying due to the difference in elevation of almost 3,000 feet.


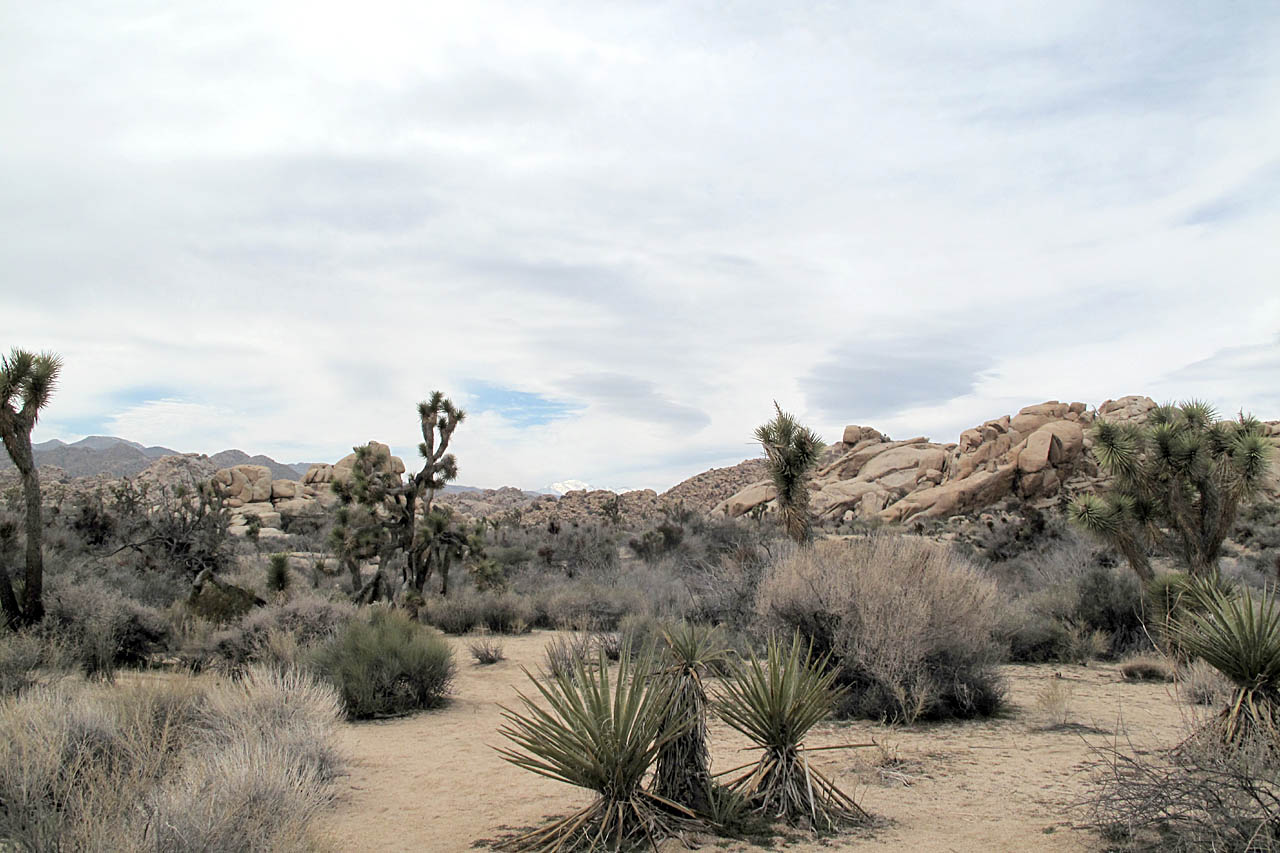
You can tell how high the elevation is at Joshua Tree by seeing the snow-capped peaks in the distance which weren't that much higher!  


An iconic view of sand, boulders and Joshua Trees. Bouldering is very popular in this part of the park and we saw several young people with their bouldering 'mats'.


One of the most interesting things to see on the Barker Dam trail are the 1,000-year-old Indian petroglyphs hidden within the rock formation above.


As you get to the opening in the boulder, the shelter of the overhanging rock is filled with petroglyphs (which are different from pictographs as they are carved into the stone rather than painted on the surface).


Unfortunately, the petroglyphs were vandalized at some point and someone painted over them.  I read one version of the story which said it was a Disney film crew that painted them to make them show up better while filming a movie in 1961 but I can't say if that story is true as I only found one mention of it. 


Our other hike took us to the Thousand Palms Oasis Preserve, not far from where we were staying.

Above is the McCallum Pond, which is a true palm oasis and desert wetland in the middle of the sandy desert. The oasis was formed by a branch of the San Andreas Fault. Water has found it way up to the surface by weaknesses in the earth caused by the fault, creating this beautiful and natural habitat, which provides water and shelter for a variety of wildlife.

Within a few hundred feet from the oasis the desert was in full bloom! We were so fortunate to see the desert flowers in bloom because of recent rains. It was a glorious sight and the scent of the flowers filled the air.  


 Native verbena and bright yellow brittlebush carpeted the hillsides where we hiked.


My husband and I hiking the Moon Country Trail where we also saw wild campanula, desert daisies and wild lupines in bloom.


The bounty of the Coachella Valley finally brings me to my recipe for Banana Date Muffins!

This part of the California desert, and stretching to Yuma, Arizona, produces the majority of dates available for purchase in the United States.  Date palms were brought to the United States in the late 1700s by missionaries but superior crops weren't introduced until the USDA went looking for crops to plant that would thrive in the U.S.  The temperatures and soil in the Coachella Valley are so similar to the arid Middle East and Sahara Desert that offshoots of those highly productive trees were planted and cultivated in California around 1900.  Now date palms are grown on over more than 6,500 acres and produce more then 40,000 pounds of dates harvested per year.  I brought home both Medjool and Deglet-Noor dates from our trip. As you might guess, I LOVE dates!


The smaller dates on the left are Deglet-Noor and the huge ones on the right are Medjool, both sweet and delicious but I've never seen such large Medjool dates available for purchase here.  Despite their higher calories, dates are highly nutritious and have antioxidant value which you can read about here.

I've been making this banana bread recipe for over 20 years and it still remains my favorite.  I decided to switch up my recipe and add some of my precious California dates, spices and fresh orange zest.  I love how they turned out.  

Banana Date Muffins

Printable Recipe

Yields 11-12 muffins (depending on how you fill the cups or 1 - 9" x 5" loaf, recipe is easily doubled.

6 tablespoons butter, softened
3/4 cups granulated sugar
2 eggs, beaten
2 cups all-purpose flour
2 teaspoons baking powder
1/4 teaspoon baking soda
1/4 teaspoon salt
1/4 teaspoon ground cardamom
1/4 teaspoon ground cinnamon
1-1/2 cups mashed overripe bananas (about 3-4)
1/2 teaspoon (packed) grated orange zest
1/2 cup finely diced pitted dates

Topping:

1 cup chopped pecans
2 tablespoons brown sugar

Preheat oven to 350 degrees. Line muffin pan with paper liners or lightly butter a loaf pan (or use a baking spray with flour added). Mix topping ingredients of chopped pecans and brown sugar together and set aside.

In a large bowl, or stand mixer, cream butter and sugar. Add eggs and mix well. Sift together flour, baking powder, baking soda, cardamom, cinnamon and salt. Add alternately with bananas to egg mixture, then mix in orange zest. Fold in chopped dates.

Pour into prepared muffin cups or loaf pan and top with the pecan/brown sugar mixture and bake in 350 degree oven for about 25 minutes for muffins or about 60 minutes for loaves, depending on the size of the pan you are using. Check to make sure a toothpick inserted in the centers out clean as all ovens are different.

Cool in pans 5 minutes and then remove to a rack to cool completely.

Friday, February 22, 2019

Blueberry Pecan Muffins


Happy last week of February, friends! As I type this post,  I'm watching snow flying outside my window. AGAIN. I think this winter calls from some TLC, don't you?  These blueberry muffins with a crunchy pecan topping fits that prescription perfectly!  You may even have everything you need to make these in your frig, pantry and freezer right now.


I recently came across a recipe for a blueberry cake in Food 52's Genius Desserts cookbook.  I decided to convert the recipe into jumbo muffins.  I love how easy muffins are to freeze and take one out at a time to enjoy.  Both my husband and I really enjoy these as a treat at breakfast or with tea or milk in the afternoon.  The little bit of cornmeal gives them a wonderful texture and color.  I added a simple streusel topping made without butter for a bit of delicious crunch.


If you're using frozen blueberries, it's a good idea to rinse them well under cold, running water and then pat them dry before adding them to the batter.


If you're as winter-wearing as we are, I hope this video of my 3-year-old grandson brings a smile to your face.  He loves playing the keyboard at Nana and Papa's house ♥  Priceless!

Blueberry Pecan Muffins


Makes 6 extra large muffins or 12 regular size muffins.  I found the paper jumbo muffin cups on Amazon.

1 cup all purpose flour
3 tablespoons ground cornmeal
1 teaspoon baking powder
1/4 teaspoon salt
1/2 cup butter, softened
1 cup granulated sugar
2 large eggs
1/3 cup milk
2 teaspoons vanilla extract
3/4 teaspoon grated orange zest (use organic, if possible)
1-1/2 cups fresh or frozen blueberries

Simple Streusel:
2 tablespoons brown sugar
1 cup chopped pecans

Place rack in center of oven and preheat to 350F .

Line muffin pan with paper liners or use jumbo muffin cups that don't need a muffin pan. I found mine here.

For the streusel, mix together the brown sugar and chopped pecans until blended together and set aside.

Add flour, cornmeal, baking powder and salt in a large bowl and whisk together.

Using a stand or hand mixer, cream together the butter and sugar until smooth. Add the eggs, milk, vanilla and lemon zest and beat until well incorporated. Don't worry if it looks a little curdled. Add the flour mixture and mix just until the flour is incorporated. Fold in the blueberries just until combined.

Fill muffin cups about 3/4 full and top with a generous amount of streusel on the top of each muffin.

Bake muffins until golden and nuts are browned and a toothpick inserted comes out clean. This will take about 20-25 minutes for standard-sized muffins and 30-35 minutes for large muffins. Oven temperatures vary so check often toward the end of baking.

Adapted from Genius Desserts

Tuesday, November 13, 2018

Pumpkin Apple Bread with Sunflower Seeds


If you love the taste of pumpkin bread and apple bread,  here is a delightful recipe that contains both! My husband is not a big fan of pumpkin and won't touch pumpkin pie at Thanksgiving but he loves this pumpkin apple bread.


Also filled and topped with healthy, crunchy sunflower seeds you will have a hard time stopping at one slice!

Wondering what those little green spots are inside the bread?  Sunflower seeds contain cholorophyll, which is also know as chologenic acid, one of their healthy attributes.  When they are baked in a recipe with baking powder or soda, they turn green.  There is absolutely no difference in taste whatsoever.  If the sight of green specks doesn't appeal to you, simple substitute chopped walnuts in the batter and save the sunflower seeds to sprinkle on top.


The original recipe calls for boiling apple cider to a condensed syrup but that takes a lot of time so I substituted unsweetened apple sauce for the apple cider.  I found some organic Gravenstein applesauce at my local grocery store which worked beautifully.


I used my Wilton 4-cavity mini loaf pan but had quite a bit of batter left after filling them, so I used it to make muffins.  The mini loaves and muffins are the perfect size for the two of us!  They would also make wonderful gifts during the holidays or for breakfast and brunch if you have having friends or family staying with you. They freeze beautifully!

Pumpkin Apple Bread with Sunflower Seeds

Printable Recipe

Makes 2-3 large loaves (I made 4 mini loaves plus a few muffins)

1-1/2 cups whole wheat flour
1-1/2 cups all-purpose flour
2-1/4 teaspoons pumpkin pie spice (or make your own using 1 1/2 teaspoons ground cinnamon, 1/2 teaspoon ground nutmeg, 1/4 teaspoon ground ginger and 1/8 teaspoon ground cloves)
2 teaspoons baking soda
1 teaspoon salt
1 cup granulated sugar
1 cup packed brown sugar
1 cup sunflower or other mild vegetable oil
4 eggs
2/3 cup unsweetened applesauce
1 15-ounce can pure pumpkin puree
1-1/2 cups finely chopped, crisp sweet apples such as Gala or Fuji, preferably organic
1/2 cup roasted sunflower seeds* or chopped walnuts

Notes:  If you have more batter than loaf pans, you can use the extra batter to make muffins.  Baking instructions below.

*Don't be alarmed if the sunflower seeds turn green around the edges inside the loaves during baking.  This is due to the natural chlorophyll in the sunflower seeds.  There will be no difference in taste whatsoever.  If the green color doesn't appeal to you, simply sprinkle the sunflower seeds on top and use chopped walnuts in the batter.

Grease loaf pans with butter and line with parchment or spray with a baking spray that contains flour, such as Bakers Joy.

In a large bowl, combine whole wheat and all-purpose flour, pumpkin pie spice, baking soda and salt.  Stir to blend.

In an extra-large mixing bowl, such as the bowl of a stand mixer, combine granulated sugar, brown sugar and oil. Beat with electric mixer on medium speed until well mixed. Add eggs, one at a time and beat well. Add half of flour mixture and mix, then half of applesauce and mix, repeating with remaining flour mixture and applesauce, beating on low speed after each addition just until combined. Beat in pumpkin puree until combined. Then, fold in apples and sunflower seeds. Fill loaf pans 3/4 full and spread evenly. If making muffins, place muffin liners in muffin pan and fill cups 3/4 full.

Bake loaves in a 350 degrees oven for 55 to 60 minutes for 9 x 5-inch loaves, 45 to 50 minutes for 8 x 4-inch loaves or 40 to 45 minutes for 7-1/2 x 3-inch loaves, or until a toothpick inserted near centers comes out clean.  Bake muffins for 25 minutes.

Cool on wire racks for 10 minutes. Remove from pans. Cool completely before slicing.

Freezes well.  Wrap in plastic wrap and then aluminum foil to freeze.

Friday, May 11, 2018

Chocolate Sour Cream Coffee Cake for Mom (or You)


Here's a perfect treat to bring to Mom on Mother's Day.  Easy to make and so delicious!  Chocolate Sour Cream Coffee Cake.


Better yet, bring a pot of coffee and some flowers and share it her :)  She would love that.


My husband's grandmother made the best Sour Cream Coffee Cake.  When she made it, she would always make enough for the church bake sale plus send small aluminum tins of it home with any family member who visited her.  I think this one may have just bested Grammie's.


There's a good chance you have everything you need to make this already in your pantry and frig.

Wishing all of my lovely friends a Happy Mother's Day!


Chocolate Sour Cream Coffee Cake

Printable Recipe

Serves 8 to 12 using a 9-inch square baking pan

Topping:

1/2 cup light brown sugar
1 tablespoon cocoa
1 teaspoon cinnamon
1/2 cup chocolate chips (I coarsely chopped them)
1/2 cup chopped pecans
1/4 cup (1/2 stick) butter, melted and cooled

In a large bowl, stir together the brown sugar, cocoa, cinnamon, chocolate chips, pecans and butter. Set aside.

Cake:

1/2 cup (1 stick) butter
1 cup plus 1-1/2 tablespoons sugar
2 eggs
1 cup sour cream
1/2 teaspoon vanilla extract
1 1/2 cups (6.4 ounces) flour
1 teaspoon baking soda
1/4 teaspoon salt
Prepared topping

Heat the oven to 350 degrees.

With a mixer, cream the butter and sugar together until light and fluffy about 3 to 5 minutes. Add the eggs, one at a time, beating each one until incorporated.  Slowly mix in the sour cream and vanilla until smooth.

Sift together the flour, baking soda and salt in a separate bowl.

Fold the dry ingredients slowly into the butter and egg mixture to form a lumpy batter.  Continue folding until no large lumps remain.

Spoon one-half of the batter into a greased 9-inch-square baking pan, then layer with half of the topping. Layer with the remaining batter, then the remaining topping.

Bake until the coffee cake is puffed and golden and a toothpick inserted in the center comes out clean, about 35-45 minutes (depending on your oven).  Cool slightly before serving.

Adapted from the LA Times and Heirloom Bakery

Tuesday, September 26, 2017

Lemon-Zucchini Bread


I can't believe it's been 3 weeks since my last post!  We took a little vacation to the Colorado mountains with friends recently and enjoyed some beautiful, warm weather and lots of fun activities which I'll share at the end of this post.

It seems the warmth followed us home. Are you having the same heat-wave that we are?  The past week has brought unseasonably warm and dry weather to the Midwest.  It's been in the upper 80s to mid 90s Fahrenheit!  Needless to say, my zucchini and tomato plants are loving the heat.

Trying to make good use of my zucchini bounty, I made this recipe that I had seen online recently that combined zucchini with my other love - lemon.  The original recipe calls for glazing the zucchini bread with a drizzle of lemony frosting, but trying to keep it more calorie-friendly, I omitted that step. I will include the glaze in the recipe in case you'd rather it be a little sweeter.


I pulled out my late mom's old Ekco loaf pans which made some lovely golden loaves.


The bread turned great!  It was so moist I was happy I didn't glaze it. I loved seeing all the beautiful flecks of green zucchini and yellow lemon zest inside.  It was pretty hard to keep myself from eating slice after slice while taking these photos ;)


Here's a tip for those of you who do grow zucchini, or have a friend or neighbor that gifts you bags of it. Freeze fresh zucchini for your fall and winter baking projects or for the next time you're craving zucchini fritters!  Simply grate the zucchini on a box grater, or use the grating attachment on your food processor.  Remove as much excess moisture as possible by putting it in a clean tea towel and ringing it, or use a potato ricer, which is my preferred method.  After squeezing out the moisture, you can simply tap out the grated zucchini patty from the potato ricer and freeze it until firm, then place it in plastic zipper bags to use whenever you like.


Back to the little trip we took the second week of September!  We have good friends who have a home in Edwards, Colorado which is just west of Vail.  We had glorious sunny and warm days which were spent golfing, hiking and river rafting.  It was my first time river rafting and it was quite a scary an exhilarating experience! We used an outfit located on the Colorado River in Glenwood Springs, which was about an hour drive from Edwards. Driving through Glenwood Canyon is a spectacular ride which I highly recommend.  There are also lots of beautiful hiking trails if you're not into rafting.

Since you do get entirely soaked while going through the rapids I couldn't film the raft ride but if you want to get a little idea of what it was like, take a look at the Rock Garden's website here.  We had an experienced helmsman who was great.


One day, we walked through the Village of Vail and had lunch.  The village is so picturesque and was modeled after European ski towns.  If you look carefully, you can see someone tending the flowers outside the middle floor in the upper-right photo.  Every hotel and business prides itself on its floral displays.


I hope you enjoyed my short Colorado mountain tour and please also enjoy this lovely zucchini bread!

Lemon-Zucchini Bread

Printable Recipe 

Makes two 9×5″ breads

4 cups unbleached all-purpose flour
4 teaspoons baking powder
1 teaspoon salt
4 eggs 1 cup neutral-flavored oil
1-1/4 cup sugar
1 cup buttermilk (or substitute sour cream or Greek Yogurt)
4 Tablespoons lemon juice
Grated zest of 1 lemon, preferably organic so you're not eating pesticides
 2 cups grated, unpeeled zucchini with excess moisture pressed out

Preheat oven to 350 F.

Grease and flour 2, 9×5″ loaf pans and set aside. Blend together flour, baking powder, and salt in a large bowl and set aside.

In a medium bowl, beat the eggs well and then blend in the canola oil and sugar. Mix in the buttermilk, lemon juice, and lemon zest. Add the zucchini and mix to distribute evenly. Add zucchini mixture to the dry ingredients and gently mix just until blended together. Don’t overmix.

Pour batter into prepared pans and bake at 350 degrees for about 35-45 minutes, or until toothpick inserted in the center comes out clean. Start checking after 35 minutes as some ovens are hotter than others.

Cool in pan 10 minutes, then remove to a wire rack and cool completely.

If desired, you can glaze the breads after they are cool:

1 cup powdered sugar
2 Tablespoons lemon juice, more or less to get desired thickness of glaze
1 teaspoon lemon zest

In small bowl, mix powdered sugar, lemon juice and zest until well blended. Spoon glaze over cooled loaf. Let glaze set, then serve.

Adapted from this recipe.