Showing posts with label canning and preserving. Show all posts

Tuesday, September 25, 2018

Homemade Red Wine Marinara Sauce


It was a great summer for tomatoes in my garden!  Even though the heavy rains and high temperatures stressed them tremendously, I was still able to pick more tomatoes than my husband and I could eat, even after giving many away.  I still have some ripening on my plants!


Last year, I tried freezing tomatoes whole, thinking I would use them in soups and stews, but I didn't use as many as I had hoped.  This year, I decided to make marinara sauce with my tomatoes to freeze and use in various pasta dishes or as a dip for eggplant or calamari throughout the fall and winter.  As of today, I've made three batches of marinara and have 14 pint jars in my freezer.  A pint of sauce is just about perfect for two.  


You could also use a water bath canning method with this but I think the frozen sauce tastes even more like garden fresh sauce.  I've adapted this recipe from several recipes and after three batches of tweaking the recipe, this tastes about as perfect as a marinara sauce can get.


Garlic, tomatoes, chopped basil and sprigs of oregano all from my garden.  Heavenly! 


A generous pour of red wine and then slowly simmered for up to five hours on the stove top to reduce to a sauce consistency and meld the flavors, I then used my immersion blender to whir it into a smooth sauce but you can leave it as coarse as you like. 


If you are still harvesting tomatoes, or have access to a farm stand or farmer's market, look for imperfect tomatoes that are sold at a discount.  You can always cut out any blemishes or brown spots before adding them to the pot.  Pick up some fresh basil and oregano while you're at it and one or two nice yellow tomatoes.  You'll have a great tasting, thick marinara sauce in an afternoon without spending a ton of time!


We're enjoying some beautiful early fall hues of purple, red and yellow in the garden and I'm not only still picking tomatoes but also flowers for bouquets.


I pulled out one of my mother's old ceramic pitchers (I think it might actually be a coffee or tea pot) to use as a vase.  I thought it suited the harvest season :)  Happy fall and harvest cooking!

Homemade Red Wine Marinara Sauce

Printable Recipe

Makes about 4-5 pints of sauce.

Recipe may be doubled or even tripled if you have a lot of tomatoes to use.  Cooking time will vary according to how many tomatoes you are using.  You may use canned tomatoes and dried herbs but you won't get the same, garden-fresh flavor.

4 tablespoons olive oil
½ cup finely chopped yellow onion
4 pounds tomatoes (about 8-9 large) peeled and coarsely chopped, including juices
4 large cloves of garlic, minced or finely chopped (about 2 teaspoons)
¼ cup fresh basil leaves, chopped
1 tablespoons fresh oregano leaves, chopped
3/4 cup hearty red wine, such as cabernet or burgundy
1/4 cup tomato paste
1 teaspoon salt
1/2 teaspoon ground black pepper
1/2 teaspoon crushed red pepper flakes
1 tablespoon sugar

Note: The easiest way to peel tomatoes is to score the bottoms with an X using a sharp, serrated knife and put them into a pot of boiling water for about 1 minute. Using a slotted spoon, transfer them to a large bowl of ice water. The skin will peel off easily with your hands. Do this in batches until all of your tomatoes are peeled.

Heat olive oil in a large pot over medium heat. Add chopped onion and sauté until softened, stirring frequently, about 4 minutes, add minced garlic and sauté for another minute.

Add the rest of the ingredients and stir together. Bring the liquid from the tomatoes to a boil and then reduce the heat to low and simmer for 3 to 5 hours, stirring occasionally until reduced to a sauce consistency. Taste and adjust seasonings to your preference.

Use an immersion blender, or a regular blender in small batches, process the sauce until it is as smooth as you like.  If desired, you can strain the sauce through a medium mesh strainer but it’s not necessary.

Friday, September 30, 2016

Homemade Ketchup made with Cherry Tomatoes~


One last garden harvest post before the garden is put to bed for the year.  Sniff-sniff. We had such a wonderful growing season.  Cucumbers and tomatoes galore. The cherry tomatoes were especially prolific and I'm still picking them!


The varieties I planted this year were Sweet Million red and Sun Sugar yellow cherry tomatoes. Both were winners! But, with so many cherry tomatoes, what to do with all of them?

I'm so glad I stumbled on this simple and delicious recipe for homemade ketchup using cherry tomatoes, It turned out great!


Above, you see about 4 pounds of halved cherry tomatoes in a 4" deep pan. I even threw in a few yellow ones. They are combined with my favorite champagne vinegar, brown sugar, just a touch of spice, salt and pepper and simmered.  


This is what they look like when reduced by about half but let the consistency be your guide.  It should be jam-like which will take approximately 90 minutes, depending on your stove and temperature. Then, after it has cooled a bit, the mixture is pureed in a food processor and then strained to remove the seeds and skins. 


The result is about 3 cups of the freshest ketchup you'll ever taste and without the high fructose corn syrup.  I placed mine in sterilized half-pint jars before refrigerating.  It will keep for at least a month or longer in the refrigerator.  Delicious with fried potatoes, on hot dogs for the kids, meat loaf, or made into a wonderful Thousand Island or Russian salad dressing.

How to do like to use ketchup?

Whether you spell it ketchup or catsup, if you still have cherry tomatoes growing in your garden or can find them at the farmers' market, please give this a try! A delicious way to bid farewell to September! I love these adorable Bee patterned pint canning jars from Amazon! 


Savoring Time in the kitchen participates in the Amazon Services LLC Associates Program, an affiliate advertising program, a means for sites to earn fees by advertising and linking to Amazon.com. Should you purchase something on Amazon after following my link, I will receive a very small commission but there will be no additional cost to you. I only link to products I already own myself or would love to own.

Homemade Tomato Ketchup

Printable Recipe

Yields about 3 cups of tomato ketchup

Note:  I tried the recipe using three different types of vinegar: balsamic vinegar, red wine vinegar and champagne vinegar.  Champagne vinegar was the winner with my taste buds because of its mild, fruity flavor.  The runner up was red wine vinegar. The balsamic vinegar didn't give it the traditional ketchup flavor that I wanted. 

4 pounds ripe cherry tomatoes washed and cut in half
1-1/2 cups champagne vinegar
⅔ cup dark brown sugar
4 teaspoons salt
2 teaspoons black pepper
1/4 teaspoon ground cloves
1/4 teaspoon ground cinnamon
¾ teaspoon Worcestershire sauce (reserved until after above ingredients have been cooked and strained)

In a wide skillet, stir together the halved tomatoes with all ingredients except Worcestershire.  Simmer over low to medium heat until a thick jam-like mixture develops (this will take up to 90 minutes, approximately, depending on your stove). Remove from heat and allow to cool for about 10 minutes.

In a food processor, purée mixture until smooth. If you have a small food processor do this in batches to prevent overflow. Then, place a fine-mesh sieve over a tall bowl (an 8 cup heat proof measuring/pouring bowl works great).  Strain puréed mixture, pressing on solids with the back of a large spoon. Throw out seeds and skins. At this point, if you want an even thicker ketchup, you may simmer again for another 15-30 minutes. 

When the ketchup is finished, add the Worcestershire sauce and refrigerate.  You may place it in attractive jars or bottles for gifting.

Ketchup will last at least one month refrigerated. 

Check out these adorable Bee patterned pint canning jars from Amazon! 
Guidelines for canning tomato ketchup can be found here on the Ball/Kerr website
Adapted from The New York Times

Wednesday, September 16, 2015

Homemade 'Chunky' Tomato Sauce


Hello!  I hope everyone is enjoying these last precious days of summer!  I've been doing my best to put the blog on hold to enjoy these last, glorious days. For the most part, it has been beautiful here, so there have been lots of golf and outdoor activities with family and friends.

Last week, on one rainy, chilly day, when a golf date with my husband was rained out, I decided to use the abundance of tomatoes I had on the kitchen counter to make tomato sauce.  Not to enjoy now, but to enjoy when the weather gets cold and pasta nights will be even more welcomed. 


This has been a banner tomato year.  I've read that others around the country have been enjoying a bountiful year as well. Even today, I harvested six gorgeous, big tomatoes. The other crazy thing about this summer is that we have barely had any mosquitoes all summer.  Now that is impressive!  All summer to enjoy the patio in the evening and not be chased indoors by mosquitoes.  Priceless!


I picked one HUGE tomato called, Mr. Stripey, that weighed over a pound and was over 5 inches long! I read not-so-stellar reviews of this tomato and I'm glad I gave it a try. It performed very well in my garden.


You can see by the slight yellow tinge to my tomato sauce that I used a few of those yellow and red striped tomatoes in this sauce. 


I tried a new-to-me recipe and loved it!  Very loosely adapted from this recipe, I altered the cooking method, tomato preparation and ingredients slightly, but it was the list of ingredients that made me choose it in the first place.  It is loaded with flavor!


The tomatoes were prepped by using the boiling water/ice bath method to remove the skins. After dicing, I drained the chopped tomatoes in a mesh colander to remove excess juice so the sauce wouldn't be too juicy.


After it was cool, it was transferred it to zipper bags and frozen to enjoy on a cool night in Autumn.  If you find yourself still picking tomatoes, or have a local farmers' market where you can buy them, please give this recipe a try.  It was so good, it was hard not to keep eating it out of the pan!  It is a 'chunky' style sauce and there are the seeds are left in it.  It neither of those things bother you, you will love it.

Homemade 'Chunky' Tomato Sauce


Adapted loosely from All Recipes
Printable Recipe

Update:  I made another batch of this recently and decided to use an immersion blender to smooth the sauce just a bit.  I know we'll enjoy it either way!

Note:  This recipe represents a half recipe of the original, which was all of the tomatoes I had on hand.  Double if you have lots of tomatoes.  

2 onions, chopped
2 large cloves of garlic, minced
1/2 green bell pepper, finely chopped
1/4 cup canola oil
About 5-6 pounds of whole, garden tomatoes
1 tablespoons dried oregano
1 tablespoons dried basil
1/2 teaspoon red pepper flakes
1/8 cup finely chopped fresh parsley
1/8 cup white sugar
1 tablespoons salt
1/2 teaspoon ground black pepper

1 (6 ounce) can tomato paste (optional to use when you are ready to use the sauce)

Prepare a large pot of water to boil.  Have a large bowl of ice water ready next to the pot when the water is boiling.  Cut a shallow 'X' across the non-stem end of the tomato. Drop 3-4 whole tomatoes into the boiling water.  When the skin has cracked, about 1 minute or so, remove the tomatoes with a slotted spoon to the ice water bath.  Repeat with all of the tomatoes.  Remove the skin from the tomatoes and core them.  Chop the tomatoes into about 1/2 inch pieces and place in a colander to drain for about 30 minutes. 

In a large stock pot over medium heat, saute the the onion, garlic, green pepper in the canola oil.  Stir often and watch carefully to that it doesn't burn. When the onion is transparent, add the chopped tomatoes, oregano, basil, red pepper flakes, parsley, sugar, salt, and ground black pepper. Cook for about 2 hours on very low heat, stirring frequently.

Let sauce cool and pour sauce into quart size freezer containers.

Will keep in freezer for 3-4 months or longer if you have a deep freeze.

When ready to use sauce, you can stir in can of tomato paste, if desired, but I found it tasted great on its own.

TIP:  If using freezer bags, after filling, place flat on a baking sheet in freezer until fully frozen (about 2 hours) so that may be stored flat.

Sunday, July 19, 2015

Simple Pickled Beets


It's that time of year again. When a trip to the garden or farmer's market yields such beautiful produce that it makes you wish it could last and last. Here is one way to prolong some of that harvest by a couple of months, at least.  If they last that long :)


Do you love beet root? I love beets just about any way...boiled, oven-roasted, hot, cold, and of course, pickled. 


My all-time most popular post is one I did on refrigerator pickles, a recipe that I got from my mother years ago. It's so simple and so delicious. One of my readers asked if beets could be used instead of cucumbers and I thought, sure, why not?  Using my mother's simple refrigerator pickle brine of sugar, vinegar, water and salt, I replaced the celery seed with a pinch of red pepper flakes for the beets.  Optionally, you could add bay leaf, cinnamon sticks, cloves or switch up the vinegar used, but frankly, I love them prepared very simply, just like this.


I used golden beets just because they're my favorite and because they look so pretty :)  I think they have a slightly more mellow flavor too. They turned out so tasty and delicious pickled this way that I'm sure I will have a jar of these in the refrigerator as long as I can find beautiful, fresh beets.

Of course, use whatever beets you prefer.  Quick, easy and delicious if you're a beet lover like me.  They make a delicious snack or side to any summer meal. Beets are an excellent source of fiber, potassium, calcium and antioxidants so if you don't like red beets, try the more mellow yellow.

Simple Pickled Beets

Printable Recipe

1 cup white vinegar
1 cup granulated sugar
1 cup water
1 teaspoon salt
1/2 teaspoon red pepper flakes

3 cups sliced, cooked beets (I like to use golden beets)

Optional additions to the brine could be cinnamon sticks, cloves, bay leaves and peppercorns but I prefer them with the simple brine.

Slice leaves and most of stems from the beets, leaving about 1 inch of stem. Place beets in a large saucepan and cover with water. Cook over medium heat, covered, over medium heat until just barely tender, about 30-40 minutes. A good test, is to stick a sharp knife into the beet and if it goes partially through but hits some resistance in the center, then it's done enough. Remove from the pan and place on a plate to cool. When cool enough to handle, the skin will easily slide off. Remove all skin and slice off the remainder of the stem. Slice beets into quarters, lengthwise, and then into 1/4 inch slices.

Place sliced beets into a large container or jar with lid. In a separate bowl, stir vinegar, sugar, water and salt together until dissolved. Add red pepper flakes. Pour mixture over beets and refrigerate.

These can be eaten after several hours in the refrigerator but taste best in 1-2 days.

Keeps for at least 2 months, refrigerated.

Thursday, September 18, 2014

Tomato Jam with Honey and Spice


Here you see that last of my garden tomatoes, sniff-sniff.  I had almost five pounds of the red, luscious beauties that needed to be used while before they went bad.  Tomato Jam to my tomatoes rescue!  Seriously, folks, this stuff is so delicious.  Sweet and spicy at the same time.  This is a really upscale and fabulous alternative to that condiment in a squeeze bottle called ketchup.  Thick, jammy and wonderful. Think Christmas gifting!


I used some beautiful, local honey for this project since I wanted to bring the best out of my summer labor growing those tomatoes.  The Tomato Jam was a such a great success and I can see opening a jar of this on a cool fall evening and serving it with meatloaf or grilled hamburgers.  I'm sure it would taste wonderful on roasted chicken or just about anything really...sandwiches, hot dogs, roasted potatoes, cheese platter appetizer, you name it!


What didn't fit into my canning jars I used to top of some smoked gouda that I had left from my Cherry Tomato Bruschettas. So good!

This is a real-deal canning recipe so you need to have sterilized jars and lids.  If that strikes fear into your heart here is a wonderful website for first-time canners.  If you still aren't sure, then simply place the jam in jars and keep in the refrigerator for about a month or so (if it lasts that long).  


Honey and Spice Tomato Jam


Note: My yield was just slightly over 4 half-pint jars

8 cups of finely chopped tomatoes, about 4 pounds or so
16 oz (about 2 cups) local honey, possible
1/2 cup freshly squeezed lime juice - about 3-4 juicy limes
1-1/2 tablespoons sea salt
1 tablespoon freshly grated ginger root
1 fiery red chili, seeds and white membranes removed and chopped very fine
2 teaspoons red pepper flakes
1 teaspoon cinnamon
1/2 teaspoon ground cloves
2 tablespoons balsamic vinegar
4 half-pint canning jars with rings and lids. 

Combine all ingredients except balsamic vinegar in a low, wide, non-reactive pot such as stainless steel. Bring to a boil over high heat and then reduce temperature to medium high. Stirring regularly, cook the jam at a low boil until it reduces to a thick and sticky jam. This takes anywhere from 1 to 2 hours, depending on the heat of your stove, the width of your pan, and the water content of your tomatoes. (It took my jam about 1-1/2 hours because I did have a very wide pot so there was much more surface area for the tomatoes to reduce). 

When the jam starts to get thick, reduce the heat to medium and continue to stir. This jam has a tendency to burn at the very end of cooking time, as the sugars concentrate and the temperature level in the pan increase, so watch the jam very closely toward the end. 

When you're 15 or 20 minutes out from the jam being finished, prepare a boiling water bath in another large pot like a stock pot or canning pot. Wash jars and lids with warm soapy water.  Completely submerge the jars into the simmering water bath and boil for 15 minutes.  A canning basket or canning tongs are handy to have (Walmart).  Place lids in a smaller pan of water and bring to a low simmer.

When the jam is getting very thick do a taste test and adjust seasonings, if necessary.  Add the 2 tablespoons of balsamic vinegar and continue to stir.  Do a final taste test.  When the jam is perfectly thickened to your liking (I got mine quite thick), remove the pan from the heat and stir for 2 to 3 minutes. This helps evaporate out the last of the water and will give you a better set when the jam cools.
Remove the jars and lids from their hot water baths and place on a clean, kitchen towel.  Keep the heat on under the large pot. 

Funnel the jam into the prepared jars, leaving a 1/2 inch space at the top of the jar. Wipe rims, apply lids and rings, and process in the boiling water bath or canner for 20 minutes.

Remove jars and place them on a kitchen towel placed over a baking pan to cool. When jars are fully cool, remove the rings and test seals. If the seals are tight you may keep the jam on the shelf. Any jars that didn't seal property should be refrigerated and used in a month or so. 

Sunday, August 17, 2014

Refrigerator Dill Pickles


It's cucumber time in my little Wisconsin Garden. I love them in freshly sliced in simple salads with my own garden tomatoes but when you have far too many to eat fresh, you need to make pickles! This year, I decided to branch out from my usual Refrigerator Pickle recipe which is sweet and similar to a Bread and Butter pickle.  I love them but my husband prefers dill pickles so here you are, Honey :)  When I first offered him a taste he said "These are really good!". 


I mixed my own herbs and spices, added some fresh dill flower heads and lots of garlic.


Since I had so many dill sprigs left after making the dill pickles, I also made some dilly beans and zucchini spears using the same recipe! I added a few thinly sliced onions to dilly beans (see note below)*.  I am still looking at quite a few dill flower heads so looking for more veggies to pickle now :) 


I love my Fido Clamp Jars that you see in the very first photo, the Golden Harvest jars that the beans are in and the Weck jar above but for refrigerator pickles, beans and zucchini you can use any glass jar with a lid that you have as they are not 'canned' in the traditional way. You will need to keep these stored in the refrigerator to keep them fresh.  

My favorites jars I only use for decoration...


These are jars are from my mother's antique bottle and jar collection that she shared with me and my sister before she passed away.  I use them as vases and also display them with other memorabilia from my late mother on a shelf my little home office.  

Wouldn't you love to know who originally owned them, how many recipes were made and stored in them? I believe the 1/2 gallon Ball Mason jar on the right is probably the oldest dating to around 1900. Considering the fact that few people even owned a refrigerator until much later, canning jars were a very important part of life then.  Can you even imagine? 


Refrigerator Dill Pickles


Makes about three 1 1/2-pint jars (my jars were varied sizes)

12-15 small pickling cucumbers (the bumpy ones)
2 cups water
2 cups distilled white vinegar
1 tablespoon sugar
2 tablespoons Kosher salt
Fresh dill flower heads - about 1 large to 2 small heads for each jar
9 garlic cloves, peeled and cut into 2-3 slivers

Seasonings:

1 teaspoon dried red pepper flakes
2 teaspoons dill seeds
1/2 teaspoon black peppercorns
1 teaspoon mustard seeds
1/2 teaspoon whole allspice
1/2 teaspoon coriander seeds
1/2 teaspoon whole juniper berries (optional)
1 bay leaf, crumbled

Combine water, vinegar, sugar and salt in a small saucepan.  Heat just until warm and the sugar and salt have dissolved.  Set aside to cool. 

Combined seasonings in a small bowl.  Divide the seasoning mixture equally among the jars you are using. 

Trim ends from cucumbers and slice.  I like the slices fairly thick - about 1/4-1/2 inch but you can also cut them into spears if you like. Fill each jar with sliced cucumbers but leave about 1" from top empty. 

Tuck in 1-2 dill heads into each jar and about 3 slivered garlic cloves.

Pour the cooled vinegar mixture over the cucumbers to cover. Cover jars with lids and close tightly.

Refrigerate at least 7-10 days for best flavor.

Pickles will last refrigerated about 2 months - if you don't eat them all before then :-)

*My Note on Dilled Beans:  I parboiled fresh beans for 3-1/2 minutes and then plunged them into a bowl of ice water to stop the cooking process before putting them in jars with pickling solution. 

Saturday, September 1, 2012

Tomatoes - Garden Fresh and Oven Dried


Earlier in the summer,  I mentioned that it was going to be a busy season for me and I that may not be posting or able to comment as often as I'd like.  One of the events that made it a busy, but fun, summer was a destination wedding that my husband and I attended in the Colorado mountains last weekend.  We had been to the Rockies on ski trips when our daughters were still living at home but we had never been in the mountains during summer.  We were blown away at how beautiful it was!

We were able to visit a couple of outdoor markets while we were there and I have to tell you that the Colorado produce was fantastic.  We were served a dessert with fresh, Colorado peaches that rivaled any other peach I've ever tasted.  The tomatoes were also amazing.  No wonder, since Colorado boasts that it has 300 sunny days a year.


With our hot, dry and sunny summer, my tomatoes have been enjoying a very productive season also.  Even though it takes lots of TLC to keep them watered this year, they do love the heat and non-humid conditions which is not our norm living next to Lake Michigan.


My cherry tomato plant is particularly happy and I recently made some oven dried tomatoes with them. They are especially good in pasta dishes and also salads as they aren't as hard as commercially dried tomatoes.


I've made oven dried tomatoes several times before, but the technique I used this time was borrowed from A View from Great Island. The thing I liked most about her method was that she gently squeezed out most of the liquid and seeds from each tomato half before putting them in the oven which allows them to dry in the oven even better.

The Method:

Preheat Oven to 200F

1.  Halve the tomatoes and squeeze each half to release some of the juices and pulp.  

2.  Place in a bowl and drizzle with a little olive oil, salt and pepper and toss gently.

3.  Place cut side up on a parchment paper-lined baking sheet.  

4.  Bake and dry for about 4 hours or so in the preheated oven.

5.  Pack in a clean jar with some sprigs of rosemary, and then fill the jar with olive oil to use later or, as I did, after they are cool, freeze them on the baking sheet and then put into plastic freezer bags to use all winter.

Thursday, August 25, 2011

Orange and Spice Fig Jam


Last week, one of our local grocery stores chains had a new store grand opening sale with lots of great offers. One of them was a carton of 12 fresh figs for $6.99. Growing up in the Midwest, I don't believe I even ate a fresh fig until I was an adult and the only figs I knew were found in Fig Newtons. More stores here are carry them now when they are in season but they are still quite expensive so this was a great deal. The figs I bought were called Brown Turkey figs and they were quite large compared to other figs I've seen.


I've been seeing lots of fig jam recipes on the internet recently, and knew I had an opportunity to finally try making some with when I saw this sale. The recipe that I decided to try I found on Simply Recipes for Spicy Fig Orange Microwave Jam. I thought - I can do that! The flavors or orange, cinnamon and cloves in the recipe sounded wonderful to me. My figs must have been a lot bigger than those in the recipe so I needed to double all of the ingredients. They did not want to cook down in the microwave and my Pyrex dish was getting so hot I could hardly hold onto it when I stirred the jam. I finished the jam on the stove and next time, I'll skip the microwave altogether!


Even with the recipe not cooperating at first, the jam turned out wonderfully and is so delicious! I've been having some each morning on toasted baguette slices and I know it will be delicious as an appetizer served with brie on crackers too. I'm keeping two jars in the refrigerator and freezing one. While fresh figs are still available, I know I will be making this recipe again soon so I'll have some to enjoy throughout the winter.


Orange and Spice Fig Jam
Inspired by Simply Recipes
Printable Recipe

Note: I doubled these ingredients for my 12 figs and this made 3 jars of jam (1 Mama, 1 Papa, and 1 Baby-sized jar).

1 1/2 cups diced fresh figs
1 1/2 teaspoons grated orange peel
1/2 cup seeded, peeled orange, diced
1 1/2 cups of sugar
3 Tbsp lemon juice
1/4 teaspoon ground ginger
1/4 teaspoon ground cloves
1/4 teaspoon cinnamon
1/2 teaspoon butter

Place all of the ingredients in a large, glass bowl and allow to macerate in the sugar for at least 30 minutes. Turn everything into a heavy saucepan and simmer until reduced and thickened (about 45 minutes on medium low) until everything is reduced by 1/3 to 1/2 original volume, stirring occasionally. Watch carefully that the jam doesn't start to burn on the bottom of the pan. Reduce heat, if necessary.

Pour the jam into jars, leaving 1/4-1/2 inch of headroom from the top of the jars. Refrigerate or freeze.

Saturday, August 13, 2011

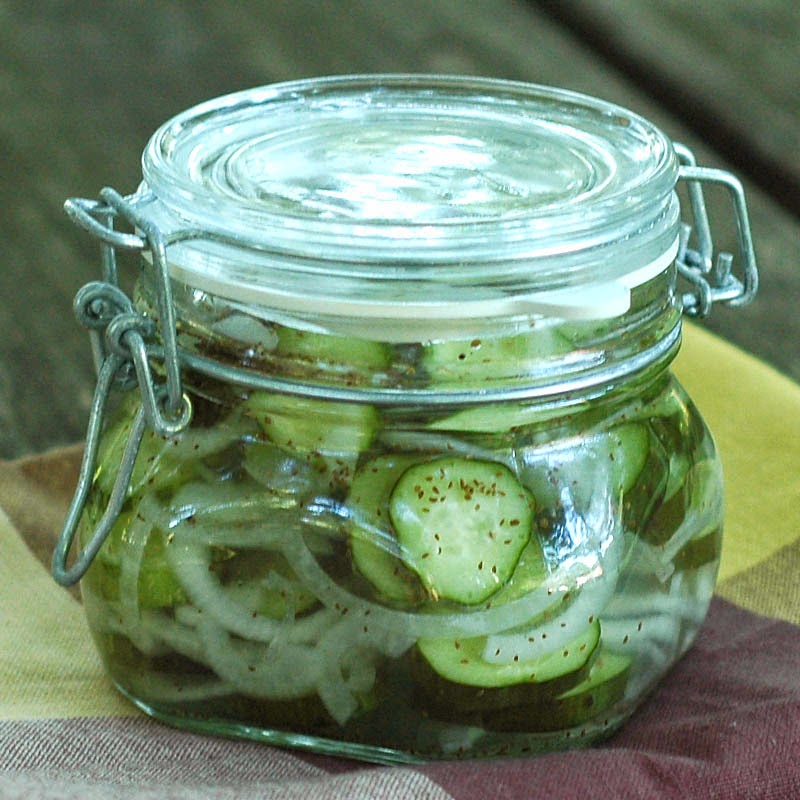
Refrigerator Pickles


I have eaten these pickles for more years than I can remember! Refrigerator pickles bring back memories of my mother and my parent's garden where they grew cucumbers, beets, peas, beans, tomatoes, potatoes and squash in their enormous back yard garden. It was my own personal farmer's market.


My mother used to love to make these pickles and I loved to eat them. Perhaps your mother made them too as I'm sure this recipe is ages old.


It's a simple sweet and sour pickle made without cooking that will last 2-3 months in the refrigerator. I keep adding freshly cut cucumbers to the jar as they ripen on the vine. I've already had to go to a larger jar now that the cucumbers are becoming more plentiful but these were my first pride and joys.


I love watching the blossoms turn into teeny-tiny cucumbers and watching them grow every day, sometimes seemingly overnight. I grew these space-saving cucumbers from seed and I'm training them to grow up our fence. The farmers' markets are full of cucumbers right now for you to try this simple recipe - no canning equipment required!

Shop my favorite refrigerator pickle jars HERE. (Affiliate Link) 

Savoring Time in the Kitchen is a member of the Amazon Affiliate Program. If you purchase a product by following a link that we provide, the price you pay as a consumer does not change, but if you do make a purchase through one of these links, we earn a very small commission for providing that link.  Thank you for your support of Savoring Time in the Kitchen!

Refrigerator Pickles

~from Savoring Time in the Kitchen's Mom
Printable Recipe

Makes about 6 Cups

1 cup white vinegar
1 cup granulated sugar
1 cup water
1-2 teaspoons celery seed (I use 2)
1 teaspoon salt

3 cups sliced cucumber
3 small onions, thinly sliced

Place sliced cucumber and onions in a large container or bowl. In a separate bowl, stir vinegar, sugar, water and salt together until dissolved. Add celery seed. Pour mixture over cucumber and onions and refrigerate.

**Many have asked when these can be eaten.  I sometimes nibble on them the same day but they taste best in 1-2 days in my opinion.  

Keeps for 2-3 months.

Sunday, October 10, 2010

The Beautiful Fall Colors of Red and Gold ... Habanero Style!

Not the colors on the trees, although that's may have been what inspired me to make this recipe because the reds and golds are glorious in the trees in our yard right now.


I just overcame my fear of canning this weekend (finally!) and the first recipe I decided to try was Habanero Gold Jelly.  Not only had I never canned before but I've never touched or eaten a Habanero pepper!


These babies are HOT! I wished I would have done some research on them before handling because I now know (a little too late) that I should have worn rubber gloves. Fortunately, the burning sensation on my fingers has subsided from scraping the seeds with bare hands! If you like hot and spicy, you'll love this! Along with Habanero peppers, sweet red pepper, red onion and dried apricots make up the red and gold of this delicious jelly. Please don't be alarmed at my red hot experience - the jelly was delightful.  I seeded the Habanero peppers to keep it a little more tame.


The recipe for Habanero Gold Jelly has been on the Cooking Forum website for many years and many of my foodie friends have made it before. I recently discovered that the original recipe is credited to Bob Rouleau of Canada and it can be found on the Bernadin Canada canning website. 


Tonight we had one of our daughters and her boyfriend for dinner and I served this jelly as a relish with brie and sharp cheddar cheeses on baguettte slices.  The creamy brie and the jelly with an 'attitude' was a wonderful pairing. Since many men love the heat of chili peppers, this jelly was very popular tonight! Others have used it in sauces or marinades for grilled meat and poultry or as a condiment. If you want to popular with the spicy men in your life - give it a try!  

Click HERE for a link to some cute 4 oz canning jars similar to the ones you see in my photos.  


Savoring Time in the Kitchen is a member of the Amazon Affiliate Program. If you purchase a product by following a link that we provide, the price you pay as a consumer does not change, but if you do make a purchase through one of these links, we earn a very small commission for providing that link. Thank you for your support of Savoring Time in the Kitchen!

Habanero Gold Jelly

Adapted from a recipe by Bob Rouleau, Canada
Printable Recipe

Makes 4 half-pint jars

1/3 cup finely sliced dried apricots
3/4 cup white vinegar
1/4 up finely diced red onion
1/4 cup finely diced sweet red pepper
1/4 cup finely diced habanero peppers - I removed the seeds but you can leave them in if you want it REALLY hot
OR 1/4 cup diced, combined jalapeno and Scotch Bonnet peppers
3 cups granulated sugar
1 pouch liquid pectin

Instructions:

Cut apricots into 1/8 inch slices. Measure into a large deep stainless steel saucepan with vinegar; let stand 4 hours. Individually, cut onion and seeded peppers into 1/8 inch slices; cut slices into 1/4 inch dice.  Measure each ingredient; add to apricots. Stir in sugar.

Bring to a full rolling boil. Stirring constantly, boil for 1 minute. Remove from heat and add liquid pectin, mixing well.

Pour jelly into hot jars, dividing solids equally among jars and filling each jar to within 1/4 inch of top rim. Wipe rims and apply lids.

Process 10 minutes in a boiling water bath. Cool upright, until lids pop down, about 30 minutes. When lids are concave but the jelly is still hot, carefully grasp jar without disturbing lid and invert, twist, or rotate each jar to distribute solids throughout jelly.

Repeat as necessary during the cooling/setting time, until solids remain suspended in the jelly.