Showing posts with label beans. Show all posts

Wednesday, March 9, 2016

Bean and Fresh Herb Soup with Cheddar-Thyme Popovers


Are you anxious for spring? So am I! Here is a light soup that is easy to make and very satisfying if you're still in the mood for soup.  Last week, we had a new blanket of snow on the ground so we were in the mood. 


I whipped up some easy 'blender' popovers to serve with the soup which are so easy to prepare that you can have them on the table in less than an hour.


Adding a few crumbles of crisp bacon on top is optional but oh, so delicious. 


What a difference a week makes!  The photo above on the left with our two oldest grandsons is from just last Sunday when they were here for an overnight and the two photos on the right were taken yesterday when it was 70F!  March always has it's ups and downs, Lions and Lambs. Spring is coming!  

Bean Soup with Fresh Herbs

 
Note:  Remember to soak dried beans overnight according to package directions.  

1/2 pound thick-sliced bacon, cut crosswise into 1/4-inch strips
1 medium yellow onion, finely chopped
1 large carrot, finely diced
2 celery ribs, finely diced
4 garlic cloves, minced
1 bay leaf
Several sprigs of fresh thyme
1 teaspoon chopped fresh thyme (reserved)
2 teaspoons chopped fresh rosemary
1 pound Great Northern beans, soaked overnight and drained
10 cups chicken stock
Salt and freshly ground pepper

In a large soup pot, cook the bacon over moderate heat, stirring, until browned and crisp. Remove the bacon with a slotted spoon and place on paper toweling to drain.  Leave about 1 tablespoon or so of bacon fat in the pot.

Add the onion, carrot and celery and cook over moderate heat, stirring occasionally, until the vegetables are softened, about 8 minutes. Stir in the garlic, bay leaf, 2-3 sprigs of thyme and chopped rosemary and cook until fragrant, about 2 minutes. Add the drained beans and chicken stock and bring to a boil. Simmer the soup over moderately low heat until the beans are tender, about 1 1/2 hours. Season with salt and pepper to taste.

Remove the bay leaf and thyme sprigs, then stir in the remaining chopped thyme and rosemary. Ladle into bowls and garnish the soup with the bacon and serve.

Make Ahead: The soup and bacon can be refrigerated separately for up to 3 days. Recrisp the bacon before serving.

Note:  The bacon can be omitted altogether and you may use olive oil instead of bacon fat to saute the vegetables in the pot.  To make the soup totally vegetarian you may substitute vegetable stock for the chicken stock. 

Inspired by Food and Wine

Easy Blender Popovers


2 eggs
1 cup milk
1 cup sifted flour
1/2 teaspoon salt
1 tablespoon canola oil 3 tablespoons grated sharp cheddar cheese (Optional)
2 teaspoons dried thyme (Optional)

Preheat oven to 475F

Brush popover pan or muffin cups with melted butter or spray with non-stick baking spray such as Bakers Joy. Be sure to brush or spray around the rims also.

Combine eggs, milk, flour and salt in a blender. Blend for 1 minute. Add the oil and blend for 30 seconds. Add optional ingredients and pulse once or twice.

Fill popover or muffin cups half full and bake for 12 minutes. Reduce heat to 350F and bake for 30 minutes longer. Prick popovers with a toothpick or fork to let steam escape and bake for 5 more minutes.

This recipe yields approximately 6 popovers.

Recipe may be doubled. Try using other cheeses and herbs of your choice!
 
Inspired by Be Our Guest

Wednesday, January 28, 2015

"Ancient" Chinese Chicken with Green Beans and Caramelized Shallots


I use the term 'Ancient' loosely here.  It's not an authentic ancient Chinese recipe but the name given the recipe in an old cookbook of mine from 1986 called "Noteworthy - A Collection of Recipes from the Ravinia Festival"  It's still one of my all-time favorite cookbooks and I love pulling it off the bookshelf every now and then to see if there's anything I may have missed. My original copy was so worn that the pages were falling out but I was lucky enough to find an almost new copy at the local used book store. 

FYI, the Ravinia Festival in northern Illinois is the oldest outdoor music festival in the United States, with a series of outdoor concerts and performances held every summer from June to September. It has been the summer home of the Chicago Symphony Orchestra since 1936 and the cookbook was the project of the Women's Board of the Ravinia Festival Organization. 


I was in the mood for some Asian BBQ chicken, and found this recipe in my cookbook.  I thought I might have a hard time finding the currant jelly and plum jam but luckily, no problem thanks to the popular store brand. The original recipe calls for chicken legs and breasts but I substituted bone-in chicken thighs because they stay so tender and juicy, even after a long cooking time.

Since my husband and I are trying to watch our carb intake during the week, I served the chicken with some sauteed mushrooms (to which I added a little of the chicken spice mixture) and my favorite recipe for green beans with caramelized shallots which I'll also share.  It's a fool proof method for getting tender but not over-cooked green beans, just like you'd get in a restaurant.


Did you know that Chinese New Year is starting on February 19!  It will be the Year of the Goat!  Some interesting facts on the Chinese Zodiac


I also want to thank my friend, Maris, at In Good Taste Magazine and Wüsthof for the opportunity to win two beautiful Wüsthof knives in December.  Thank you, both very much!  I am thrilled with them and the boning knife is perfect for cutting up chicken parts.


"Ancient" Chinese Chicken with Green Beans and Caramelized Shallots

Printable Recipe

Serves 6

12 bone-in chicken thighs trimmed of excess skin (you may use other chicken parts if you prefer)
1/2 cup Canola oil
2 teaspoons Herbes de Provence
2 teaspoons coarse salt (I like to use coarse sea salt)
1 teaspoon freshly ground pepper
2 tablespoons lemon juice

Note: I ground the dry seasonings together in my spice grinder (which is a coffee grinder I use just for spices).  Save any leftover spice mixture to use on sauteed mushrooms or green beans.

For the Sauce:

1-1/3 cups ketchup
2/3 cup red currant jelly
3 tablespoons Worcestershire sauce
2 tablespoons Chinese rice vinegar
1 tablespoon light soy sauce
1/2 teaspoon Tabasco (or Sriracha)
1 teaspoon grated fresh ginger root (or 1/2 teaspoon dry ginger)
1/4 teaspoon Chinese Five Spice powder
1-2 cloves garlic, minced
1/4 cup plum jam (strained if it has large bits of plum)

Preheat oven to 350F.

Arrange the chicken on a rimmed baking sheet. Rub the chicken pieces with oil and then sprinkle the lemon juice, Herbes de Provence, salt and pepper over chicken and cover with aluminum foil. Bake in the preheated oven for about 45 minutes to an hour.

While the chicken is baking, combine all of the sauce ingredients in a heavy saucepan and whisk together. Bring to a boil, reduce heat and cook for 10-15 minutes, stirring occasionally. Set aside.

When the chicken is done, remove from oven, uncover, and drain the juices.

Increase the oven temperature to 400. Baste the chicken generously with the sauce and bake, uncovered for 30 minutes, or until browned. Serve with remaining sauce.

You may also grill the chicken on a medium heat grill, basting frequently with the sauce until browned for about 10 minutes, turning frequently.

Serve with sauteed mushrooms, and,

Green Beans with Caramelized Shallots
Adapted from Epicurious

Serves 4

1 pounds slender green beans, stem ends trimmed
3-4 shallots
1 tablespoons butter
1 tablespoons olive oil
1/4 teaspoon dried thyme (or 1/2 teaspoon freshly chopped thyme leaves are even better)
Have a large bowl of ice water ready.

Bring a large saucepan of water to boil.  Add the green beans and return to a boil.  Cook until just tender, about 6 minutes. Drain and transfer immediately to bowl of ice water to cool. Drain well. (Can be made 1 day ahead. Wrap in several layers of paper towels. Seal in plastic bag and chill.)

Trim ends and peel shallots. Cut lengthwise in half, then slice thickly. Melt butter with oil in heavy large skillet over medium-high heat. Add shallots and sauté 1 minute. Reduce heat to medium-low; sauté until shallots are browned and tender, about 20 minutes. Sprinkle with thyme. Season to taste with salt and pepper. (Shallots can be made 2 hours ahead. Cover loosely with foil and let stand at room temperature).

Add pre-cooked and drained green beans to the shallots in skillet and stir over medium-high heat until heated through, about 6 minutes. Season to taste with salt and pepper.
 

Thursday, May 19, 2011

Delicious Baked Beans


We usually kick off the outdoor barbecue/grilling season over the Memorial Day weekend here in the northern part of the U.S.  There will be picnics and outdoor barbecues galore and, hopefully, the weather will cooperate. It's hard to believe that it's only one week away and soon it will be June.

I would like to share a delicious baked bean recipe which is easy to put together and so delicious!  I received the recipe from my friend, Debbie, at Mountain Breaths, and she got it from the Cooking Forum. 

There is a very similar recipe in the cookbook Junior League at Home that has the same medley of beans but also calls for dry mustard, molasses and a little Worcestershire.  My adaptation contains fresh thyme as well.

I made these beans for our Easter dinner last month so I'm sorry I don't have an 'after' photo. They were quickly devoured with our Easter ham :)

Shop oven safe baking dishes for baked beans HERE.  (Affiliate Link). 
 
Delicious Baked Beans
Printable Recipe

Serves 8-10

2 cups canned kidney beans, drained
2 cups butter beans, drained
2 cups pork & beans with juice
1/2 cup ketchup
1/2 cup packed brown sugar
1/8 tsp garlic powder
1/2 lb bacon, chopped
1 cup chopped onion
2 teaspoons fresh thyme leaves
1/2 teaspoon pepper
(Optional additions are 1/4 cup Molasses, 2 Tablespoons Dry Mustard, 2 Tablespoons Worcestershire)

Saute the bacon and onion in a skillet until the bacon is cooked through and the onions are soft.

Meanwhile, preheat the oven to 325F.

Combine all the beans in a large bowl and stir in the ketchup, brown sugar, garlic powder, thyme, pepper and any other seasonings you choose to use. Stir in the bacon and onions. Spoon into a 2 qt baking dish (or large enough to hold all of the beans) and bake in a preheated 325° oven approximately 1-1/2 hours or until the beans are your desired consistency.  I like mine a little less 'runny' so sometimes I increase the baking time a little.

These can easily be made the day ahead and reheated.

Sunday, May 1, 2011

Garbanzo Burgers


A week ago, I was lucky enough to win a copy of the cookbook, Super Natural Cooking, by Heidi Swanson from Barbara at Moveable Feasts. Thank you, Barbara! You may know Heidi Swanson from her culinary website 101 Cookbooks or Mighty Foods. She's a wonderful photography and graphic designer and great cook.

Super Natural Cooking is filled with recipes on how to add more healthy, natural ingredients to our diet. When I first leafed through the book, I was surprised to see so many recipes that sounded not only healthy but flavorful as well, including recipes for desserts. This recipe for Garbanzo Burgers was the first to grab my attention with its ingredients and creativity. 


Rather than making a pattie using beans to use as the 'burger', the pattie becomes the 'bun'! What a great idea.

A delicious mixture of garbanzo beans, egg, sprouts,, onion, parsley, and whole wheat bread crumbs form the patty which then becomes the bun for more healthy filling ingredients. The original recipe calls for chopped cilantro, which I'm not a huge fan of, so I substituted parsley.  I also decided to add a healthy splash of Tabasco for 'kick'. 


I am growing my own arugula sprouts right now and it's such a fun and easy way to add sprouts to salads or sandwiches like this.


The mixture is then formed into patties and fried in olive oil until golden on both sides.  The patties are carefully sliced in half and then your imagination is the limit for the filling.  I chose avocado, tomato, chives, more arugula sprouts, and sliced radishes.

I think these would be a wonderful served with a salad or roasted vegetables also.


It was such a flavorful and delicious 'burger' and a wonderful lunch or meatless meal.


I'm looking forward to trying more recipes from Super Natural Cooking after this very tasty, first experience.


Garbanzo Burgers
Adapted from Super Natural Cooking
Printable Recipe

Note - This recipe is halved from the original and yielded 5 medium Garbanzo Burgers

For the garbanzo burgers:

1 can of garbanzo beans, rinsed and drained (about 1-1/3 cups)
2 large eggs
1/4 teaspoon fine-grain sea salt
1/4 cup chopped fresh parsley or cilantro
1/2 cup red onion, chopped
Zest of 1/2 lemon
Several dashes of Tabasco
1/2 cup sprouts, such as arugula, alfalfa, broccoli,
1/2 cup toasted whole-grain bread crumbs
1 tablespoon extra-virgin olive oil for frying

Filling ideas:

Additional sprouts
Avocado slices
Tomato slices
Chives or sliced onion
Radish slices
Another dash or two of Tabasco or your favorite salsa.

Combine the drained garbanzo beans, eggs, and salt in a food processor and puree until mixture is the consistency of thick, chunky hummus. Pour into a mixing bowl and add the parsley, onion, lemon zest and Tabasco. Add the bread crumbs and stir until blended. Allow to rest for a couple of minutes while the pan is heating so the crumbs absorb some of the moisture. You should be able to easily form the mixture into patties after this time.

Preheat a large frying pan (I used a large cast iron skillet) with the olive oil over medium low heat. Add as many patties as you can without crowding. Cover the pan and cook them for 5-10 minutes, until the bottoms begin to brown. If necessary, turn up the heat slightly if they are not browning. Flip the patties over and cook for another 7 minutes, or until golden brown. Remove the patties from the skillet and cool on a wire rack and cook any remaining patties.

Carefully cut each patty in half with a long, serrated knife. Add your favorite fillings.

~~~~~~~~~~~~~~~~~~~~~~~~~~~~~~~~~

Sunday, October 24, 2010

Black Bean Chili in Squash Bowls

Here is a fun serving idea that is perfect for the fall season! If you like chili and squash, this is delicious recipe. I was especially happy with the flavor of the black beans and the savory seasonings. It was delicious and the bowl is edible!


I was able to find Sweet Dumpling squash at my local grocer and you could likely find them at your farmers' market as well. Otherwise, I'm sure any small squash would work.


I had never made Sweet Dumpling squash before and the taste and texture reminded me very much of Acorn squash. Scooping out bits of squash made the chili even tastier!


We did have a light frost this past week and most of the tender annuals are gone but I still have a few blooms hanging on. I'm sharing this mosaic and recipe at Seasonal Sundays at The Tablescaper and Mosaic Monday at Little Red House.


Black Bean Chili in Squash Bowls
Recipe adapted from The Philadelphia Inquirer
Printable Recipe

Makes 4 servings

4 small sweet dumpling or other small winter squash
1 tablespoons olive oil
1/2 cup red onion, chopped
3 cloves garlic, minced
1/2 teaspoon dried cumin powder
1/4 teaspoon dried coriander powder
1/4 teaspoon fennel seed, crushed
1-1/2 cups cooked black beans (I used one can, rinsed well)
1 teaspoon Chipotle chili in Adobo, canned or dried
1/2 stalk celery, minced
1/2 roasted red pepper, skinned, seeded, and minced
1/2 teaspoon thyme leaves
3 plum tomatoes, chopped coarsely
1/2 cup water
Salt and pepper to taste
3 leaves fresh basil, minced

1 avocado, peeled, pitted and chopped for garnish

Preheat the oven to 375 degrees.

Pierce each squash with a knife and place on an oiled baking sheet. Cook for about 20 minutes or until just a bit softened. Remove from oven and let cool until not too hot to handle. Cut off the top (stem end) of each squash and reserve. Scoop out the seeds and stringy flesh very carefully - taking extra care not to cut into the bottom of the squash. You can save seeds for roasting, if desired. Season the flesh of each squash with a bit of salt and pepper. Return the squash, cut side down, to baking sheet and continue to cook until it softens and the edges are browned. They must be cooked through, but should still retain their shape and structure.

2. Meanwhile, warm the olive oil in the bottom of a large sauté pan and add the onion and garlic. Cook over medium heat until the onion is softened and browning. Add the cumin, coriander, and fennel seeds and cook a few minutes more to toast the spices slightly. Add the beans, chipotle, celery, thyme, and tomatoes and simmer for ½ hour to 45 minutes, adding as much water or stock as needed to keep from sticking. Stir often. Beans can be more or less soupy, as desired. Season well with salt and fresh pepper. Stir in basil before serving.

3. To serve, cut just a thin slice off the bottom of each squash to allow it to sit on the plate securely. Place squash on platter or individual plates. Fill with warm beans. Set the lid askew or alongside as garnish if desired. Top with chopped avocado.

Friday, June 25, 2010

Arugula, Cannellini Bean and Red Onion Salad

 
Last month, I won a beautiful bottle of Moroccan extra virgin olive oil and 10-year-aged balsamic vinegar from Black Star Gourmet foods and given away by Rebecca at Chow and Chatter.  Rebecca has been busy traveling this past month and keeping us posted on all the beautiful sights she is seeing during her travels to England and Turkey.

I wanted to wait until Rebecca returned home to post a recipe using her gracious gift. I also knew I wanted to prepare a dish where this special oil and vinegar would be showcased.


That dish was an Arugula, Cannelini Bean and Red Onion Salad.


Peppery arugula picked right from my garden, sliver-thin sliced red onion and cannelini beans are tossed with a vinaigrette made with the first cold press Moroccan extra virgin olive oil and 10-year old, aged balsamic vinegar, chopped basil, salt and lots of freshly ground black pepper. It was a delicious salad!  I tasted both the oil and vinegar before tossing them together and the flavors were wonderful.


Thank you again, Rebecca and Black Star Gourmet food for the wonderful gift!


Arugula, Cannelini Bean and Red Onion Salad
Recipe adapted from The Food Network and Dave Lieberman
Printable Recipe

2 Servings

1 (15-ounce) can cannellini beans
1/3 cup red onion, thinly sliced
1 bunch arugula, thick stems removed, washed and dried
1/4 cup extra virgin olive oil
1/8 cup balsamic vinegar
About 10 washed basil leaves, roughly chopped
1/2 teaspoon salt
Freshly Ground Black pepper to taste

Strain and rinse the beans under cold water. Drain thoroughly and place into a serving bowl. Toss the beans with the red onion and arugula.

Shake the olive oil, vinegar, chopped basil, salt and pepper in a jar with a lid until the salt has dissolved. Pour the dressing over the salad and toss .

This salad tastes best if made an hour before you plan on serving it tossing several times. Just before serving, season with additional salt and pepper, if desired.

Thursday, June 17, 2010

Steak Dinner with Roasted Green Beans and Fennel


 We had a super-easy and delicious dinner last night.  A simple steak on the grill along with some fresh tomatoes tossed with EVOO, balsamic and fresh basil from my garden and a new green bean side dish that I just recently found on the while surfing the net for recipes for our gourmet group that we are hosting in a few weeks.

The green beans, or thin haricot verts if you can find them (or, as the author of the blog where I found the recipe calls them, Harry Corvair), are roasted in the oven with diced fennel.  My husband and I both thought they were wonderful! 


The fennel adds a wonderful, rich flavor to the beans.  When they come out of the oven, a squeeze of fresh lemon juice and a handful of freshly-grated Parmesan cheese are added.  Oh, yum!  This is a perfect side dish for a grilled steak.


I had to buy a fairly large bulb of fennel which was too much for the green beans so I carmelized the rest of the fennal on the stove with a little EVOO and  S&P and added it as a topping to the steak.

I can't believe I wasted so many years not cooking with fennel!

The recipe is adapted from the food blog, Foodgasms. I loved this blog!  Unfortunately, it doesn't appear that the author has posted anything new in quite a long while.    

Oven Roasted Green Beans and Fennel 
Recipe adapted from Foodgasms
Printable Recipe

Serves 2 as a side dish~

1 pound fresh green beans, trimmed, washed and dried
1 small fennel bulb chopped, white part only, core removed, about 1/2 cup
Splash of Extra Virgin Olive Oil
Kosher salt, about 1 teaspoon
Freshly ground black pepper , about 1/2 teaspoon
A Squeeze of fresh lemon juice,, about 1 tablespoon
Freshly grated Parmesan cheese about 1/4 cup

Preheat oven to 450˚. Chop the fennel bulb into a fine dice. Add the clean, trimmed green beans to a baking sheet and toss with the chopped fennel. Add a splash of EVOO to coat the green beans and fennel without drowning them in oil, add the salt and pepper and toss to blend. Roast until the beans reach the desired al dente stage, about 5-7 minutes

Remove from the oven and immediately add the squeeze of fresh lemon over them and add the fresh grated Parmesan and toos.

Serve immediately.

Thursday, June 3, 2010

Black Eyed Pea Salsa


Here is a tasty appetizer that is perfect for summer entertaining.  Our family loves chips and salsa outdoors in the summertime! 


The first time I had this salsa was at a party in Georgia when we were visiting friends about two years ago.  The woman who brought it was kind enough to share the recipe with several of us who asked for it (thank you, Harriet!).  The recipe calls for a can of field peas which I couldn't find at my local store.  I assume they must be readily available in the south. I substituted black beans and found this recipe is easily adaptable. When I made it recently, I forgot to buy black olives and instead added a can of crispy corn and pepper blend.


Black Eyed Pea Salsa
Printable Recipe


Serves 8 as an appetizer

2 cans seasoned black eyed peas
1 can field peas (l use black beans since I couldn’t find field peas)
1 red pepper, chopped
2 jalapeno peppers, chopped (more or less - adjust to your preference of hotness)
3 or 4 scallions, chopped
2 small cans sliced black olives
1 to 1-1/2  cups Seven Seas Italian dressing

1 seeded tomato, chopped
2 or 3 avocados, chopped

Drain peas and beans well before adding other ingredients. Refrigerate until ready to serve.  Add chopped tomato and avocado and mix together just before serving.

Tuesday, September 22, 2009

Spinach, Pasta e Fagioli Soup


Hello Fall....Hello Soup!

It was a dreary, drizzly first full day of fall here today so I decided to make soup for dinner. With fresh tomatoes, basil and parsley still available from the garden, I had everything I needed to put this soup together - including some homemade chicken stock from the freezer.


This is one of my all-time favorite soup recipes. The first time I made it was eleven years ago when it was given to my husband and I to prepare for an Italian-themed gourmet group event hosted by friends. I don't know where the recipe originally came from but the photocopy included in our gourmet menu packet looks like it came from a cookbook.

The addition of spinach to this otherwise classic Italian soup makes it even more healthy and delicious. A good handful of freshly grated Parmesan and some snipped parsley garnish this wonderful early fall soup. Satisfying and healthy!


Spinach, Pasta e Fagioli Soup

Source Unknown
Printable Recipe

Serves 6

1 cup dried white beans (I use 1 can of cannelini beans, drained and rinsed)
2 tablespoons olive oil
2 medium onions, coarsely chopped
2 large carrots, peeled and coarsely chopped
1 small bunch spinach (or bagged – about a cup, cut into thin julienne)
6 cups chicken stock or broth
2 garlic cloves, minced
2 medium tomatoes, peeled, seeded, and coarsely chopped, or 1 cup chopped canned tomatoes, well-drained.
2 tablespoons finely chopped fresh basil or 2 teaspoons dried
¾ cup dry pasta such as Ditalini
1 teaspoon salt or to taste
½ teaspoon white pepper
¼ cup finely chopped parsley

Garnish

Freshly grated Parmesan

1. If using dry beans, soak overnight in enough cold water to cover generously or do a quick soak by bringing them to a boil in just enough water to cover, boiling for 2 minutes, then covering and letting stand for 1 hour. Drain.

2. In a 6-quart soup pot over medium heat, heat the oil, add the onions, and sauté for about 5 minutes, stirring occasionally. Add the carrots and sauté for 3 minutes. Add garlic, stock, beans (only if using dried), tomatoes and basil and simmer for about 30 minutes, partially covered.

3. Meanwhile, cook the noodles or pasta in boiling water, drain and reserve.

4. Add the beans now if using canned cannelini beans. Puree the soup with an immersion blender or in batches in a food processor making sure the vegetables still have some texture.

5. Return the pot of soup to medium-high heat, add the julienne of spinach and pasta. Cook for only about 5 minutes, then add salt, pepper, 2 tablespoons of the parsley and taste for seasoning.

6. To serve, ladle the soup into bowls and garnish with the remaining parsley and parmesan.

This soup can be prepared up to 3 days ahead through step 5 and then refrigerated. You can also freeze the soup. Adjust seasonings and add fresh herbs after reheating frozen soup.

Thursday, August 13, 2009

Cannelini Dip with Herb-Roasted Pitas


I wanted to share a tasty appetizer that was served to us by our daughter and son-in-law at their home one evening recently.  It's similar to hummus in that it contains legumes (this time cannelini beans), lemon juice and garlic. It is low fat, healthy and so very good! The original recipe is from Giada De Laurentis - her first cookbook. One of the best things about this appetizer is the herb-toasted pita triangles - crispy, savory and so delightful with the dip.

This could be a meal for me!

I like to use roasted garlic in this recipe rather than plain garlic. I think it gives it much milder, nuttier flavor that I enjoy.


I suggest doubling this recipe!

Cannelini Bean Dip with Herb-Roasted Pita Triangles


Printable Recipe
Adapted from Giada De Laurentis - Everyday Italian

1 (15-ounce) can cannelini beans, drained and rinsed
5-6 cloves of garlic, unpeeled and rubbed with a little olive oil and roasted in a 350 degree oven for 5 minutes
2 tablespoons fresh lemon juice
1/3 cup light olive oil, plus 4 tablespoons
1/4 cup (loosely packed) fresh Italian parsley leaves, washed and dried
Good quality Sea Salt
Freshly ground black pepper

6 pitas
1 teaspoon dried oregano

Directions

Preheat the oven to 400 degrees F.

Place unpeeled garlic on a small cookie sheet and sprinkle with a little olive oil. Toast with your hands to coat. Place in preheated oven and roast for 3-5 minutes. When cool, squeeze out the garlic into the work bowl.

Combine the drained beans, roasted garlic, lemon juice, 1/3 cup light (not EVOO) olive oil, and parsley in the work bowl of a food processor. Pulse until the mixture is coarsely pureed. Season with sea salt and pepper, to taste. Transfer the bean puree to a small bowl.

Cut each pita in half and then into 8 equal wedges. Arrange the pita wedges in a single layer on a large baking sheet and sprinkle our the remaining olive oil over the pitas. Toss with your hands and again arrange in a single layer. Sprinkle with the oregano, sea salt, and pepper. Bake for 8 to 12 minutes, or until toasted and golden in color.

Serve the pita toasts warm or at room temperature with the cannelini bean puree.

Tuesday, April 14, 2009

Leftover Ham? Make Navy Bean Soup!


Please see my 2019 updated post on this recipe by clicking HERE!

I may bake a ham once, possibly twice a year. I enjoy the ham but I have to admit - the best thing, for me, is making soup from the ham bone! My favorite use of leftover ham is to make split pea soup, but this time navy bean soup just sounded so good and hearty. My soup was made from mostly navy beans but I found a bag of dried pink beans on the shelf and couldn't resist adding a few of those.


Add a sprinkle of freshly chopped parsley or a dash of Herbes de Provence and a few cheddar bread sticks and you'll have a cozy and delicious dinner!

This soup recipe is adapted from numerous recipes and adapted to my taste buds. I hope you try it!!

Enjoy :)


Savoring Time in the Kitchen is a member of the Amazon Affiliate Program. If you purchase a product by following a link that we provide, the price you pay as a consumer does not change, but if you do make a purchase through one of these links, we earn a very small commission for providing that link. Thank you for your support of Savoring Time in the Kitchen! 

Navy Bean Soup
Printable Recipe
~A Savoring Time in the Kitchen Original

1 pound navy beans (Today, I added some pink beans also)
1 meaty ham bone, or you could use a smoked pork hock
1 tablespoon olive oil
1 medium onion, diced
2-3 medium carrots, diced
2-3 stalks of celery, diced
1 large clove minced garlic
2-3 sprigs of thyme
Approximately 3 quarts Water, Chicken or Vegetable Stock
Salt and Pepper

If you are a well-planned soup maker, you can soak the beans overnight. If you’re like me, at least get started in the morning! Pick out any unsavory-looking beans and rinse in a colander. Place the beans into a soup pot, cover with water and bring to a boil. Cover the pot, remove from heat and let them rest for 30 minutes. Pour beans back into the colander and rinse again.

Meanwhile, heat olive oil in a sauté pan. Add the onion, carrots and celery and sauté for about 5 minutes or until the onion is translucent. Add the minced garlic and cook for 1 minute more.

Put the beans back into the soup pot along with the ham bone and cover with water or, as I do, add chicken or vegetable stock to cover the beans by at least 2 inches. Add the sautéed vegetables and thyme sprigs and simmer the soup on low heat for 4-5 hours until the beans are tender. Remove ham bone, dice the remaining ham from the bone and return to soup.

Add salt and pepper to taste.

Remove thyme stems before serving and garnish with Mediterranean Sea Salt or Parsley. Cheddar bread sticks are a perfect compliment.

Tuesday, January 27, 2009

Chili Blanco Especial


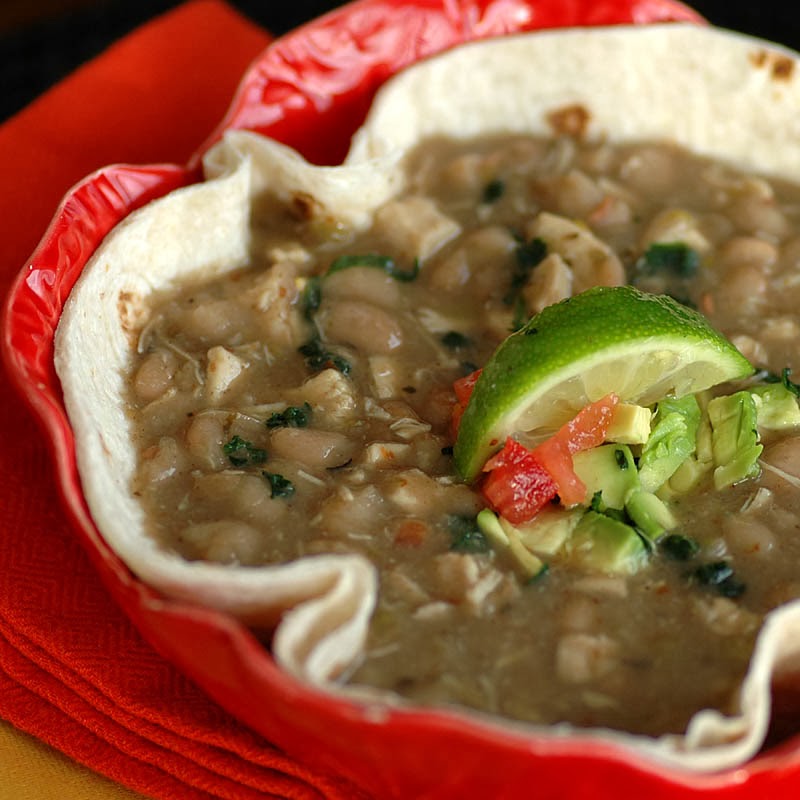
A fiesta in a bowl! This delicious recipe comes from one of my favorite cookbooks - Creme de Colorado. This is by no means a new cookbook - I've owned it since the early '90s when we used to travel to Colorado on family ski trips with our daughters. Some of the recipes in this cookbook are still some of my favorites.

I like to include this recipe at least once in my winter soup and stew rotation. My husband says it has just the right amount of 'bite'.  I like to add lots of avocado to my bowl!


Chili Blanco Especial

Serve 8

1 pound dry White Northern beans
5-1/4 cups chicken broth
2 cloves garlic, minced
1 large white onion, chopped
1 tablespoon ground white pepper
1 teaspoon salt
1 tablespoon dried oregano
1 tablespoon ground cumin
½ teaspoon ground cloves
1 7-ounce can diced green chilies
5 cups diced cooked chicken breast
1-3/4 cups chicken broth
1 tablespoon diced jalapeño pepper (optional)
8 flour tortillas

My Notes: I like to use chicken stock for an even more full-bodied flavor. I also prefer fire-roasted green chilies for a nice, smokey taste. I usually use the 'quick soak' method on the package of beans rather than soaking them overnight.

Soak beans in water to cover for 24 hours; drain.

In crock pot or large kettle, combine beans, 5-1/4 cups chicken broth, garlic, onion, white pepper, salt, oregano, cumin and cloves. Simmer covered for at least 5 hours until beans are tender, stirring occasionally. Stir in green chilies, diced chicken and 1-3/4 cups chicken broth. For hotter taste, add jalapeño. Cover and simmer for 1 hour. To serve, line each bowl with 1 flour tortilla. Spoon in chili and serve with all condiments for a very special chili.

Flavors are enhanced when this chili is made 1 day ahead.

Serve with any of the following condiments:

Shredded Monterey Jack cheese
Sliced black olives
Chunky salsa or diced tomato
Sour cream
Diced avocado
Wedge of lime
Chopped cilantro

Monday, January 12, 2009

Zuppe Ribollita - Classic Italian Soup


The heart of winter - what could be better than another hearty soup recipe? This one comes from one of my favorite Italian cookbooks - The Silver Spoon. This is a classic Italian 'thick soup' - the distinctive characteristic being the immersion of one or more slices of bread in the stock with no additional pasta or rice. Ribollita means 're-boiled' in Italian because it originally was made using the previous day's leftover vegetable soup.


Since the recipe called for putting a slice of country-style bread on the bottom of the bowl before putting finishing it in the oven, I decided to make a 'bread bowl' using some Artisan Bread in 5 dough that I had in the refrigerator. I flattened the dough as for pizza and shaped it to fit my soup bowls and then baked them in a 450 degree oven for about 20 minutes.

This would have been so perfect if only I would have sprayed the baking dish with some oil first and used more flour when shaping or rolling out the bread! The bread stuck to the dish and was a little hard to spoon out with the soup but it still tasted wonderful. A drizzle of olive oil, some freshly-grated parm on the top and a turn or two of freshly ground pepper - wonderful!


Ribollita
Recipe adapted from The Silver Spoon

The major changes I made were adding more vegetables and stock instead of plain water.

Serves 6-8

1/4 cup olive oil, plus extra for drizling
3 carrots, chopped
1 onion, chopped
2 celery stalk, chopped
5 canned tomatoes, chopped, juice reserved
1 fresh thyme sprig or 1 tsp dried thyme
4 potatoes, coarsely diced (about 2 cups)
7.5 cups cavolo nero (Tuscan cabbage), shredded Kale or Savoy cabbage are good substitutes
4 cups chicken stock + reserved tomato juices + additional water to = 8-3/4 cups total liquid
2 cups cannelini beans
or 1 cup dry white beans, soaked in cold water overnight and drained
Enough country-style bread slices for the number of people you are serving
Salt and pepper

Heat the oil in a pan, add the carrot, onion and celery and cook over low heat, stirring occasionally, for 5-10 minutes until softened. Add the tomatoes, thyme and potatoes and cook for 5 minutes, then add the cavolo nero and beans. Pour in 8.75 cups water and season with salt. Bring to a boil, lower heat, cover and simmer for about 2 hours. Preheat the oven to 350 degrees F. Place the bread in the bottom of an oven-proof soup bowl or small casserole dish and ladle in the soup. Cook in the oven for about 10 minutes. Sprinkle with pepper and drizzle with oil. Add freshly-grated parmesan, if desired.

My Notes: The amount of vegetables I used are doubled from the original recipe. Also, the original recipes called for using plain water. For the cabbage, I used Savoy but I think Kale would probably be closer in texture to cavalo nero.